- Blogs
- Paso a paso
- Cómo usar .htaccess para bloquear una dirección IP de la página de inicio de sesión de WordPress
Paso a paso / 8 min de lectura
Cómo usar .htaccess para bloquear una dirección IP de la página de inicio de sesión de WordPress

.htaccess (hypertext access) es un archivo de configuración utilizado para agregar o cambiar características en sitios web alojados usando Apache Web Server, un software de servidor web gratuito y de código abierto. El archivo .htaccess te permite bloquear una dirección IP específica para que no acceda a la página de inicio de sesión de tu WordPress, entre muchas otras funciones.
Dependiendo de tus necesidades y preferencias, puede ser que quieras usar este archivo para asegurarte de que sólo tu dirección IP y las que utilicen tus otros administradores para gestionar tu sitio puedan iniciar sesión en tu panel de administración.
Si ese es el caso, seguí leyendo para aprender cómo acceder al archivo .htaccess y agregar los comandos necesarios para asegurar tu página de inicio de sesión.
Puntos Clave
- Podés usar el archivo .htaccess para agregar comandos que te permitan bloquear todas las direcciones IP, excepto unas pocas autorizadas, de acceder a tu página de inicio de sesión.
- Podés acceder al archivo .htaccess a través de FTP, un panel de control de hosting como cPanel, o el plugin Yoast SEO.
¿Por Qué Bloquear Direcciones IP Desde el Inicio de Sesión de WordPress con el Archivo .htaccess?
La página de inicio de sesión de WordPress, generalmente ubicada en https://wcanvas.com/wp-login.php, es donde accedés al panel de administración. Sin embargo, por defecto, el panel de administración permite que cualquier usuario con tu contraseña acceda desde cualquier dirección IP.
Esto te da mucha flexibilidad para iniciar sesión desde cualquier lugar, pero potencialmente podría permitirle a alguien con tu contraseña entrar desde cualquier parte del mundo también.
Como sabés, las direcciones IP son similares a direcciones físicas digitales que identifican la ubicación de un dispositivo. Si querés asegurar la página de inicio de tu sitio, tal vez desees limitar las direcciones IP que pueden acceder, únicamente a tu dirección IP y las direcciones de tus colaboradores más cercanos.
Bloquear todas las direcciones IP excepto por una o un puñado de direcciones autorizadas asegura que solo dispositivos de confianza puedan acceder a tu sitio.
Esto significa que cualquiera que intente ingresar a tu sitio con una dirección IP fuera de la gama autorizada encontrará un error 403 Forbidden, protegiendo tu sitio de ataques de fuerza bruta y otros tipos de intentos de hackeo.
3 Métodos para Bloquear una Dirección IP del Inicio de Sesión de WordPress con el Archivo .htaccess
Ahora que sabemos por qué podrías querer bloquear el acceso a tu administración con el archivo .htaccess, exploremos los diversos métodos para acceder a este archivo y bloquear cualquier IP no autorizada de la página de inicio de sesión.
Nota: Recordá que el archivo .htaccess solo está disponible en servidores que usan el software Apache Web Server. Si tu sitio está alojado en un servidor Nginx u otro tipo de servidor, probablemente .htaccess no esté disponible.
Método #1: Acceder al Archivo .htaccess con un Cliente FTP
El primer método para acceder a tu archivo .htaccess y bloquear direcciones IP es usar un cliente de Protocolo de Transferencia de Archivos (FTP) como FileZilla para acceder a tu servidor web. FileZilla es gratuito y podés descargarlo desde la página oficial.
Después de instalarlo, abrí la aplicación e ingresá el host, nombre de usuario, contraseña y puerto. Tu proveedor de hosting debería tener tu información de FTP. Contactalos o explorá la configuración de tu cuenta de hosting para obtenerla.
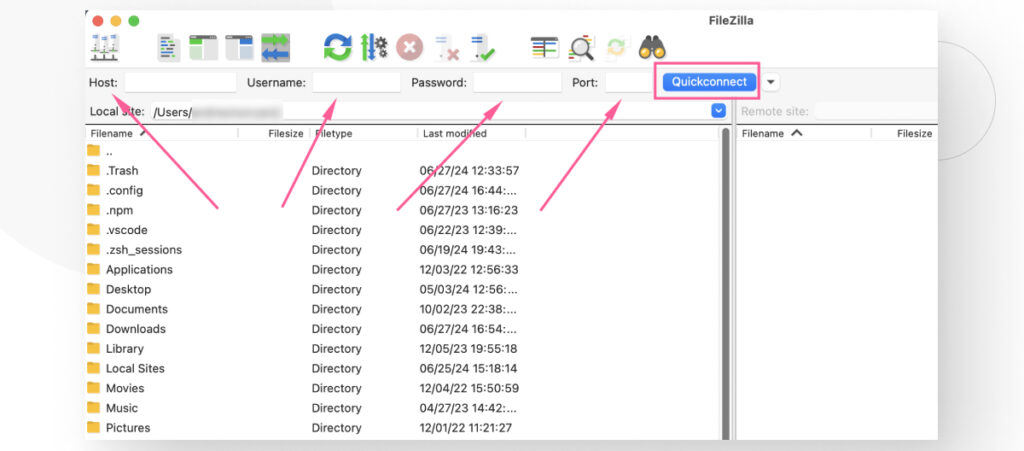
Una vez conectado, verás las carpetas de tu servidor.
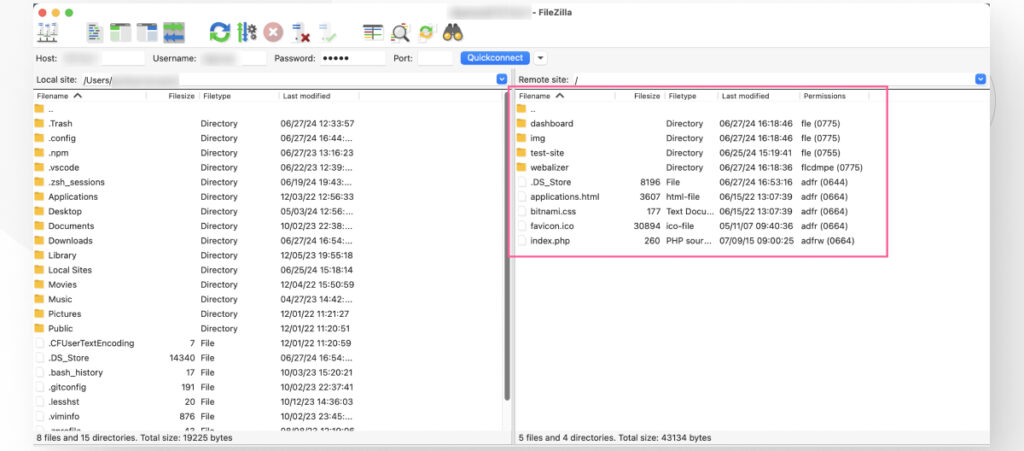
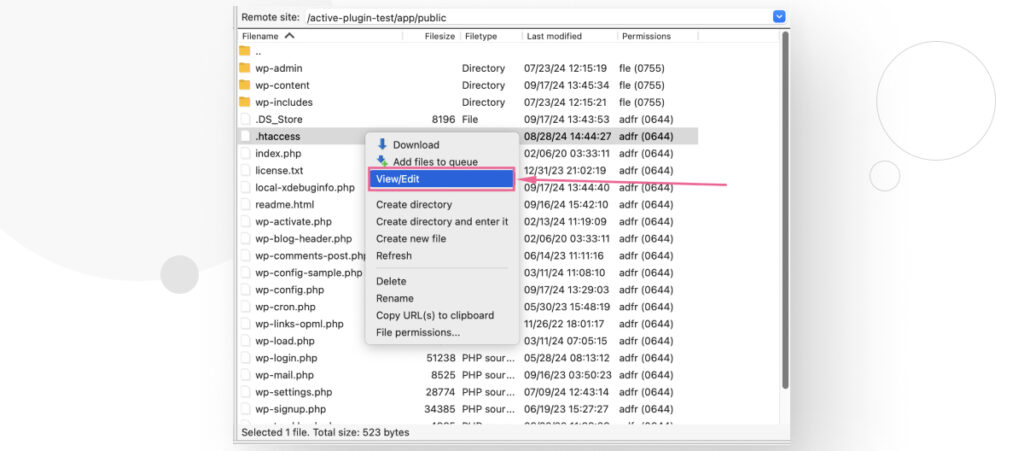
Navegá a la carpeta public_html de tu sitio (a veces llamada simplemente public o /). Verás el archivo .htaccess entre varios archivos sueltos y las 3 carpetas principales de WordPress (wp-admin, wp-content, wp-includes).
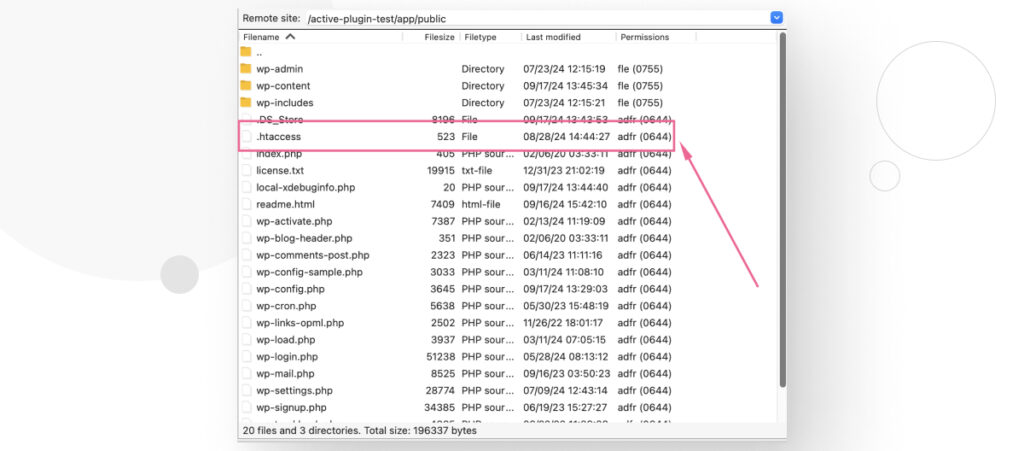
Hacé clic derecho sobre él y seleccioná Ver/Editar.
Tu sistema operativo lo abrirá con el editor de texto predeterminado.
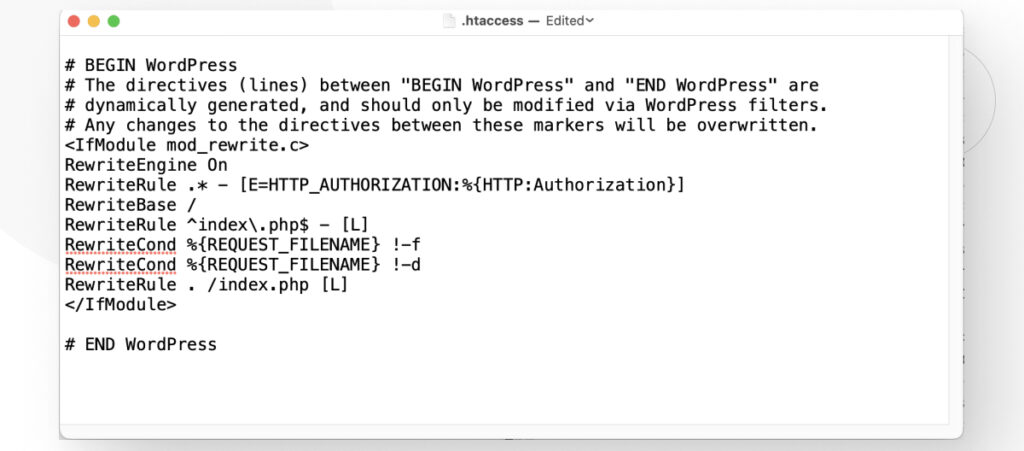
Ahora es momento de agregar los comandos que bloquearán todas las direcciones IP de acceder a tu página de inicio de sesión, salvo algunas autorizadas. Agregá el siguiente código de configuración en la parte superior del archivo, justo debajo de las primeras líneas de comentario.
<Files wp-login.php>
        order deny,allow
        Deny from all

# Permitir tu dirección IP
allow from xx.xx.xx.xx

# Permitir la dirección IP de otros administradores
allow from xx.xx.xx.xx

</Files>
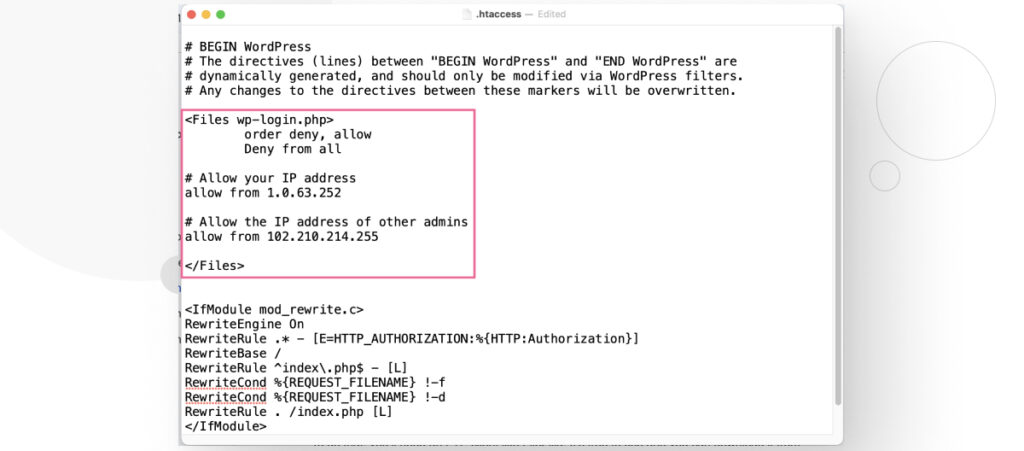
Este código bloquea todas las direcciones IP de acceder a tu página de inicio de sesión, excepto las que están en las directivas allow from.
Recordá sustituir xx.xx.xx.xx por tu dirección IP real y las de tus otros administradores, si los tenés. Para saber tu dirección IP, usá una herramienta como What Is My IP Address e ingresá la dirección IP que la herramienta te devuelve.
De esta forma:
Guardá los cambios y cerrá el archivo.
Después de guardar los cambios, cualquier usuario que intente acceder a tu página de inicio de sesión desde una dirección fuera del rango de IP autorizado recibirá un error 403 Forbidden.
Método #2: Acceder al Archivo .htaccess con el Panel de Control de tu Hosting
Si tu proveedor de hosting tiene un software de panel de control como cPanel, podés repetir el proceso del primer método, ya que los pasos son esencialmente los mismos.
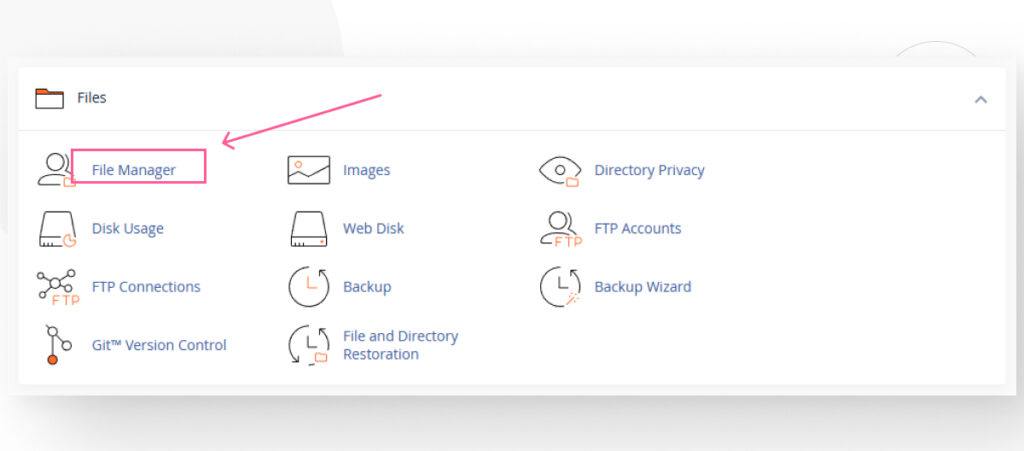
Si tu proveedor usa cPanel, accedé a este a través de tu-dominio.com/cpanel. Iniciá sesión en tu cuenta de cPanel e ingresá a Administrador de Archivos desde el panel principal.
Después, accedé al directorio que te lleva a la ruta de instalación. Generalmente será public_html, pero puede ser diferente para vos.
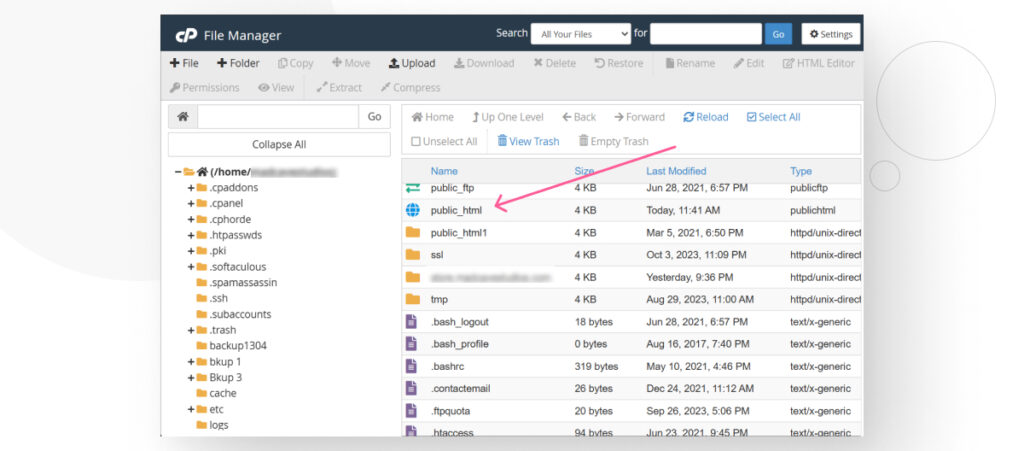
Una vez que ingreses, deberías ver el archivo .htaccess entre los diversos archivos sueltos y las 3 carpetas principales de WordPress (wp-admin, wp-content, y wp-includes).
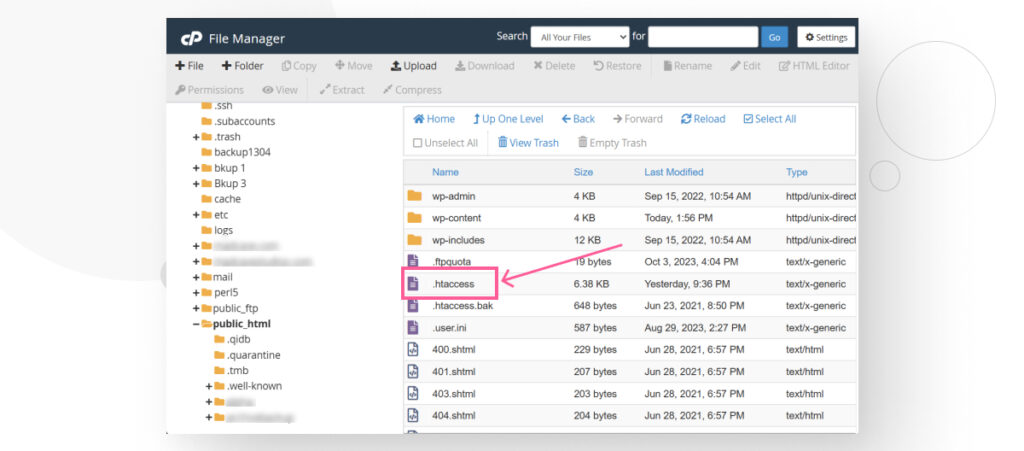
Hacé clic derecho sobre él y seleccioná Ver/Editar, luego añadí el siguiente código de configuración por debajo de las primeras líneas de comentarios.
<Files wp-login.php>
        order deny,allow
        Deny from all

# Permitir tu dirección IP
allow from xx.xx.xx.xx

# Permitir la dirección IP de otros administradores
allow from xx.xx.xx.xx

</Files>
Este código bloquea todas las direcciones IP de acceder a tu página de inicio de sesión, salvo aquellas en las directrices allow from. Sustituí xx.xx.xx.xx con tu dirección IP real y las de tus otros administradores, si las tenés.
Ahora, tu página de inicio de sesión bloqueará intentos de acceso desde cualquier dirección IP fuera del rango autorizado que acabás de establecer.
Método #3: Acceder al Archivo .htaccess con Yoast SEO
Si ya tienes Yoast SEO instalado, esta es la manera más sencilla de modificar tu archivo .htaccess porque el plugin tiene una función que te permite acceder y editarlo rápidamente.
Andá a Yoast > Herramientas desde el panel de administración.
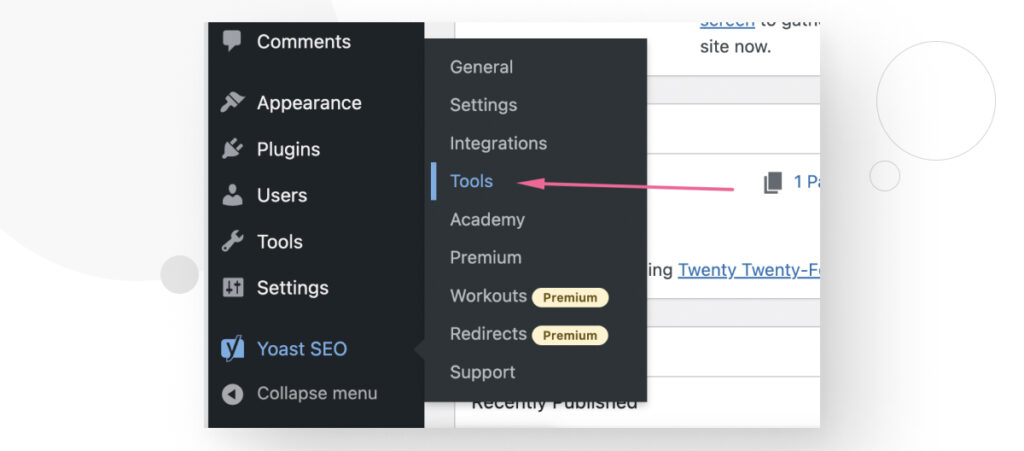
En la pantalla de Herramientas, desplazate hacia abajo hasta que veas el enlace Editor de Archivos y hacé clic en él.
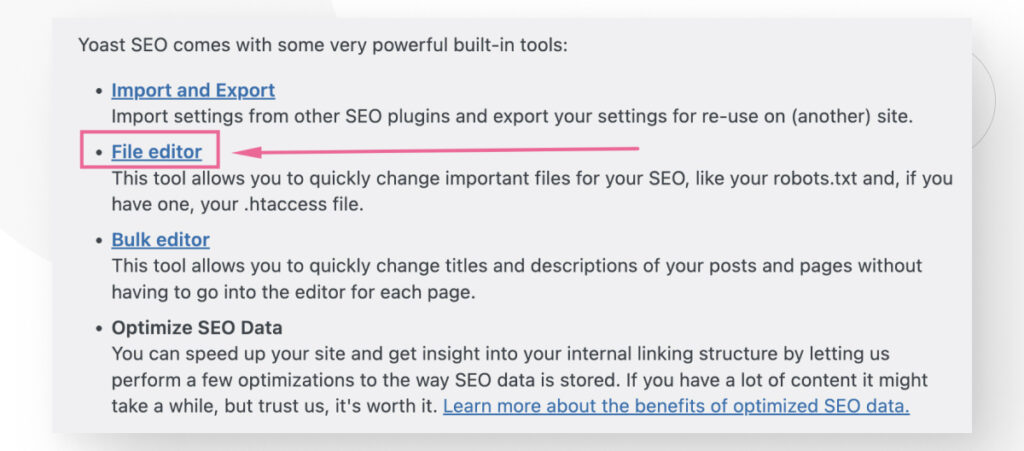
Ahora deslizate hacia abajo hasta que veas un cuadro de texto etiquetado como Archivo .htaccess.
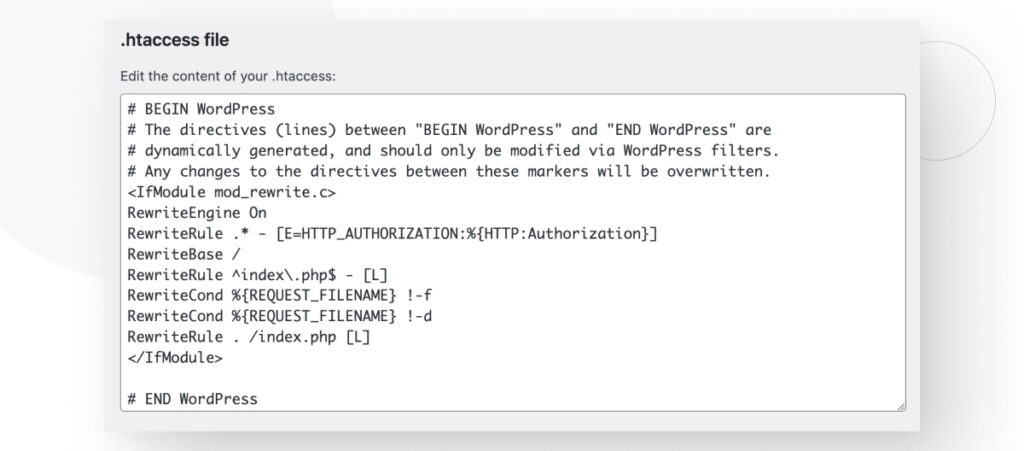
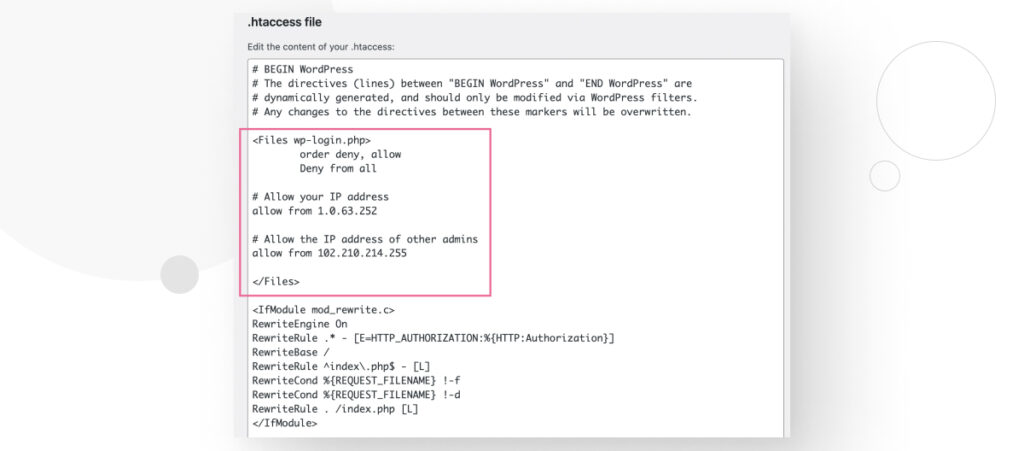
Agregá el siguiente código de configuración en la parte superior del archivo, después de las primeras líneas de comentarios.
<Files wp-login.php>
        order deny,allow
        Deny from all

# Permitir tu dirección IP
allow from xx.xx.xx.xx

# Permitir la dirección IP de otros administradores
allow from xx.xx.xx.xx

</Files>
Recordá usar una herramienta como What Is My IP Address para comprobar tu dirección IP y pedile a tus colaboradores que te compartan sus direcciones para que las puedas agregar a la lista de acceso.
Tu archivo .htaccess puede verse algo así después de editarlo:
Después de hacer tus cambios, desplazate hacia abajo y hacé clic en el botón Guardar cambios en .htaccess.
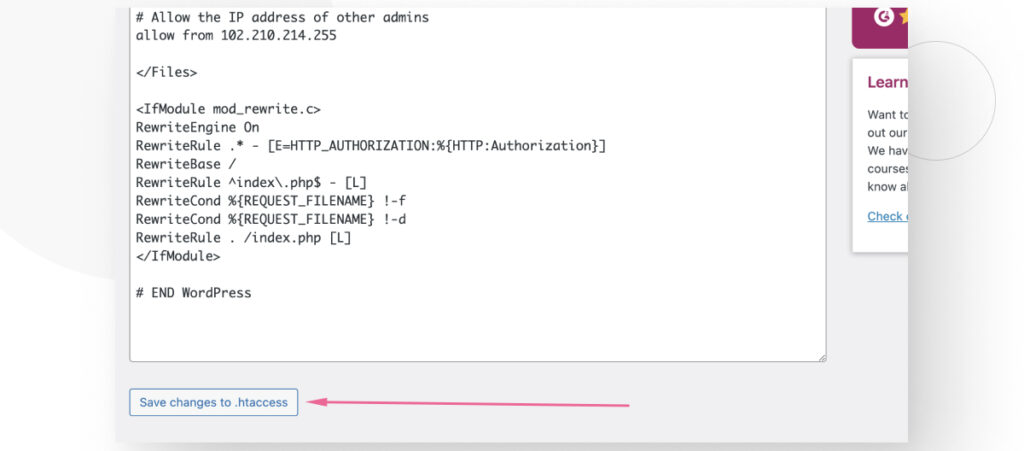
Después de guardar tus cambios, cualquier usuario que intente acceder a tu página de inicio de sesión desde una dirección fuera del rango de IP autorizado recibirá un error 403 Forbidden.
Usá el Archivo .htaccess para Bloquear Direcciones IP de la Página de Inicio de Sesión de WordPress
Ahora sabés cómo usar el archivo .htaccess para bloquear direcciones IP de la página de inicio de sesión de WordPress. Todo se reduce a saber cómo acceder a él y qué comandos añadirle.
En este artículo, proporcionamos varios métodos para acceder a este archivo de configuración y permitir sólo tu dirección IP y las de tus otros administradores, si los tenés. Con suerte, podés usar esta información para añadir otra capa de protección a tu sitio.
Si encontraste útil esta publicación, leé nuestro blog y recursos para desarrolladores para más ideas y guías.
Related Articles

Paso a paso / 4 min de lectura
Paso a paso / 4 min de lectura
Cómo Otorgar Acceso Seguro a un Sitio de WordPress No Activo Durante el Desarrollo
Al desarrollar un sitio de WordPress, a menudo es necesario colaborar con varios desarrolladores y otorgar acceso al propietario del sitio para que pueda revisar el progreso por sí mismo.…
Read More
Diseño Web / 6 min de lectura
Diseño Web / 6 min de lectura
Cómo agregar bordes de texto en WordPress (2 métodos)
Si estás comenzando a explorar las numerosas opciones de estilo de WordPress, tal vez te estás preguntando cómo agregar bordes de texto a tu sitio de WordPress. Dependiendo de lo…
Read More
Paso a paso / 7 min de lectura
Paso a paso / 7 min de lectura
Cómo cambiar las dimensiones del margen inferior en los bloques de WordPress
Si estás aprendiendo a modificar el diseño y la apariencia de tu sitio de WordPress, quizá te estés preguntando cómo cambiar las dimensiones del padding inferior de algunos de sus…
Read More
Paso a paso / 12 min de lectura
Paso a paso / 12 min de lectura
Cómo desactivar la sección de “Posts Similares” en blogs de WordPress
Si estás profundizando en la personalización de tu sitio, puede que te preguntes cómo desactivar la sección de "Publicaciones Similares" que aparece en la parte inferior, barra lateral o pie…
Read More
Paso a paso / 9 min de lectura
Paso a paso / 9 min de lectura
Cómo cambiar el ancho de una entrada de blog en WordPress (3 métodos)
Si estás profundizando en el diseño web con WordPress, eventualmente necesitarás aprender cómo cambiar el ancho de un blog en tu sitio de WordPress. Esto puede mejorar la legibilidad o…
Read More