- Blogs
- Paso a paso
- Cómo configurar Google Search Console en sitios de WordPress usando Yoast SEO
Paso a paso / 8 min de lectura
Cómo configurar Google Search Console en sitios de WordPress usando Yoast SEO
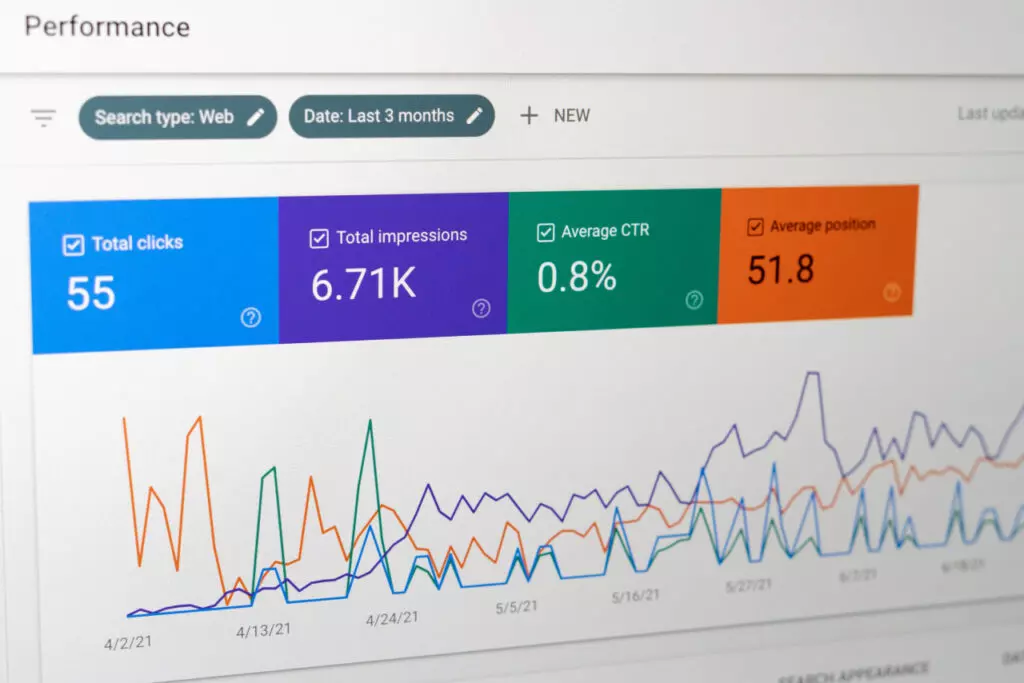
Google Search Console (GSC) es una herramienta gratuita para gestionar el rendimiento de tu sitio web en los resultados de búsqueda de Google. Esto la convierte en una herramienta esencial para propietarios de sitios que manejan un negocio digital o desean atraer tráfico a su sitio y gestionar problemas de resultados de búsqueda.
Seguí leyendo para aprender a comenzar a usar y gestionar Google Search Console en tu sitio de WordPress utilizando el plugin SEO más popular, Yoast SEO, y aprovechá sus numerosos beneficios.
Aspectos clave
- Google Search Console es una herramienta gratuita para monitorear, gestionar y solucionar problemas de resultados de búsqueda para sitios de WordPress.
- Hay múltiples formas de integrar GSC con tu sitio de WordPress, siendo Yoast SEO una de las opciones más amigables para el usuario.
- Integrar tu sitio de WordPress con GSC usando Yoast SEO solo requiere habilidades básicas de computación, ya que el plugin se encarga de todos los aspectos técnicos.
- Después de integrar con GSC, podés configurar tu archivo robots.txt y enviar tu mapa del sitio a Google, dos pasos fundamentales para posicionarse alto en los resultados de búsqueda.
¿Qué es Google Search Console? ¿Para qué sirve?
Google Search Console es un servicio gratuito de Google que ayuda a los propietarios de sitios a entender cómo está su sitio web en los resultados de búsqueda de Google. Sus funciones principales son monitorear, gestionar y solucionar problemas de resultados de búsqueda.
GSC es útil para los siguientes propósitos:
- Confirmar si tu sitio puede ser rastreado e indexado por Google.
- Recibir alertas si Google detecta problemas de indexación en tu sitio web o si tu sitio recibe penalizaciones.
- Solucionar problemas de indexación y enviar solicitudes para indexar contenido nuevo o actualizado.
- Enviar un mapa del sitio y el archivo robots.txt a Google.
- Revisar los datos de tráfico de tu sitio en Google Search Orgánico: con qué frecuencia aparece tu sitio en Google Search (impresiones), las consultas asociadas con el rendimiento de los resultados de búsqueda de tu sitio, y cuántas veces los usuarios hacen clic en tus resultados, entre otros datos relevantes.
- Conocer tus páginas más enlazadas internamente.
- Saber qué sitios web externos enlazan al tuyo.
- Corregir problemas relacionados con la usabilidad móvil y las páginas AMP.
- Explorar métricas de velocidad de carga de página y experiencia de la página.
- Enviar solicitudes manuales para la eliminación de URL del índice de Google.
En resumen, GSC es una herramienta esencial para consultar y gestionar el rendimiento de tu sitio web en los resultados de búsqueda. Ahora, pasemos a cómo podés integrar GSC con tu sitio de WordPress utilizando Yoast SEO.
¿Cómo integrar Google Search Console con tu sitio de WordPress?
Para comenzar a usar Google Search Console en WordPress con la ayuda de Yoast SEO, debés completar tres pasos:
- Instalar y activar Yoast SEO.
- Agregar tu sitio a GSC.
- Verificar que sos el propietario del dominio de tu sitio.
Todo lo que necesitás para integrar GSC con tu sitio de WordPress usando Yoast SEO son habilidades básicas de computación, así que no debería ser difícil de seguir. Vamos a meternos en el tema.
Paso 1: Instalar Yoast SEO
Yoast SEO es el plugin SEO más popular, simplificando muchas soluciones relacionadas con los motores de búsqueda. Empecemos el proceso instalándolo.
Desde tu panel de control, andá a Plugins > Agregar Plugins y buscá “Yoast SEO”. Hacé clic en Instalar ahora. Una vez instalado, hacé clic en Activar.
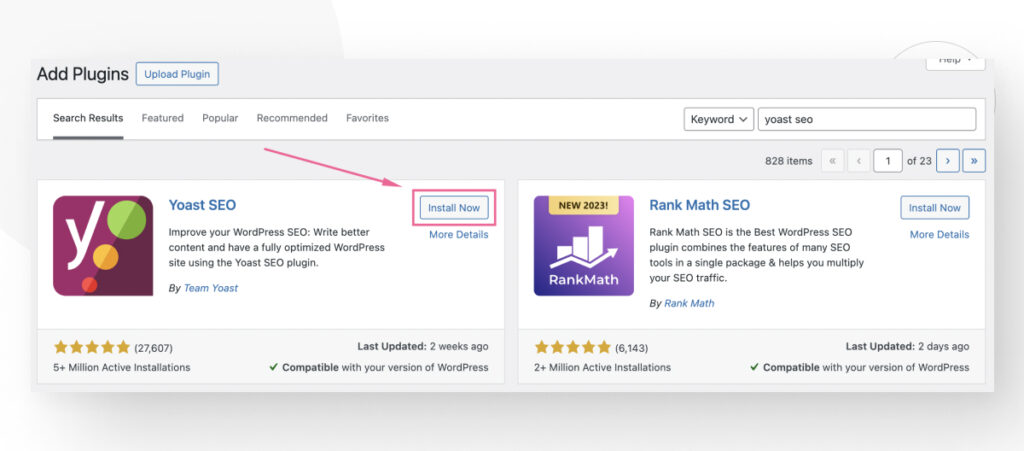
Por ahora, este es el único paso que necesitás realizar en tu sitio de WordPress, así que dejá tu panel abierto en una pestaña del navegador.
Configuraremos Google Search Console en una pestaña diferente.
Paso 2: Agregar la propiedad del sitio a Google Search Console
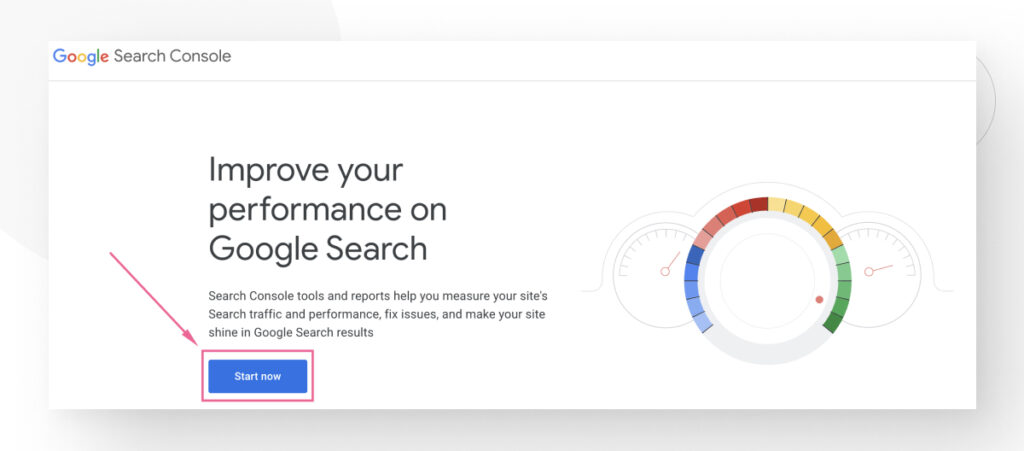
Primero necesitarás una cuenta de Gmail para este paso. Una vez la tengas, es momento de crear una propiedad en GSC. Visita este enlace y hacé clic en Comenzar ahora.
En la esquina superior izquierda, hacé clic en Buscar propiedad y seleccioná Agregar propiedad del menú desplegable.
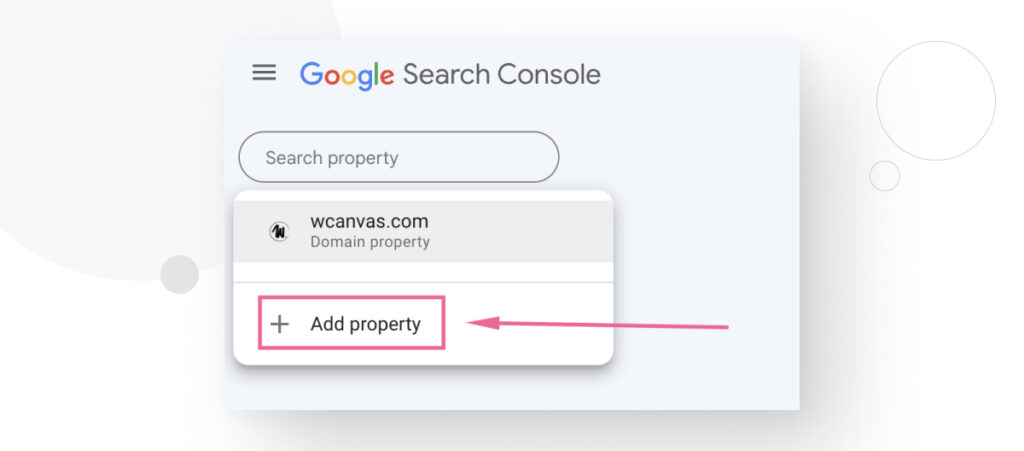
La “propiedad” en GSC generalmente se refiere a una instancia específica de tu sitio web que querés rastrear y gestionar dentro de la plataforma. Dependiendo de cómo configurás tu integración, esta propiedad puede contener todas las URL dentro del dominio de tu sitio o solo algunas de ellas.
Para configurarla, elegí entre dos tipos de propiedad: Prefijo de la URL y Dominio.
La propiedad “Dominio”
Si seleccionás la opción Dominio, integrarás GSC con todas las instancias de tu sitio web, incluidas todas las URL, subdominios y protocolos (HTTP y HTTPS). Para esta opción, debés agregar la dirección web de tu dominio. Por ejemplo, wcanvas.com. Aunque esta opción incluye cada versión de tu sitio, también requiere verificar la propiedad a través de los registros DNS usando el panel de control de tu hosting web.
Por esta razón, utilizaremos la opción de Prefijo de la URL en esta guía. Es la forma más sencilla de verificar tu propiedad, ya que solo necesitás usar Yoast SEO.
Configurar la propiedad “Prefijo de la URL”
Pegá la URL de la página principal de tu dominio (por ejemplo, https://wcanvas.com/) en la caja de texto y hacé clic en Continuar. Recordá incluir el “/” al final de la dirección. Para evitar errores, te recomendamos copiar la dirección que muestra el navegador cuando estás en la página principal de tu sitio. No podrás cambiar la dirección después, así que asegurate de que esté correcta.
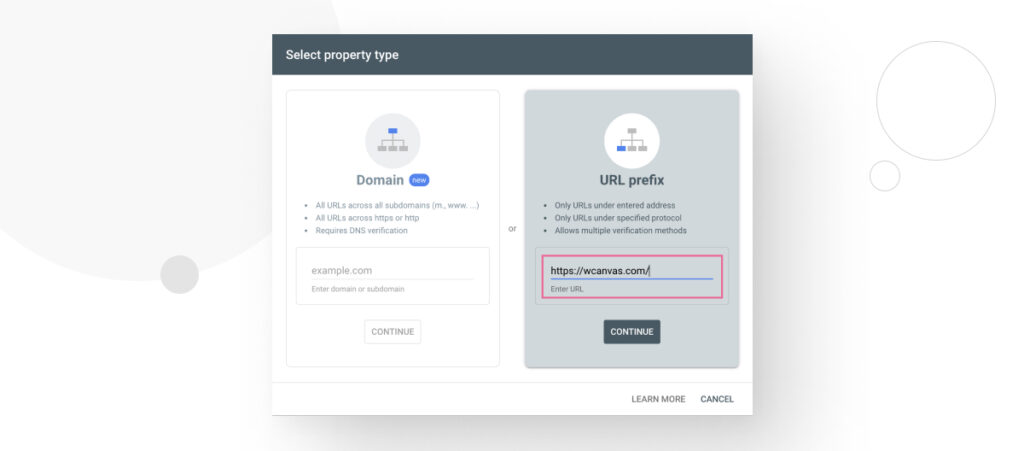
El principal inconveniente de la opción Prefijo de la URL es que solo incluye URL bajo la dirección web y protocolo específicos que ingresaste. Por ejemplo, si ingresás http://tu-sitio.com, integrarás tu dominio principal y todos sus caminos, pero no integrarás la versión HTTPS de tu sitio. Por el contrario, ingresar la versión HTTPS de tu sitio ignora la versión HTTP.
Además, si ingresás un subdirectorio o subdominio con un protocolo específico (como http://tu-sitio.com/blog/), solo podrás gestionar las URL dentro del subdirectorio /blog en la versión HTTP de tu sitio.
Si no estás seguro de qué versión de tu sitio deberías ingresar, podés consultar con tu proveedor de hosting. Un buen punto de partida es simplemente usar la URL en la página principal de tu sitio, como hacemos en esta guía.
Paso 3: Verificar la propiedad
Independientemente del tipo de propiedad que uses, el siguiente paso es verificar que sos el propietario del sitio web para completar la integración.
Paso 3.1: Copiar la etiqueta HTML
Después de hacer clic en Continuar en el paso anterior, se te presentarán varias opciones para verificar que sos el propietario del sitio. Para hacerlo, necesitarás copiar un fragmento de HTML y pegarlo en el código HTML de tu página de inicio.
Sin embargo, dado que muchas personas no saben cómo manejar HTML, Yoast SEO simplificó el proceso permitiéndote pegar el fragmento en una simple caja de texto. El plugin se encarga de todo el aspecto técnico por vos.
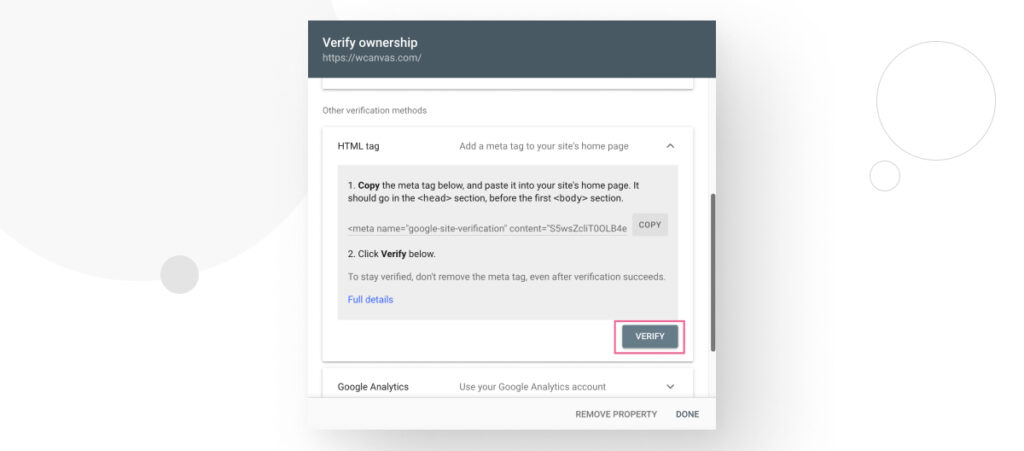
Desplazate hacia abajo y hacé clic en el desplegable de Etiqueta HTML. Verás dos instrucciones que explican el proceso que acabamos de describir y una caja de texto con el fragmento HTML que necesitás pegar en tu sitio. Presioná Copiar.
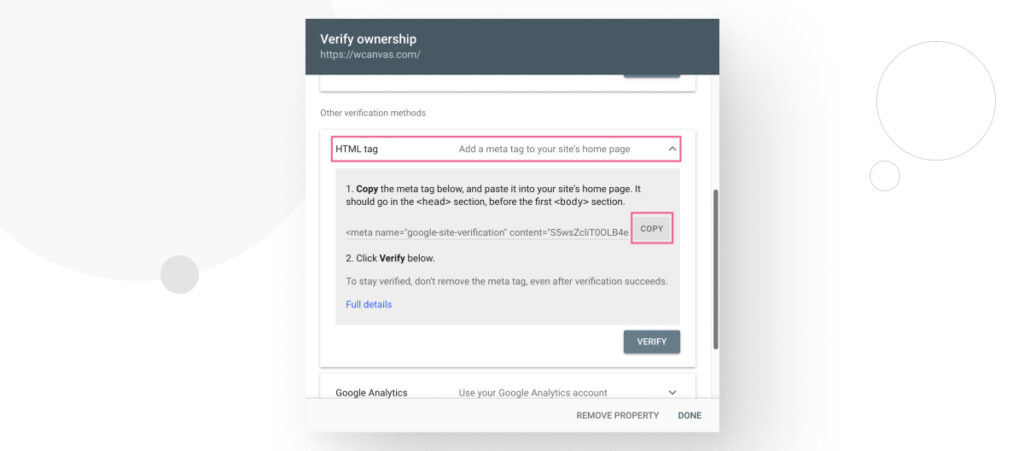
El texto copiado se verá algo así:
<meta name="google-site-verification" content="tu código de verificación">Dejá la pestaña de GSC abierta por ahora y volvé a tu panel de WordPress.
Paso 3.2: Pegar la etiqueta en tu sitio usando Yoast SEO
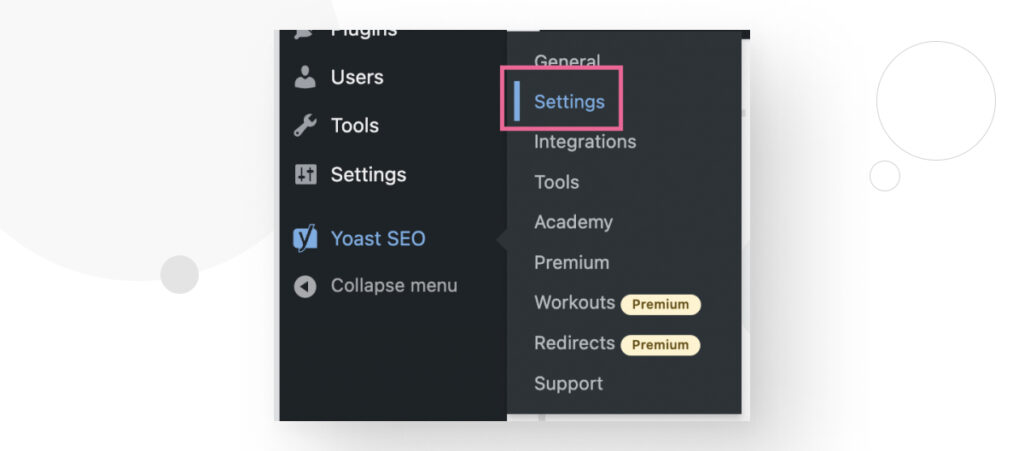
Andá a tu panel de WordPress. En la barra lateral izquierda, dirigite a Yoast SEO > Ajustes.
Ahora, verás varias configuraciones de Yoast SEO. Hacé clic en Conexiones del sitio. Habrá múltiples cajas de texto para verificar tu sitio usando diferentes herramientas, incluyendo Bing, Pinterest y Google. Pegá el fragmento HTML en la caja de texto etiquetada como Google.
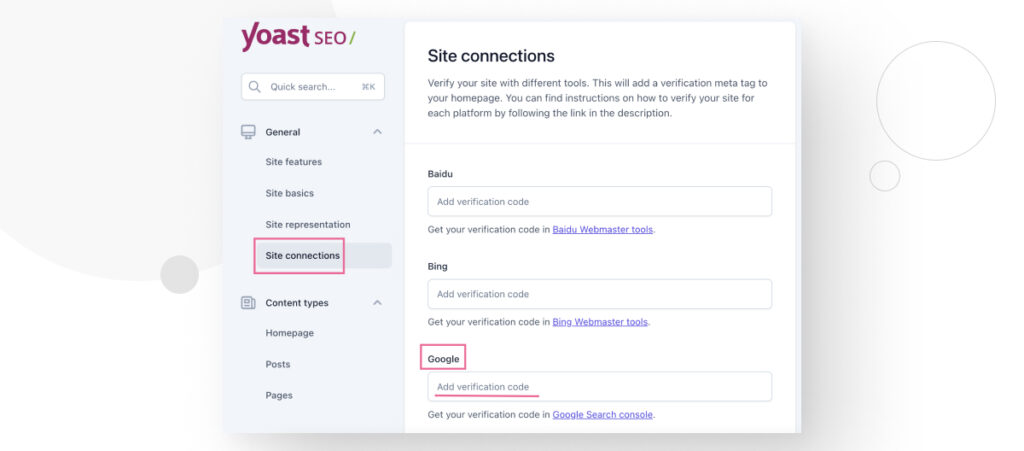
Paso 3.3: Completar la verificación
Para completar el proceso, volvé a la pestaña de GSC y hacé clic en Verificar.
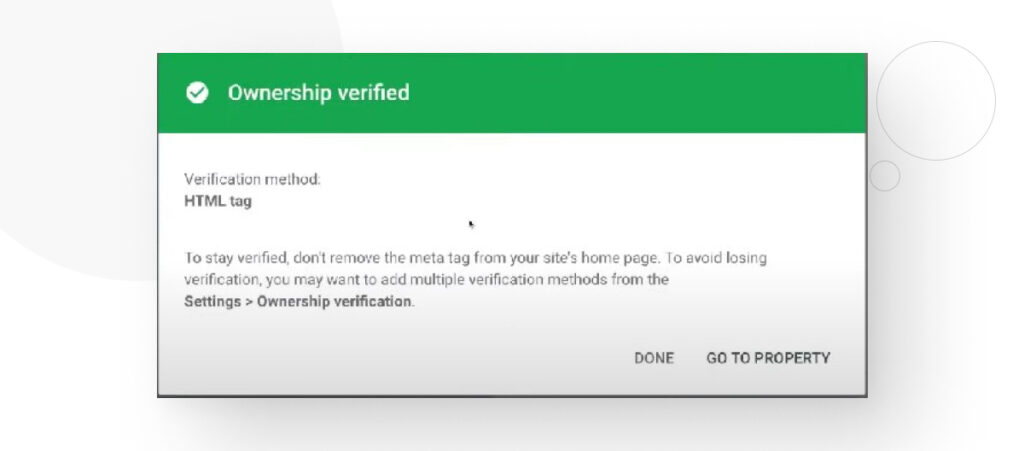
Si seguiste los pasos correctamente, verás un mensaje indicando que la configuración fue exitosa.
¡Y eso es todo! Ahora estás listo para configurar tu archivo robots.txt y enviar tu mapa del sitio a Google, dos pasos esenciales para aparecer en los resultados de búsqueda. Para enviar tu mapa del sitio usando Yoast SEO, seguí los pasos en esta publicación de blog. Y para configurar tu archivo robots.txt, seguí estos pasos.
Google Search Console apoya el SEO de tu sitio
Google Search Console es la herramienta gratuita más completa para mantenerte actualizado sobre el estado de indexación de tu sitio, ayudándote a interpretar y mejorar su rendimiento en los resultados de búsqueda.
Como desarrolladores de WordPress, GSC es invaluable para mejorar las métricas de visibilidad de tu sitio. Si planeás hacer un negocio con tu sitio web, es fundamental familiarizarse con Google Search Console y sacarle el máximo provecho.
Si encontraste útil esta publicación, leé nuestro blog para más guías e información sobre WordPress.
Artículos relacionados

WordPress Seo / 4 min de lectura
WordPress Seo / 4 min de lectura
Cómo desactivar el indexado de Google en un sitio de WordPress
Ya sea que quieras que tu sitio web solo por invitación se mantenga privado o que estés probando tus habilidades de desarrollo web y quieras evitar el tráfico, hay varias…
Leer más
WordPress Seo / 14 min de lectura
WordPress Seo / 14 min de lectura
¿Qué es un consultor de SEO para WordPress?
Un consultor de SEO para WordPress es una agencia especializada en optimizar el SEO de tu sitio web para ayudarte a atraer más tráfico orgánico y volverte más relevante en…
Leer más
Paso a paso / 13 min de lectura
Paso a paso / 13 min de lectura
Cómo configurar y utilizar Link Whisper en WordPress
Link Whisper es un plugin de WordPress que facilita y acelera la creación de enlaces internos al ofrecer sugerencias impulsadas por inteligencia artificial, basadas en un escaneo de todo el…
Leer más
Paso a paso / 7 min de lectura
Paso a paso / 7 min de lectura
Cómo gestionar las etiquetas Noindex en WordPress con Yoast SEO
Gestionar las etiquetas noindex en WordPress es uno de los ajustes de SEO más comunes que realizan los administradores, propietarios y desarrolladores. Si bien es posible editar el HTML de…
Leer más
Paso a paso / 11 min de lectura
Paso a paso / 11 min de lectura
Yoast SEO para WordPress sin cabeza: cómo configurarlo con GraphQL y Next.js
Como muchos desarrolladores de WordPress headless saben, mejorar el SEO del frontend de tu sitio es muy desafiante cuando se utilizan ciertos frameworks de frontend, como React. Pero en la…
Leer más