- Blogs
- Paso a paso
- Cómo implementar la política de seguridad de contenido en tu sitio de WordPress
Paso a paso / 15 min de lectura
Cómo implementar la política de seguridad de contenido en tu sitio de WordPress

La Content Security Policy (CSP) es una función de seguridad que protege tu sitio de WordPress de XSS, adware, clickjacking, spyware y otras inyecciones de código malicioso filtrando las fuentes de los recursos de tu sitio, como imágenes, scripts, fuentes, estilos y más.
Al permitir que solo fuentes de confianza muestren contenido en tu sitio, garantizás que vos y tus usuarios estén protegidos de actores malintencionados que se aprovechan de vulnerabilidades de seguridad.
Exploremos qué es la CSP y cómo podés implementarla para hacer tu sitio más seguro.
Puntos Clave
- La Content Security Policy (CSP) es una función de seguridad que previene ataques XSS y otros tipos de ataques.
- La CSP se implementa a través de encabezados HTTP que filtran las fuentes para los recursos de tu sitio (imágenes, scripts, etc.) y solo permiten que las fuentes explícitamente confiables los muestren o ejecuten.
- Podés implementar la CSP manualmente editando tu archivo de configuración del servidor o utilizando un plugin.
¿Qué es la Content Security Policy (CSP) en WordPress?
Más adelante, explicaremos cómo configurar CSP en tu sitio de WordPress.
La Content Security Policy (CSP) es una función de seguridad que ayuda a prevenir varios tipos de ataques en sitios de WordPress, tales como cross-site scripting (XSS), clickjacking, adware o spyware, y otros ataques de inyección de código. El Consorcio World Wide Web (W3C) establece las directrices para CSP.
La CSP protege tu sitio permitiéndote controlar qué recursos se pueden cargar en él. Los recursos que tu sitio de WordPress puede cargar pueden incluir imágenes, estilos, scripts, fuentes, audio, video y más.
En la práctica, CSP es un encabezado HTTP. Un encabezado HTTP es un campo en una solicitud o respuesta HTTP que proporciona información adicional sobre ella. CSP es un encabezado HTTP que los servidores web envían al navegador del usuario para controlar qué recursos el navegador puede cargar para una página web dada.
Aquí tienes un ejemplo de cómo puede verse CSP en el archivo .htaccess de tu sitio:
<IfModule mod_headers.c>
Header set Content-Security-Policy "default-src 'self'; img-src 'self' http: https: *.amazon.com;"
</IfModule>
Más adelante, explicaremos cómo configurar CSP en tu sitio de WordPress.
¿Por qué es importante la Content Security Policy en WordPress?
La CSP es esencial porque controlar los recursos que tu sitio está autorizado a cargar tiene los siguientes beneficios:
- Prevención de ataques XSS. La CSP ayuda a prevenir la ejecución de scripts maliciosos inyectados por atacantes.
- Especificación de fuentes confiables. Crear una lista blanca de fuentes confiables reduce el riesgo de que un actor malicioso inyecte contenido malicioso en tu sitio.
- Protección contra clickjacking. Asegura que tu sitio no sea embebido en un sitio malicioso usando <iframe>, un elemento HTML que incrusta una página HTML en otra.
- Garantizar el cumplimiento. La CSP ayuda a cumplir con los estándares y regulaciones de seguridad local e internacional.
Estas características protegen tanto tu sitio como a tus usuarios de código malicioso, lo cual puede ser particularmente importante en entornos de WordPress, donde los temas y plugins a menudo son el origen de vulnerabilidades de seguridad.
Directivas de Content Security Policy
Las directivas de Content Security Policy son las reglas que definen las políticas para cargar contenido en una página web. Cada directiva especifica las fuentes permitidas para un tipo específico de recurso. Aquí hay algunas de las directivas de CSP más comunes y sus funciones.
default-src
Esta directiva sirve como respaldo para otras directivas. Si una directiva específica no está definida, se aplicará la política default-src. Por ejemplo, default-src 'self'; significa que, por defecto, el contenido solo se puede cargar desde el propio sitio.
Sin embargo, si otra directiva más específica establece que un tipo de recurso (como imágenes) se puede cargar desde un dominio externo, entonces tu sitio cargará imágenes de ese dominio externo, mientras que todos los demás recursos deben proceder de tu sitio.
script-src
Controla las fuentes desde las cuales se pueden cargar scripts. Esto es particularmente importante para prevenir ataques de cross-site scripting (XSS). Por ejemplo, script-src 'self' https://trustedscripts.com; establece que los scripts solo se cargarán y ejecutarán si se originan en el propio dominio de tu sitio y en un dominio externo confiable especificado.
style-src
Controla las fuentes desde las cuales se pueden cargar hojas de estilo.
img-src
Controla las fuentes desde las cuales se pueden cargar imágenes.
font-src
Controla las fuentes desde las cuales se pueden cargar fuentes.
connect-src
Controla las fuentes desde las cuales el sitio puede cargar datos usando mecanismos como XHR, WebSockets y EventSource.
frame-src
Controla las fuentes desde las cuales se pueden cargar marcos. Esto es importante para prevenir ataques de clickjacking.
media-src
Controla las fuentes desde las cuales se pueden cargar archivos multimedia (como audio y vídeo).
object-src
Controla las fuentes desde las cuales se pueden cargar plugins (como Flash, Java, etc.). Esto es útil para mitigar riesgos asociados con plugins vulnerables.
frame-ancestors
Especifica padres válidos que pueden embeber una página utilizando frame, iframe, object o embed. Esto es útil para prevenir clickjacking. Por ejemplo, frame-ancestors 'none'; previene que todos los frames se carguen en tu sitio.
form-action
Restringe las URLs que se pueden utilizar como acción de los elementos de formulario HTML.
base-uri
Restringe las URLs que se pueden utilizar en el elemento <base>.
report-uri y report-to
Estas directivas especifican a dónde el navegador debe enviar los informes sobre violaciones de políticas.
upgrade-insecure-requests
Instruye al navegador a actualizar todas las solicitudes HTTP a HTTPS.
block-all-mixed-content
Impide la carga de cualquier activo que use HTTP cuando la página se carga mediante HTTPS.
Palabras Clave de Content Security Policy
Las palabras clave de Content Security Policy (CSP) son valores que podés usar dentro de las directivas CSP para especificar ciertos comportamientos o permitir fuentes específicas de manera concisa. Aquí están las palabras clave de CSP más comunes y sus funciones.
self
Se refiere al propio origen del sitio, incluyendo el mismo esquema (HTTP o HTTPS), host y puerto. Por ejemplo, Content-Security-Policy: script-src 'self'; permite que los scripts se carguen solo desde el propio dominio del sitio.
none
Prohíbe todas las fuentes para la directiva especificada. Por ejemplo, object-src 'none'; evita que se carguen todos los elementos de objeto.
unsafe-inline
Permite recursos en línea como elementos <script> en línea o atributos style. Esto debilita tu política de seguridad y debe usarse con precaución.
Por ejemplo, script-src 'self' 'unsafe-inline'; permite tanto scripts del propio dominio del sitio como scripts en línea.
unsafe-eval
Permite usar eval() y métodos similares para crear código dinámicamente. Esto también debilita la política de seguridad y debe evitarse, si es posible, especialmente considerando que eval() no es tan común en JavaScript moderno. Por ejemplo, script-src 'self' 'unsafe-eval'; permite scripts del propio dominio del sitio y el uso de eval().
strict-dynamic
Permite ejecutar scripts añadidos dinámicamente si son añadidos por un script de confianza (uno que fue permitido por la política). Esto requiere unsafe-inline y nonce-<base64-value> o hash-<hash-algorithm>-<base64-value>. Por ejemplo, script-src 'self' 'strict-dynamic' 'nonce-<base64-value>'; permite scripts añadidos dinámicamente si son añadidos por scripts con el nonce especificado.
Un nonce (“número usado una vez”) es un número seudoaleatorio usado una vez para autenticación. Son comunes para prevenir ataques XSS.
data:
Permite que los recursos se carguen desde URIs data:. Por ejemplo, img-src 'self' data:; permite que las imágenes se carguen tanto del propio dominio del sitio como de URIs data:.
unsafe-hashes
Permite el uso de controladores de eventos en línea y URLs de JavaScript cuando coinciden con un hash en la política. Úsese con precaución.
¿Cómo configurar la Content Security Policy en WordPress?
Ahora que exploramos la Content Security Policy y las directivas y palabras clave más comunes, conocemos lo básico para configurarla en nuestro sitio de WordPress.
Hay dos formas principales de configurar CSP en WordPress: manualmente y a través de un plugin.
En las siguientes secciones, explicaremos ambos métodos.
Configurar la Content Security Policy Manualmente
Si querés implementar CSP manualmente, tendrás que editar el archivo de configuración del servidor de tu sitio de WordPress. Es decir, tendrás que editar .htaccess.
La Content Security Policy sigue este formato:
Content-Security-Policy: <policy-directive>; <policy-directive>;Donde <policy-directive> consiste en <directive> <value> sin puntuación entre ellos.
Exploremos cómo editar manualmente el archivo .htaccess.
Nota: Hacé una copia de seguridad de tu sitio antes de agregar directivas CSP. Las directivas mal pensadas pueden romper tu sitio, por lo que es buena idea tener una copia de seguridad para regresar a ella. Exploraremos las precauciones a tomar al implementar CSP más adelante en este post.
Nota adicional: Probá las políticas en un entorno de prueba o desarrollo antes de implementarlas en tu sitio en vivo.
Cómo Editar Manualmente el Archivo .htaccess
Puedes usar varios métodos para editar el archivo .htaccess. Si tenés Yoast SEO, la forma más fácil de editar es ingresando a Yoast > Herramientas desde el panel de control.
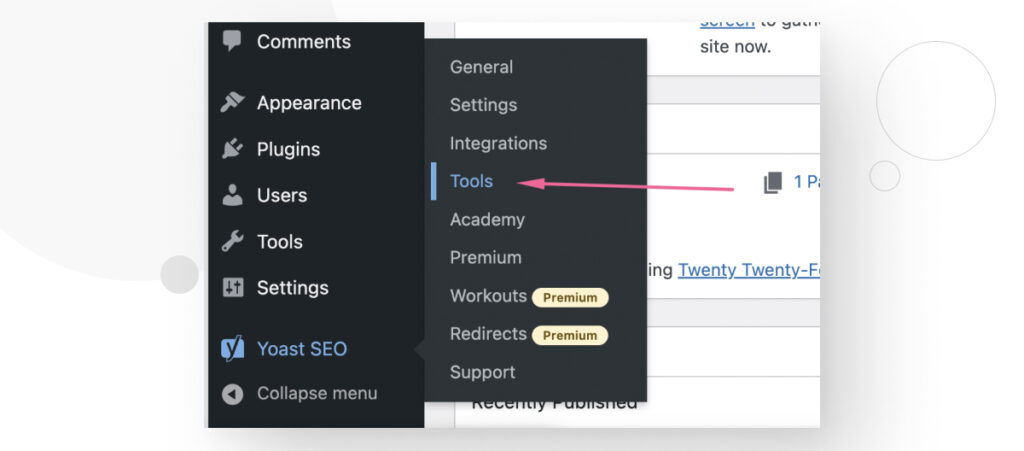
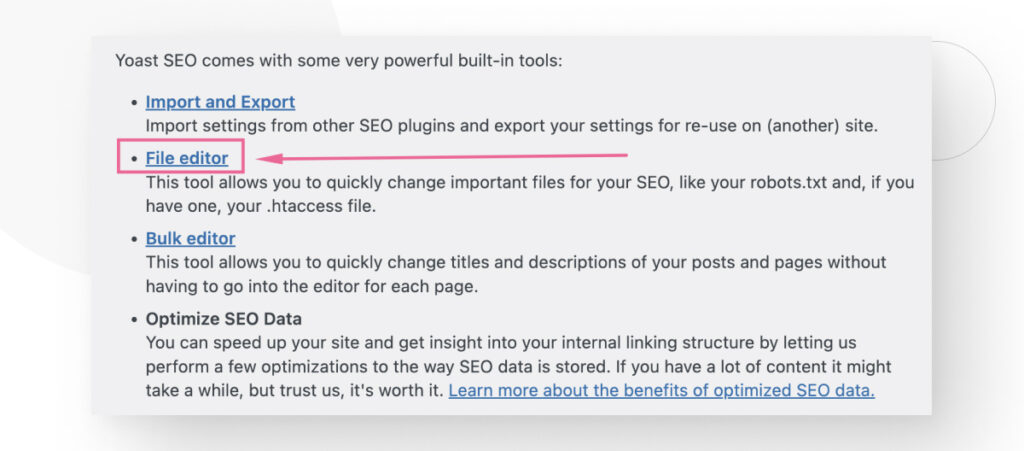
En la pantalla de Herramientas, desplazate hacia abajo hasta ver el enlace del Editor de Archivos y hacé clic en él.
Ahora desplazate hacia abajo hasta ver un cuadro de texto etiquetado como archivo .htaccess. Si no ves esta sección, es posible que necesites crear un archivo .htaccess en blanco y subirlo a la carpeta raíz de tu sitio antes de que aparezca en la pantalla del Editor de Archivos.
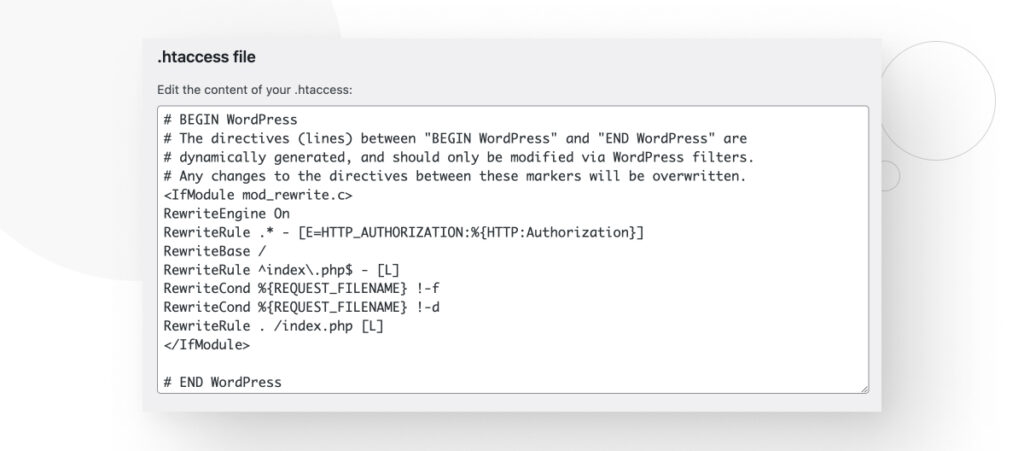
Ahora tenés que abrir un módulo con la directiva IfModule, luego usar la directiva Header set, escribir tu configuración CSP y cerrar el módulo. La siguiente configuración es un ejemplo:
<IfModule mod_headers.c>
Header set Content-Security-Policy default-src 'none'; script-src 'self'; connect-src 'self'; img-src 'self'; style-src 'self';
</IfModule>
Si no tenés Yoast SEO, tendrás que acceder a tus archivos principales a través de un cliente FTP como FileZilla o un panel de control de hosting como cPanel. .htaccess estará en el directorio raíz (public_html). Hacé clic derecho sobre el archivo, seleccioná Ver/Editar y luego editálo.
Tene en cuenta que si estás utilizando un servicio de hosting compartido, es posible que no tengas acceso al archivo .htaccess y necesites hablar con tu proveedor para ver cómo implementar CSP.
Configurar la Content Security Policy Con un Plugin
Hay múltiples plugins que te ayudan a configurar CSP y otros encabezados HTTP. Algunos son gratuitos y otros son premium.
Una de las soluciones más accesibles es HTTP Headers. Este plugin gratuito te ayuda a establecer y mantener múltiples tipos de encabezados HTTP, incluida la CSP. Recordá que, en la práctica, la CSP se implementa a través de un encabezado HTTP que restringe las fuentes de los recursos de tu sitio.
Veamos el proceso paso a paso de implementación de CSP con un plugin.
Implementar Content Security Policy Con HTTP Headers
Comenzá buscando e instalando el plugin HTTP Headers. Ir a Plugins > Añadir nuevo plugin. Escribí “HTTP Headers” en el cuadro de búsqueda. Hacé clic en Instalar y luego en Activar.
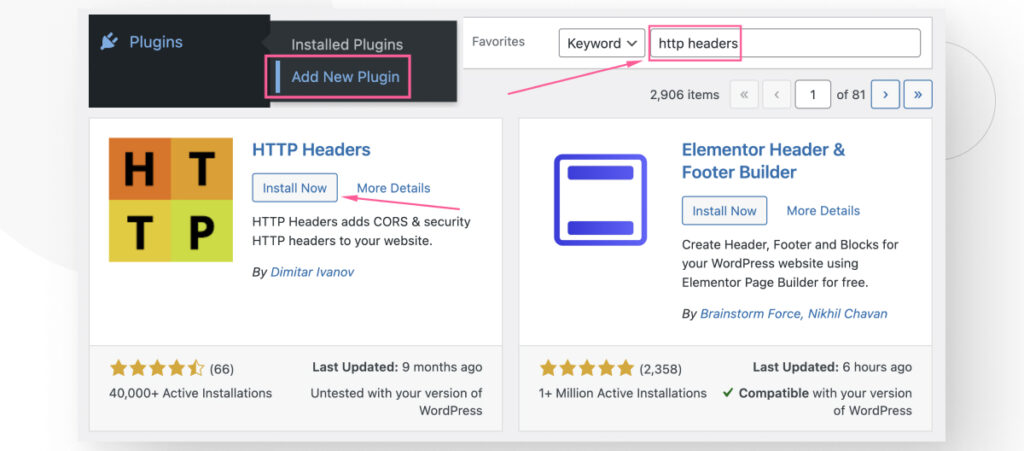
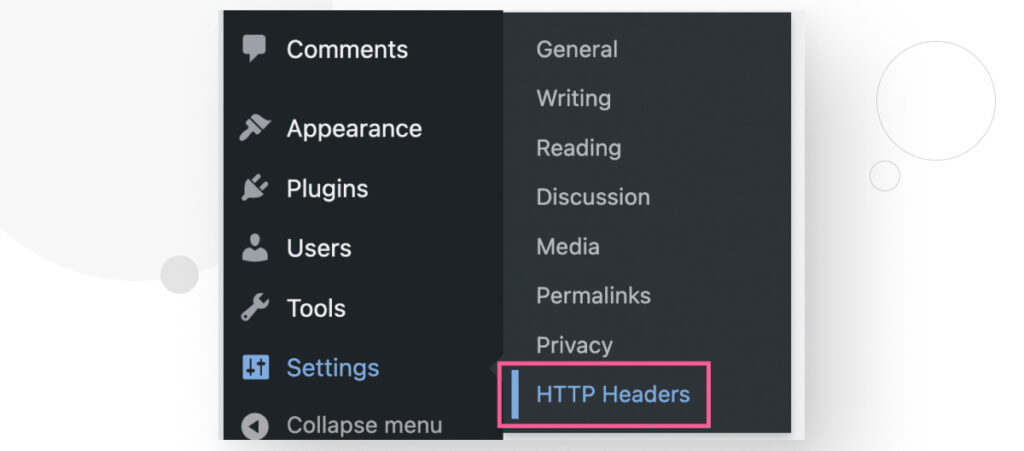
Una vez instalado, andá a Ajustes > HTTP Headers.
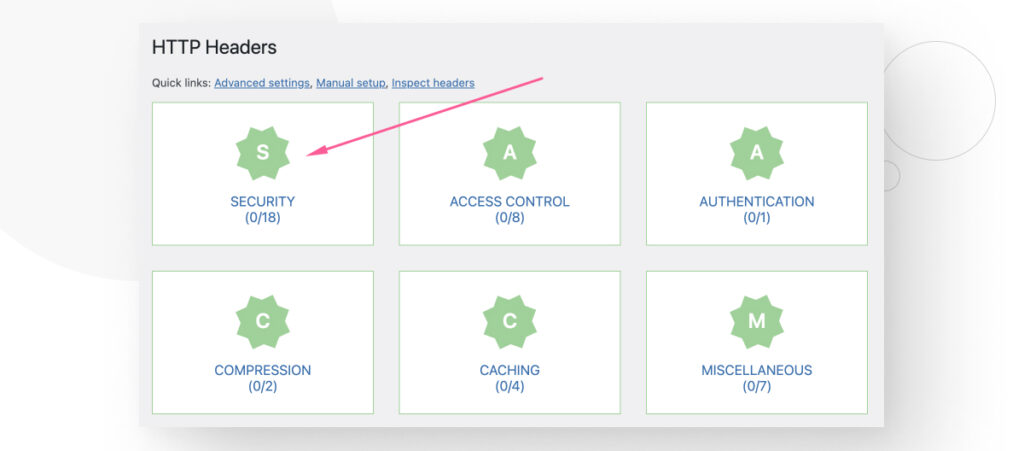
Hacé clic en el icono de Seguridad.
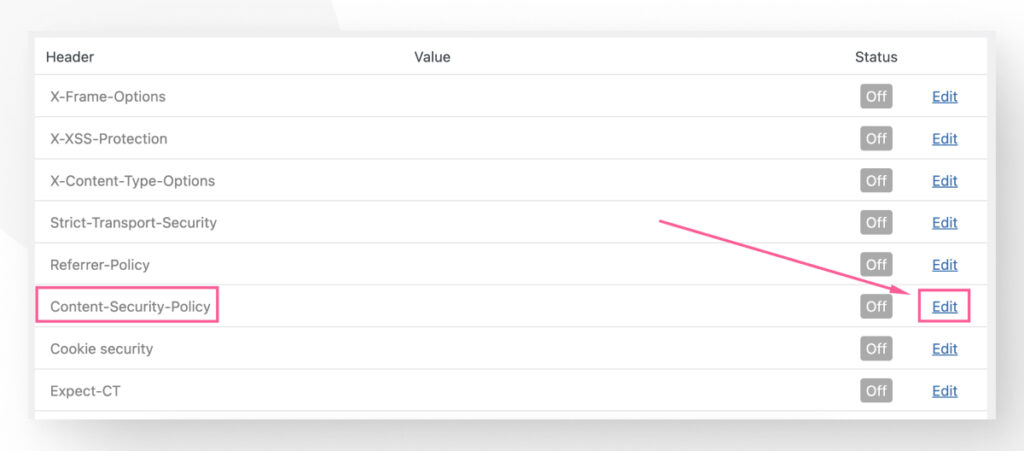
Verás varios encabezados HTTP relacionados con características de seguridad. Todos están inactivos por defecto. Hacé clic en Editar en la fila correspondiente a Content-Security-Policy.
Comenzá haciendo clic en la casilla de verificación On para implementar el encabezado HTTP CSP.
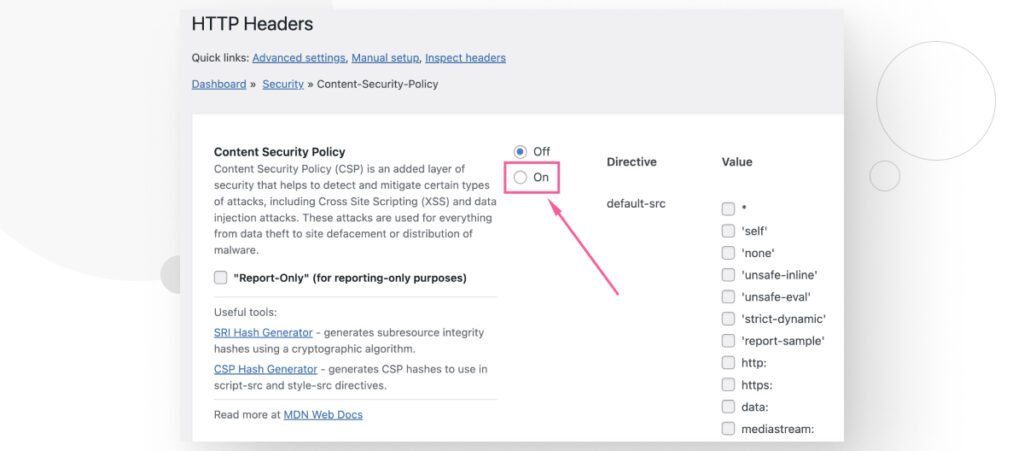
Ahora podés agregar las directivas de CSP que tu sitio necesita para protegerte a vos y a tus usuarios.
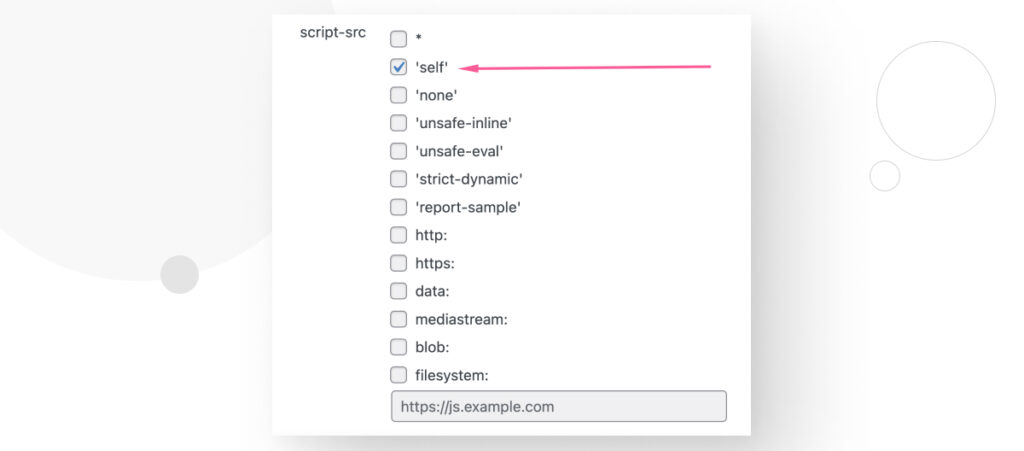
Por ejemplo, si querés que tu sitio solo cargue y ejecute scripts que se originen en tu propio dominio, podés ir a la sección script-src y marcar la opción 'self', luego desplazarte hacia abajo y hacer clic en Guardar Cambios.
¿Qué Especificaciones Debe Tener tu Content Security Policy?
Debés tener mucho cuidado con tus directivas al usar CSP en tu sitio de WordPress.
Ser demasiado restrictivo puede evitar que algunas piezas de contenido se ejecuten porque no se les permite, lo que podría romper la funcionalidad de tu sitio. Por ejemplo, algunos plugins y temas también pueden requerir la carga de contenido externo que políticas demasiado estrictas impedirían.
Por otro lado, ser demasiado permisivo puede exponer tu sitio y a tus usuarios a ataques de XSS y otros tipos de ataques.
Sobre todo, tené en cuenta que cada sitio tiene una configuración CSP diferente porque cada sitio utiliza diferentes fuentes para sus estilos, imágenes, scripts, etc. Por lo tanto, tu configuración CSP depende de los recursos específicos de tu sitio y sus orígenes.
¿Cómo Determinar Qué Directivas Necesitás Para tu Content Security Policy?
Implementar directivas CSP es crear una lista de todos los recursos que utiliza tu sitio, junto con sus orígenes, y permitir solo esos recursos y orígenes en tus directivas. Todo lo demás sería bloqueado.
Revisar manualmente cada fuente para cada recurso en tu sitio llevaría una cantidad significativa de tiempo y es propenso a errores, especialmente si tu sitio extrae contenido de múltiples fuentes externas. Es mejor usar una extensión de navegador o un plugin.
Para este ejemplo, te vamos a mostrar cómo usar la extensión Content Security Policy (CSP) Generator para Chrome (también funciona con Edge).
Determinando Directivas CSP Con la Extensión CSP Generator
Después de instalar la extensión Content Security Policy (CSP) Generator, andá a tu sitio y habilitá la extensión para tu dominio.
Paso 1: Auditoría de tu Sitio
Para hacer eso, hacé clic en el botón de extensión CSP Generator, luego hacé clic en Start Building Policy.
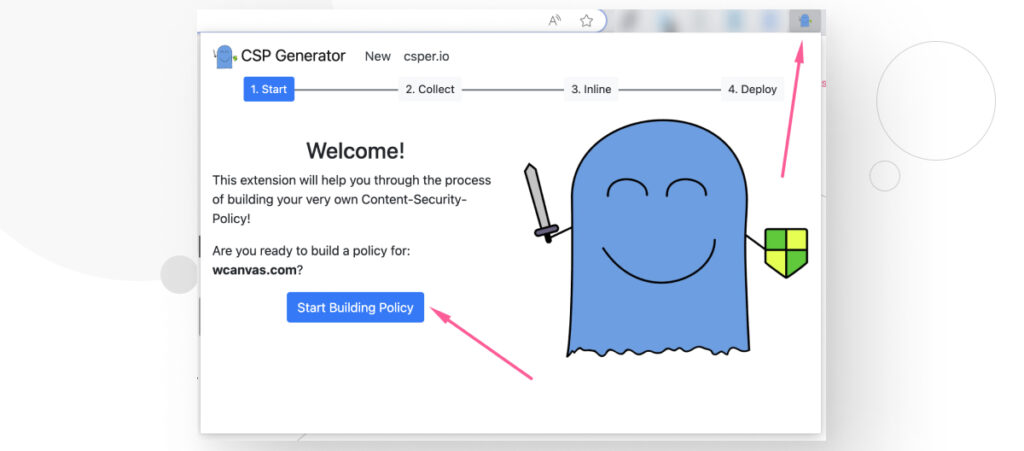
La extensión comenzará a auditar tu dominio y a construir una lista temporal de directivas CSP.
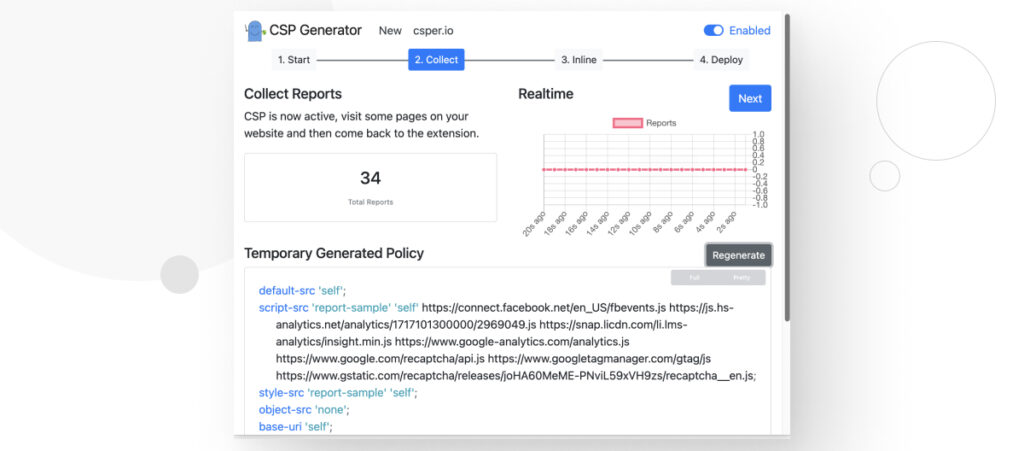
Paso 2: Visitá Múltiples Páginas
Sin embargo, la extensión solo puede generar directivas para el contenido que ve. Como resultado, deberías visitar múltiples páginas en tu sitio. No es necesario presionar el botón Start Building Policy nuevamente. Solo navegá tu sitio.
Después de recorrer varias páginas, es posible que tengas más informes, y la política generada temporalmente podría tener más directivas que antes.
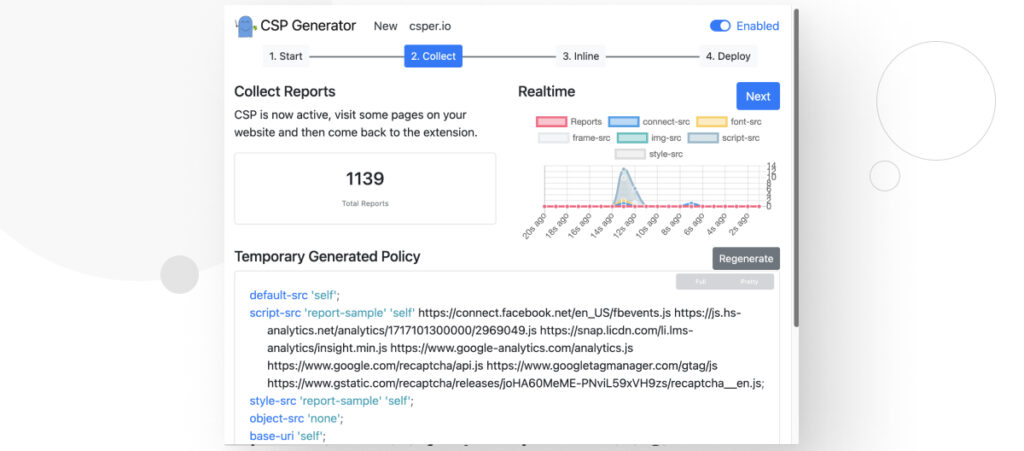
Cuantas más páginas visites, más probabilidades tendrás de encontrar recursos de varias fuentes, haciendo que la política automatizada sea más exhaustiva y ahorrándote tiempo al modificarla durante la implementación.
Paso 3: Revisión de Recursos en Línea
Ahora hacé clic en Siguiente o en 3. Inline.
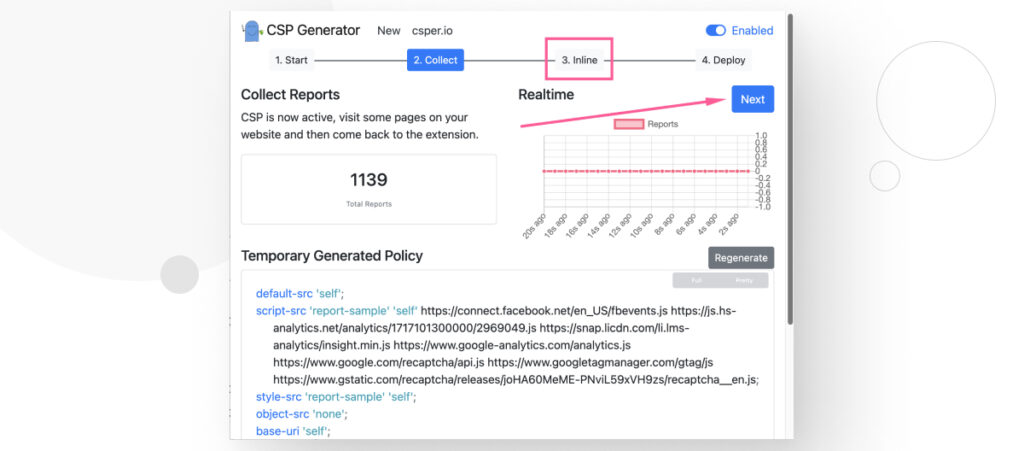
Esta sección te dará una lista de recursos en línea que necesitas mover a sus propios archivos por razones de seguridad.
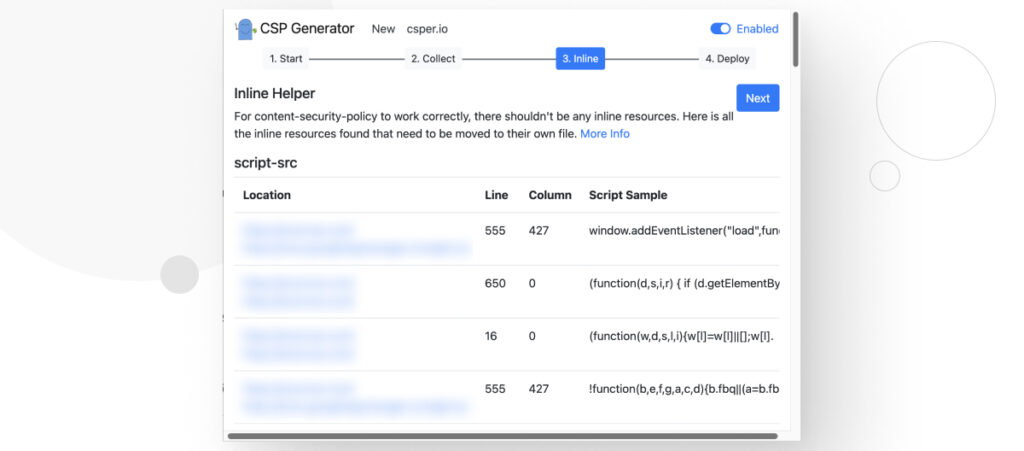
La CSP bloquea todos los recursos en línea porque es imposible determinar si un recurso en línea es intencional, no intencional o malicioso.
Por esta razón, la CSP bloquea todo, lo que significa que cualquier recurso en línea que hayas agregado a tu sitio será bloqueado a menos que los muevas a sus propios archivos JavaScript/estilo y te asegures de tener 'self' en la lista blanca de tu política.
Paso 4: Despliegue
Hacé clic en Siguiente o 4. Deploy. Verás un cuadro de texto con una lista de directivas CSP que podés pegar en tu archivo .htaccess o replicarlo a través del plugin HTTP Headers.
Como sugiere la extensión, deberías usar el modo “solo para informes” durante un tiempo para asegurarte de que la política funcione correctamente sin dañar tu sitio web. Después de confirmar que no está causando problemas, desplieguelo.
Para usar el modo “solo para informes”, lo único que tenés que hacer es usar Content-Security-Policy-Report-Only en lugar de Content-Security-Policy al escribir tu política en el archivo .htaccess. Aquí tienes un ejemplo:
<IfModule mod_headers.c>
Header set Content-Security-Policy-Report-Only default-src 'none'; script-src 'self'; connect-src 'self'; img-src 'self'; style-src 'self';
</IfModule>
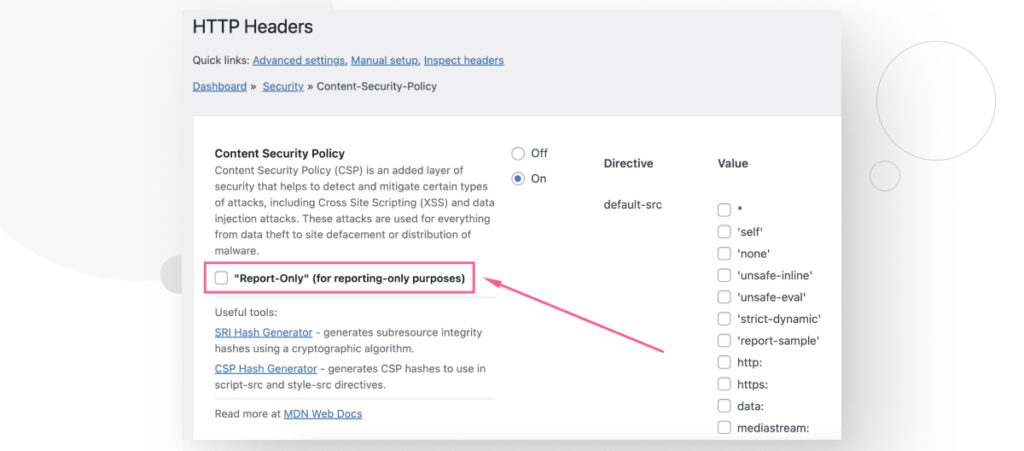
Si estás utilizando el plugin HTTP Headers, andá a Ajustes > HTTP Headers > Seguridad y hacé clic en Editar en la fila correspondiente a Content Security Policy.
Al redactar tu política, hacé clic en la casilla “Report-Only” (para fines de solo reporte), luego desplazate hacia abajo y hacé clic en Guardar Cambios.
Implementá Seguridad de Contenido en tu Sitio de WordPress
La Content Security Policy es una guía regulada por el World Wide Web Consortium (W3C) que previene XSS y otras vulnerabilidades de seguridad. La CSP te permite controlar qué recursos se pueden cargar en ella, ayudándote a filtrar las fuentes para tus imágenes, estilos, scripts y otros contenidos.
En WordPress, esta es una medida de seguridad crucial porque es el CMS más popular del mundo y, por lo tanto, muchos actores malintencionados buscan inyectar código malicioso en sitios de WordPress. Además, los temas y plugins son a menudo el origen de vulnerabilidades de seguridad, por lo que restringir las fuentes de contenido de tu sitio es la mejor manera de minimizar o eliminar completamente recursos no autorizados.
Ojalá este post te haya ayudado a entender CSP y cómo implementarlo en tu sitio de WordPress.
Si encontraste útil este post, leé nuestro blog y recursos para más información y guías.
Related Articles

Seguridad en WordPress / 11 min de lectura
Seguridad en WordPress / 11 min de lectura
¿Por qué tu sitio de WordPress está “No Seguro”? Lo que necesitás saber
En julio de 2018, Google Chrome comenzó a marcar los sitios sin un certificado SSL como "no seguros". Cualquier sitio web que aún use HTTP en lugar de HTTPS para…
Read More
Paso a paso / 8 min de lectura
Paso a paso / 8 min de lectura
Ataques CSRF en WordPress: ¿qué son y cómo prevenirlos?
Los ataques de CSRF (cross-site request forgery) en WordPress son una de las vulnerabilidades de seguridad más comunes que deben tener en cuenta los desarrolladores de plugins, temas y sitios…
Read More
Paso a paso / 9 min de lectura
Paso a paso / 9 min de lectura
WordPress SEO spam: ¿qué es y cómo prevenirlo?
El spam SEO en WordPress es una de las amenazas de seguridad más comunes para los sitios web que usan este CMS. Puede hacer que tu sitio sea etiquetado como…
Read More
Seguridad en WordPress / 9 min de lectura
Seguridad en WordPress / 9 min de lectura
Ataques a la cadena de suministro de WordPress: ¿qué son y cómo prevenirlos?
WordPress es el sistema de gestión de contenidos más popular, atrayendo a muchos hackers que quieren aprovechar un ecosistema tan rico para su beneficio. Los ataques a la cadena de…
Read More
Seguridad en WordPress / 9 min de lectura
Seguridad en WordPress / 9 min de lectura
18 Estadísticas de Seguridad de WordPress para 2024
Explorar estadísticas sobre la seguridad en WordPress puede ser una gran causa de insomnio si sos propietario de un sitio web. Sin embargo, también es una excelente manera de mantenerse…
Read More