
How to Implement Content Security Policy in Your WordPress Site

Content Security Policy (CSP) is a security feature that protects your WordPress site from XSS, adware, clickjacking, spyware, and other malicious code injections by filtering the sources of your site’s resources, such as images, scripts, fonts, styles, and more.
By allowing only trusted sources to display content on your site, you ensure that you and your users are protected from bad actors who take advantage of security vulnerabilities.
Let’s explore what CSP is and how you can implement it to make your site safer.
Key Takeaways
- Content Security Policy (CSP) is a security feature that prevents XSS and other attacks.
- CSP is implemented through HTTP headers that filter the sources for your site’s resources (images, scripts, etc.) and only allow explicitly trusted sources to display or execute them.
- You can implement CSP manually by editing your server configuration file or using a plugin.
What Is Content Security Policy (CSP) in WordPress?
Further down, we’ll explain how to configure CSP on your WordPress site.
Content Security Policy (CSP) is a security feature that helps prevent various types of attacks on WordPress sites, such as cross-site scripting (XSS), clickjacking, adware or spyware, and other code injection attacks. The World Wide Web Consortium (W3C) establishes the guidelines for CSP.
CSP protects your site by allowing you to control which resources are allowed to load on it. Resources your WordPress site can load may include images, styles, scripts, fonts, audio, video, and more.
In practice, CSP is an HTTP header. An HTTP header is a field in an HTTP request or response that provides additional information about it. CSP is an HTTP header that web servers send to the user’s browser to control which resources the browser can load for a given web page.
Here’s an example of what CSP may look like in your site’s .htaccess file:
<IfModule mod_headers.c>
Header set Content-Security-Policy "default-src 'self'; img-src 'self' http: https: *.amazon.com;"
</IfModule>
Further down, we’ll explain how to configure CSP on your WordPress site.
Why Is Content Security Policy Important in WordPress?
CSP is essential because controlling the resources your site is allowed to load has the following benefits:
- Preventing XSS attacks. CSP helps prevent the execution of malicious scripts injected by attackers.
- Specifying trusted sources. Creating a whitelist or allowlist of trusted sources reduces the risk of a bad actor injecting malicious content into your site.
- Protecting against clickjacking. Ensures your site is not embedded into a malicious site using <iframe>, an HTML element that embeds an HTML page into another.
- Ensuring compliance. CSP helps comply with local and international security standards and regulations.
These features protect both your site and your users from malicious code, which can be particularly important in WordPress environments, where themes and plugins are often the origin of security vulnerabilities.
Content Security Policy Directives
Content Security Policy directives are the rules that define the policies for loading content on a web page. Each directive specifies the allowed sources for a specific type of resource. Here are some of the most common CSP directives and their functions.
default-src
This directive serves as a fallback for other directives. If a specific directive is not defined, the default-src policy will apply. For example, default-src 'self'; means that, by default, content can only be loaded from the site itself.
However, if another, more specific directive establishes that a resource type (such as images) can be loaded from an external domain, then your site will load images from that external domain, while all other resources must originate from your site.
script-src
Controls the sources from which scripts can be loaded. This is particularly important for preventing cross-site scripting (XSS) attacks. For example, script-src 'self' https://trustedscripts.com; establishes that scripts will only load and execute if they originate from your site’s own domain and one specified, trusted external domain.
style-src
Controls the sources from which stylesheets can be loaded.
img-src
Controls the sources from which images can be loaded.
font-src
Controls the sources from which fonts can be loaded.
connect-src
Controls the sources from which the site can load data using mechanisms like XHR, WebSockets, and EventSource.
frame-src
Controls the sources from which frames can be loaded. This is important for preventing clickjacking attacks.
media-src
Controls the sources from which media files (like audio and video) can be loaded.
object-src
Controls the sources from which plugins (like Flash, Java, etc.) can be loaded. This is useful for mitigating risks associated with vulnerable plugins.
frame-ancestors
Specifies valid parents that may embed a page using frame, iframe, object, or embed. This is useful for preventing clickjacking. For example, frame-ancestors' none'; prevents all frames from loading on your site.
form-action
Restricts the URLs which can be used as the action of HTML form elements.
base-uri
Restricts the URLs which can be used in the <base> element.
report-uri and report-to
These directives specify where the browser should send reports about policy violations.
upgrade-insecure-requests
Instructs the browser to upgrade all HTTP requests to HTTPS.
block-all-mixed-content
Prevents loading of any assets using HTTP when the page is loaded using HTTPS.
Content Policy Keywords
Content Security Policy (CSP) keywords are values that you can use within CSP directives to specify certain behaviors or allow specific sources in a concise manner. Here are the most common CSP keywords and their functions.
self
Refers to the site’s own origin, including the same scheme (HTTP or HTTPS), host, and port. For example, Content-Security-Policy: script-src 'self'; allows scripts to be loaded only from the site’s own domain.
none
Disallows all sources for the specified directive. For example, object-src' none'; prevents any object elements from being loaded.
unsafe-inline
Allows inline resources like inline <script> elements or style attributes. This weakens your security policy and should be used with caution.
For example, script-src 'self' 'unsafe-inline'; allows both scripts from the site’s own domain and inline scripts.
unsafe-eval
Allows using eval() and similar methods for dynamically creating code. This also weakens the security policy and should be avoided, if possible, especially considering eval() is not as common in modern JavaScript. For example, script-src 'self' 'unsafe-eval'; allows scripts from the site’s own domain and the use of eval().
strict-dynamic
Allows dynamically added scripts to be executed if they are added by a trusted script (one that was allowed by the policy). This requires unsafe-inline and nonce-<base64-value> or hash-<hash-algorithm>-<base64-value>. For example, script-src 'self' 'strict-dynamic' 'nonce-<base64-value>'; allows dynamically added scripts if they are added by scripts with the specified nonce.
A nonce (“number used once”) is a pseudo-random number used once for authentication. They are common for preventing XSS attacks.
data:
Allows resources to be loaded from data: URIs. For example, img-src 'self' data:; allows images to be loaded from both the site’s own domain and data: URIs.
unsafe-hashes
Allows the use of inline event handlers and JavaScript URLs when they match a hash in the policy. Use with caution.
How to Configure the Content Security Policy in WordPress?
Now that we’ve explored Content Security Policy and the most common directives and keywords, we know the basics to configuring it on our WordPress site.
There are two main ways of configuring CSP in WordPress: manually and through a plugin.
In the following sections, we will explain both methods.
Configuring the Content Security Policy Manually
If you want to implement CSP manually, you’ll have to edit your WordPress site’s server configuration file. That is, you’ll have to edit .htaccess.
Content Security Policy follows this format:
Content-Security-Policy: <policy-directive>; <policy-directive>;Where <policy-directive> consists of <directive> <value> with no punctuation between them.
Let’s explore how to manually edit the .htaccess file.
Note: Back up your site before adding CSP directives. Poorly thought-out directives can break your site, so it’s a good idea to have a backup to roll back to. We’ll explore the precautions to take when implementing CSP further down in this post.
Additional note: Test policies on a staging or development environment before implementing them on your live site.
How Manually Edit the .htaccess File
You can use various methods to edit the .htaccess file. If you have Yoast SEO, the easiest way to edit is going to Yoast > Tools from the dashboard.
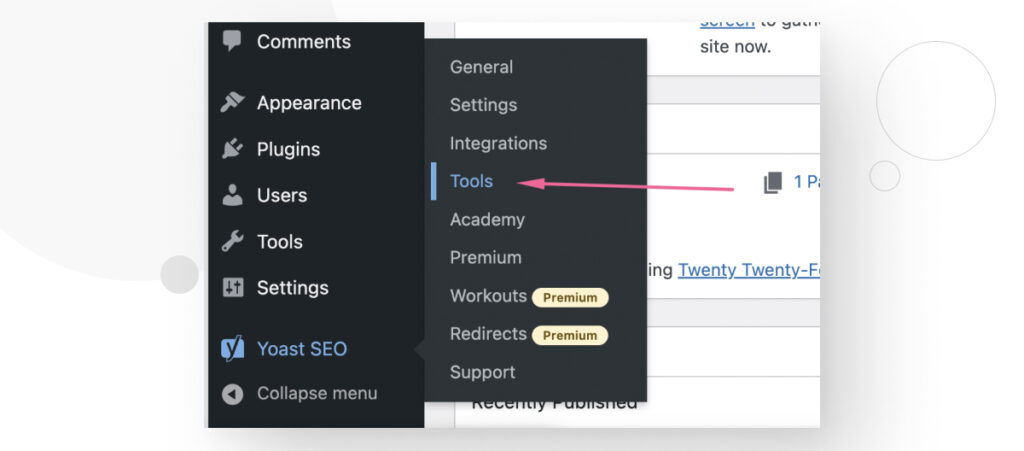
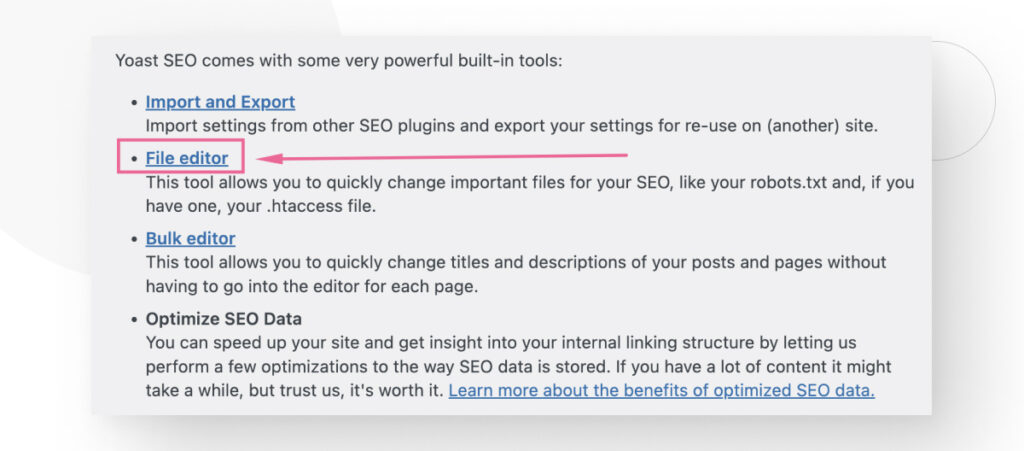
On the Tools screen, scroll down until you see the File Editor link and click on it.
Now scroll down until you see a text box labeled .htaccess file. If you don’t see this section, you may need to create a blank .htaccess file and upload it to your site’s root folder before it appears in the File Editor screen.
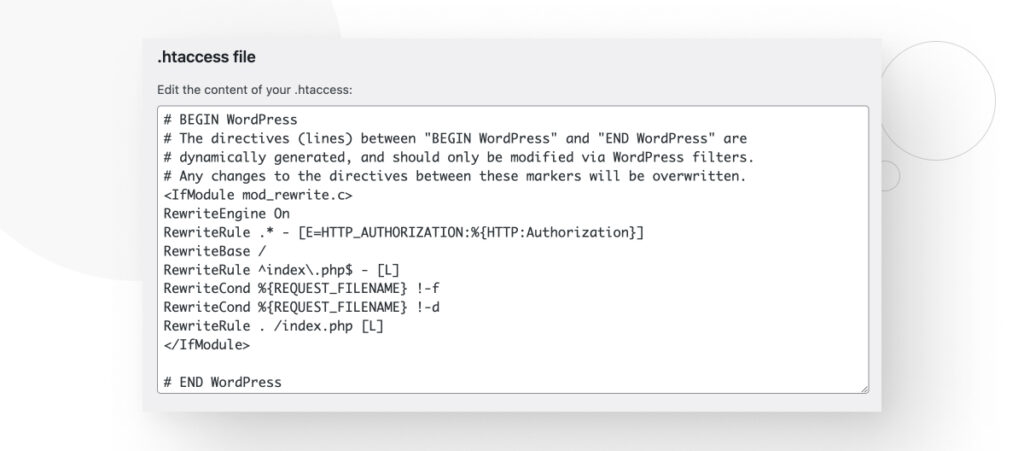
Now you have to open a module with the IfModule directive, then use the Header set directive, type your CSP configuration, and close the module. The following configuration is an example:
<IfModule mod_headers.c>
Header set Content-Security-Policy default-src 'none'; script-src 'self'; connect-src 'self'; img-src 'self'; style-src 'self';
</IfModule>
If you don’t have Yoast SEO, you’ll have to access your core files through an FTP client like FileZilla or a hosting control panel like cPanel. .htaccess will be in the root directory (public_html). Right-click on the file, select View/Edit, and then edit it.
Keep in mind that if you’re using a shared hosting service, you may not have access to the .htaccess file and may need to talk to your provider to figure out how to implement CSP.
Configuring the Content Security Policy With a Plugin
There are multiple plugins that help you set CSP and other HTTP headers. Some are free, and some are premium.
One of the most accessible solutions is HTTP Headers. This free plugin helps you set and maintain multiple types of HTTP headers, including CSP. Remember that, in practice, CSP is implemented through an HTTP header that restricts the sources of your site’s resources.
Let’s go through the step-by-step process of implementing CSP with a plugin.
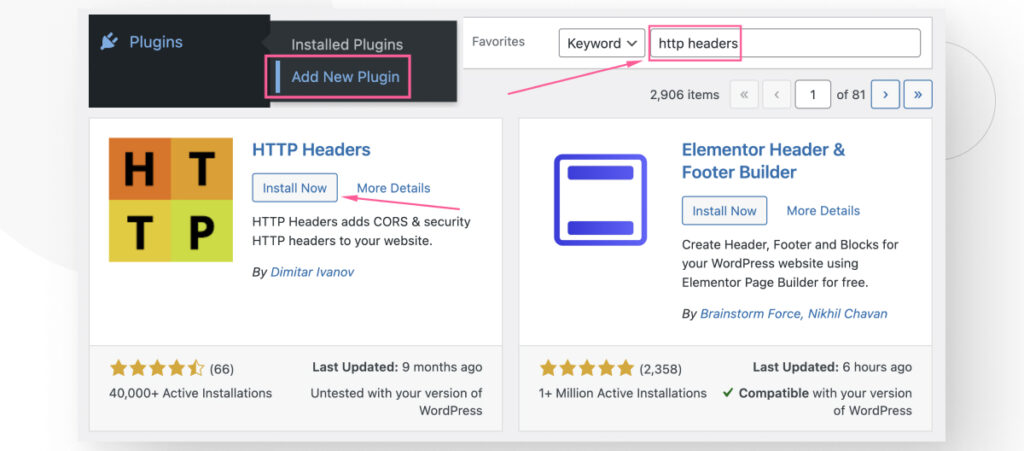
Implementing Content Security Policy with HTTP Headers
Start by searching and installing the HTTP Headers plugin. Go to Plugins > Add New Plugin. Type “HTTP Headers” in the search box. Click Install and then Activate.
Once installed, go to Settings > HTTP Headers.
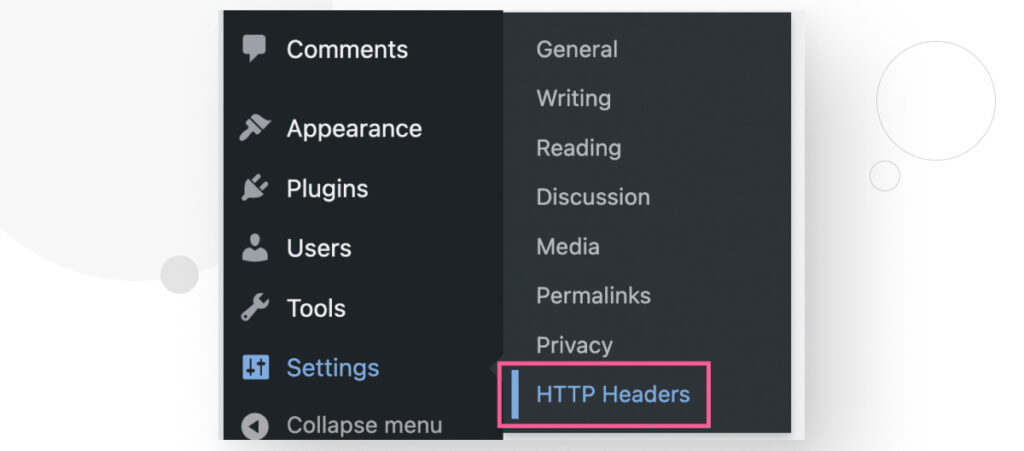
Click on the Security icon.
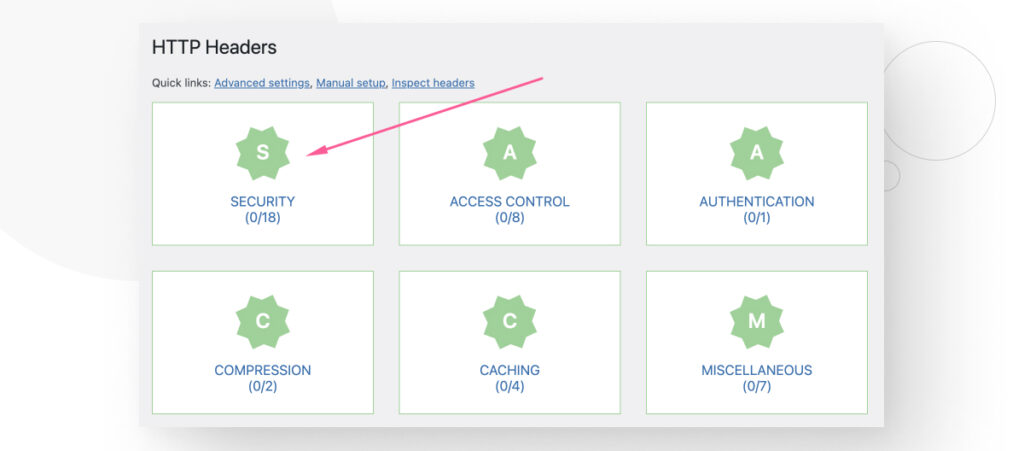
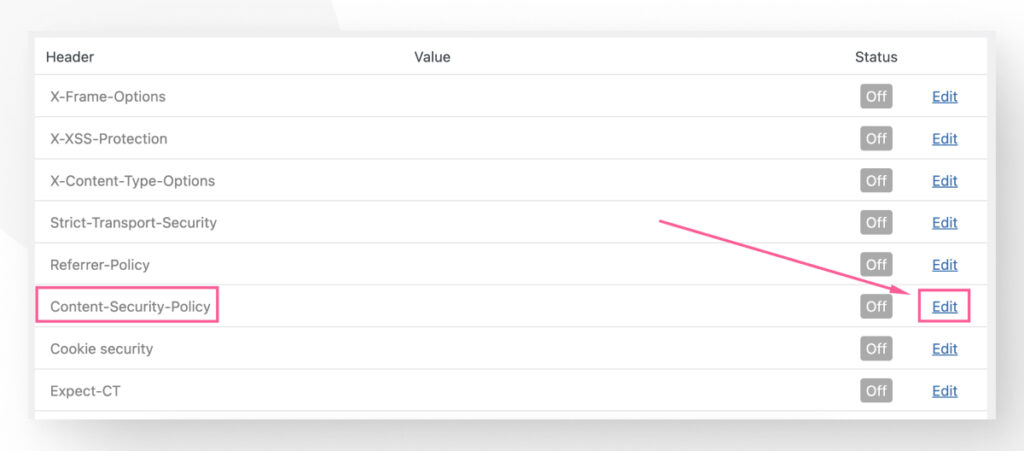
You will see various HTTP headers related to security features. All are inactive by default. Click Edit on the row corresponding to Content-Security-Policy.
Start by clicking on the On checkbox to implement the CSP HTTP header.
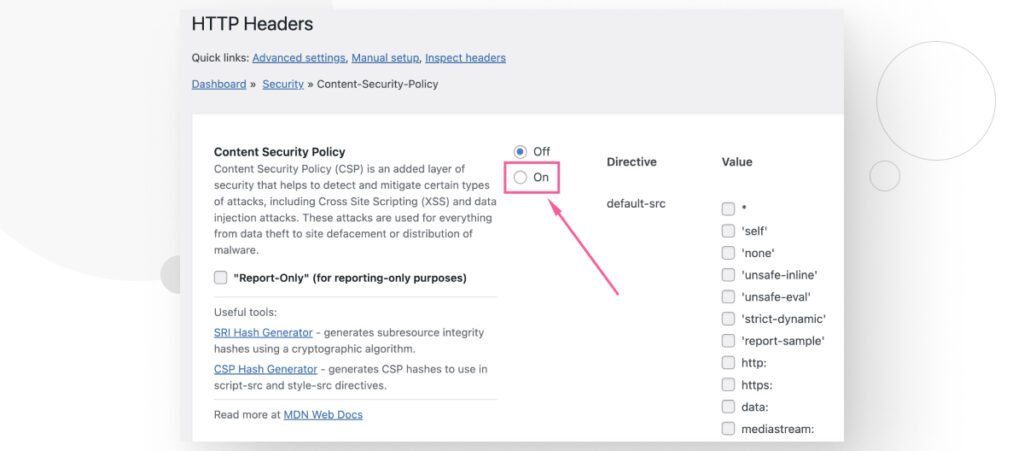
Now you can add the CSP directives your site requires to protect yourself and your users.
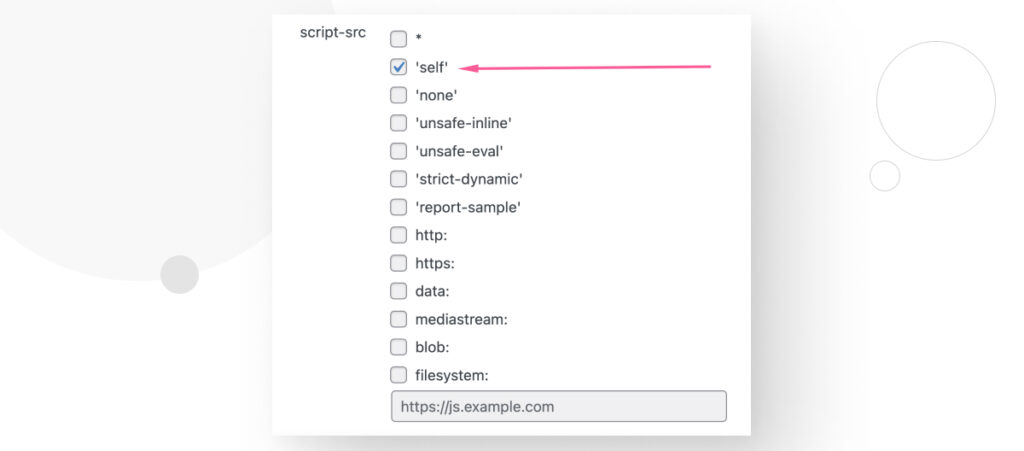
For example, if you want your site to only load and execute scripts originating from your own domain, you can go to the script-src section and check the 'self' option, then scroll down and click on Save Changes.
What Specifications Should Your Content Security Policy Have?
You must be very careful with your directives when using CSP on your WordPress site.
Being too restrictive can prevent some pieces of content from executing because they’re not allowed to, which may break your site’s functionality. For example, some plugins and themes may also require loading external content that too-strict policies would disallow.
Conversely, being too permissive can expose your site and users to XSS and other types of attacks.
Above all, keep in mind that every site has a different CSP configuration because every site uses different sources for its styles, images, scripts, etc. So, your CSP configuration depends on your site’s specific resources and their origins.
How to Determine Which Directives You Need for Your Content Security Policy?
Implementing CSP directives involves creating a list of all resources your site uses, along with their origins, and allowing only those resources and origins in your directives. Anything else would be blocked.
Manually going through every source for every resource on your site would take a significant amount of time and is error-prone, especially if your site pulls content from multiple external sources. It’s best to use a browser extension or a plugin.
For this example, we’re going to show you how to use the Content Security Policy (CSP) Generator extension for Chrome (also works with Edge).
Determining CSP Directives With the CSP Generator Extension
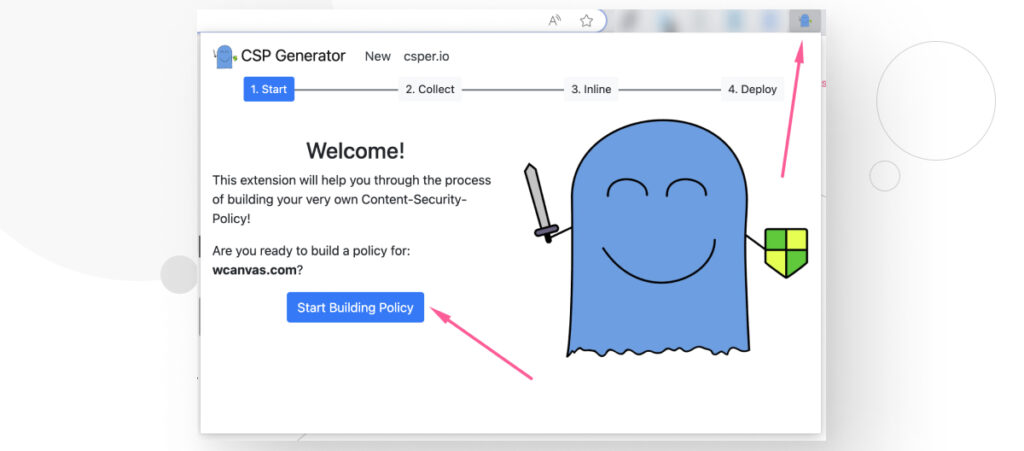
After installing the Content Security Policy (CSP) Generator extension, go to your site and enable the extension for your domain.
Step 1: Audit Your Site
To do that, click on the CSP Generator extension button, then click on Start Building Policy.
The extension will start auditing your domain and building a temporary list CSP directives.
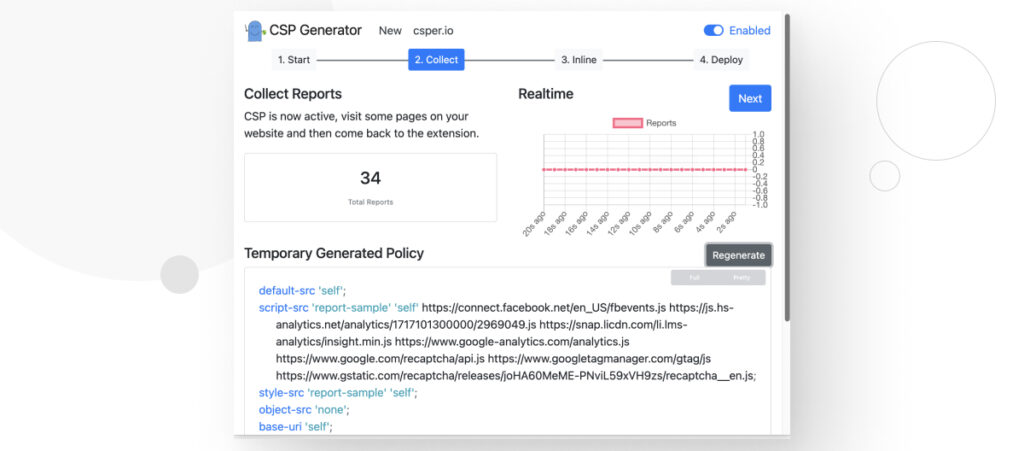
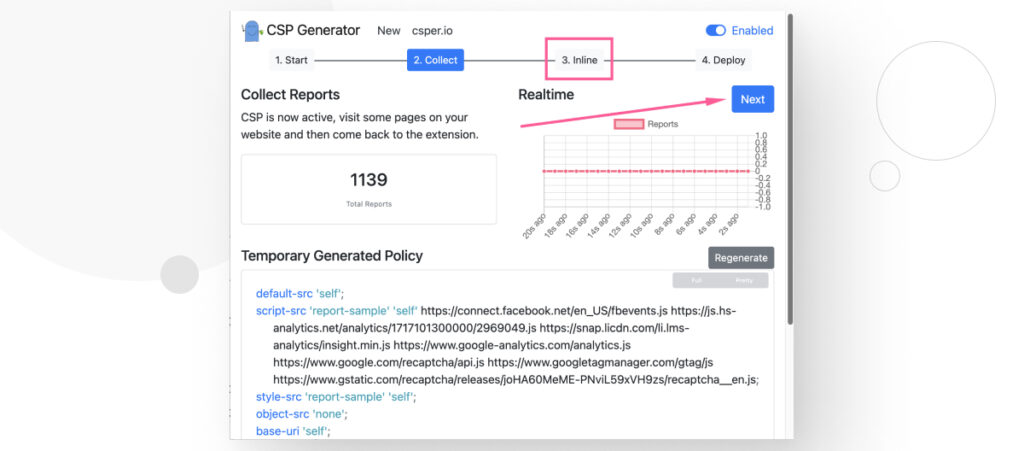
Step 2: Visit Multiple Pages
However, the extension can only generate directives for the content it sees. As a result, you should visit multiple pages on your site. It’s not necessary to press the Start Building Policy button again. Just browse your site.
After going through various pages, you may have more reports, and the Temporary Generated Policy may have more directives than before.
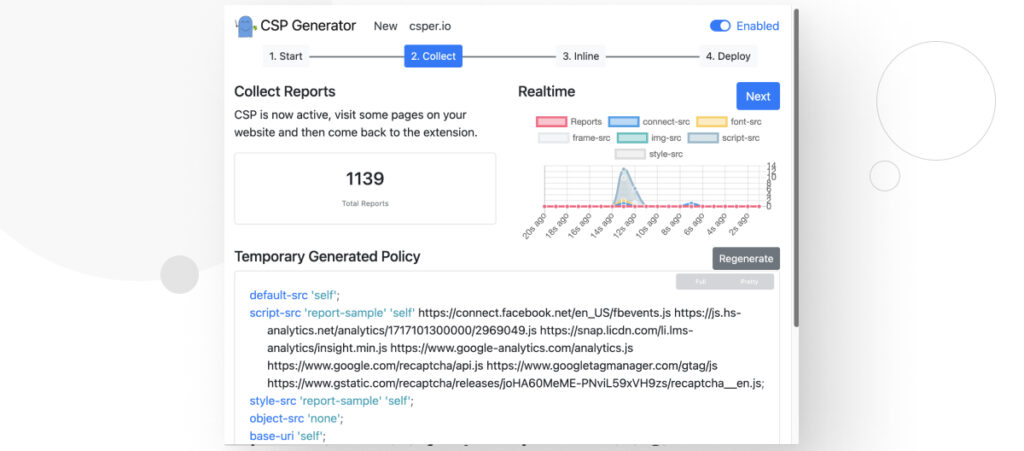
The more pages you visit, the more likely you are to encounter resources from various sources, making the automated policy more comprehensive and saving you time when modifying it during deployment.
Step 3: Check Inline Resources
Now click on Next or on 3. Inline.
This section will give you a list of inline resources that you need to move to their own files for security reasons.
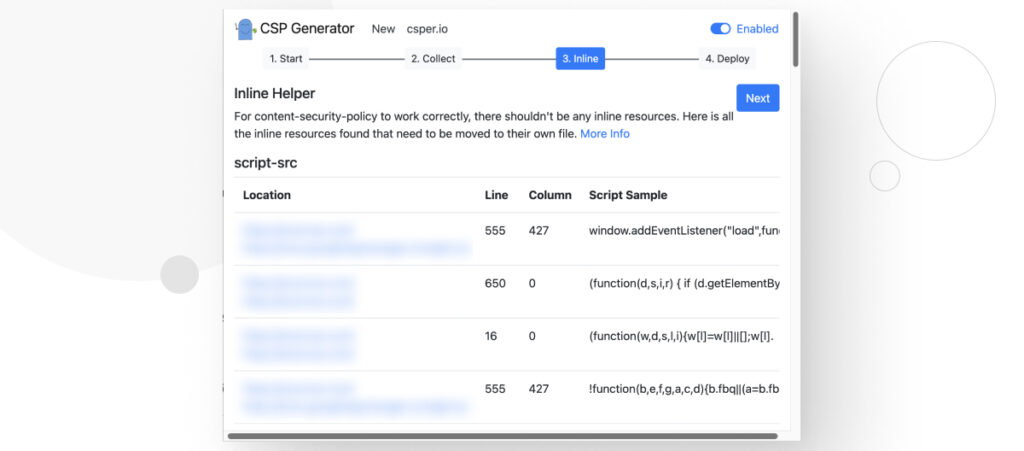
CSP blocks all inline resources because it’s impossible to determine whether an inline resource is intentional, unintentional, or malicious.
For this reason, CSP blocks everything, meaning that any inline resource you’ve added to your site will be blocked unless you move them to their own JavaScript/style files and make sure you have 'self' whitelisted on your policy.
Step 4: Deploy
Click on Next or 4. Deploy. You will see a text box with a list CSP directives you can paste into your .htaccess file or replicate through the HTTP Headers plugin.
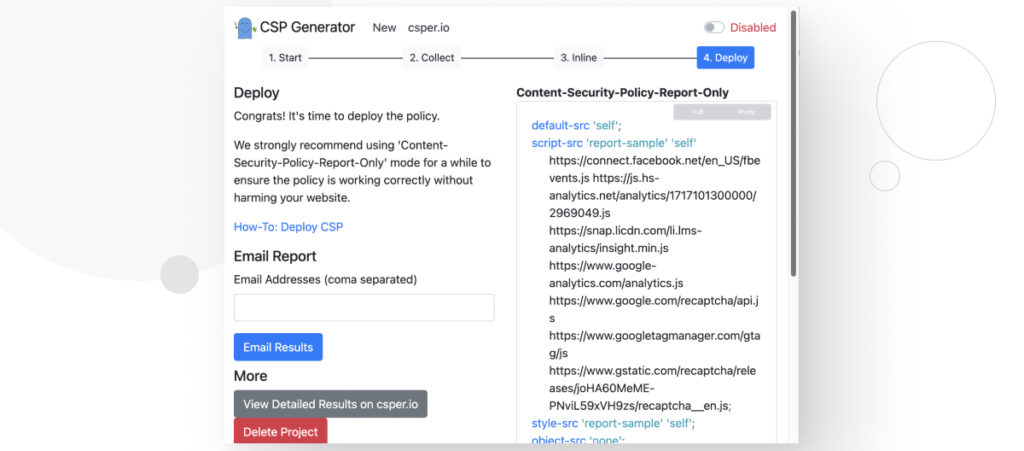
As the extension suggests, you should use “report-only” mode for a while to ensure the policy is working correctly without harming your website. After you’ve confirmed it’s not causing issues, deploy it.
To use report-only mode, all you have to do is use Content-Security-Policy-Report-Only instead of Content-Security-Policy when writing your policy on .htaccess file. Here’s an example:
<IfModule mod_headers.c>
Header set Content-Security-Policy-Report-Only default-src 'none'; script-src 'self'; connect-src 'self'; img-src 'self'; style-src 'self';
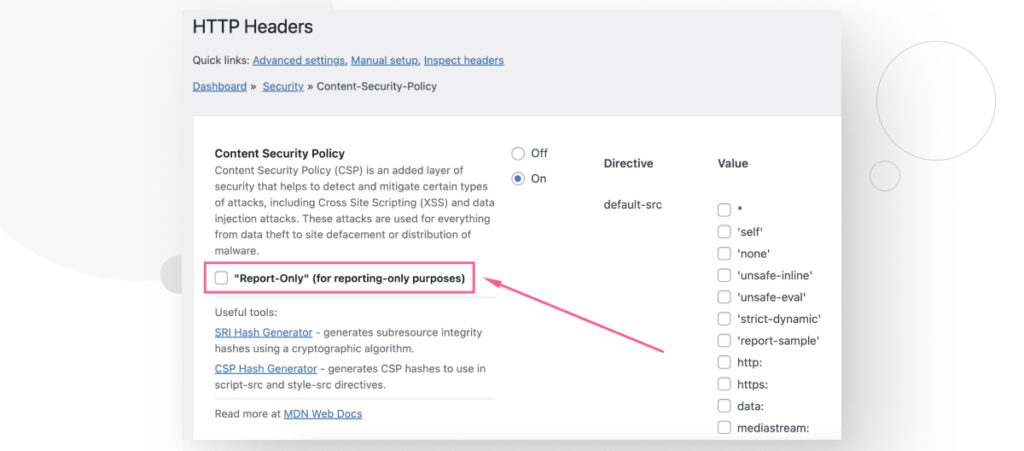
</IfModule>If you’re using the HTTP Headers plugin, go to Settings > HTTP Headers > Security and click Edit on the row corresponding to Content Security Policy.
When crafting your policy, click on the “Report-Only” (for reporting-only purposes) checkbox, then scroll down and click Save Changes.
Implement Content Security on Your WordPress Site
Content Security Policy is a guideline regulated by the World Wide Web Consortium (W3C) that prevents XSS and other security vulnerabilities. CSP allows you to control which resources are allowed to load on it, helping you filter the sources for your images, styles, scripts, and other content.
In WordPress, this is a crucial security measure because it is the world’s most popular CMS and therefore many bad actors seek to inject malicious code into WordPress sites. Additionally, themes and plugins are often the origin of security vulnerabilities, so clamping down your site’s sources of content is the best way to minimize or completely eliminate unauthorized resources.
Hopefully, this post helped you understand CSP and how to implement it on your WordPress site.
If you found this post useful, read our blog and resources for more insights and guides!
📬 Get WordPress updates to your inbox
Sign up for WC Blog updates and never miss a post!