- Blogs
- Paso a paso
- Cómo solucionar los errores “Timeout” de WordPress durante actualizaciones: 6 soluciones
Paso a paso / 13 min de lectura
Cómo solucionar los errores “Timeout” de WordPress durante actualizaciones: 6 soluciones

Si estás enfrentando errores de tiempo de espera en WordPress durante una actualización de tus plugins, temas o versión de WordPress, sabés lo frustrante que puede ser este problema. No podés actualizar tu software y tal vez ni siquiera entiendas de dónde viene el problema, por lo que no lo podés solucionar.
Este artículo será una guía para comprender qué es este problema y cómo solucionarlo.
Puntos Clave
- WordPress puede mostrar un error de tiempo de espera durante las actualizaciones debido a un límite de tiempo bajo de PHP, un límite de memoria bajo de WordPress, una mala conexión a internet, un servidor sobrecargado, o una falta de permisos adecuados para los archivos.
- Para resolver el problema, podés desactivar todos los plugins antes de reintentar la actualización o contactar a tu proveedor de hosting web.
- Adicionalmente, podés realizar arreglos manuales accediendo a los archivos principales de WordPress y aumentando el límite de tiempo de PHP o el límite de memoria de WordPress.
¿Qué Causa Que las Actualizaciones de WordPress Expiren?
Varios factores pueden hacer que tu sitio genere un error de tiempo de espera al actualizar tus plugins, temas o versiones de WordPress. Cuando sucede, es posible que veas un mensaje de error como el siguiente: Ha habido un error crítico en tu sitio web.
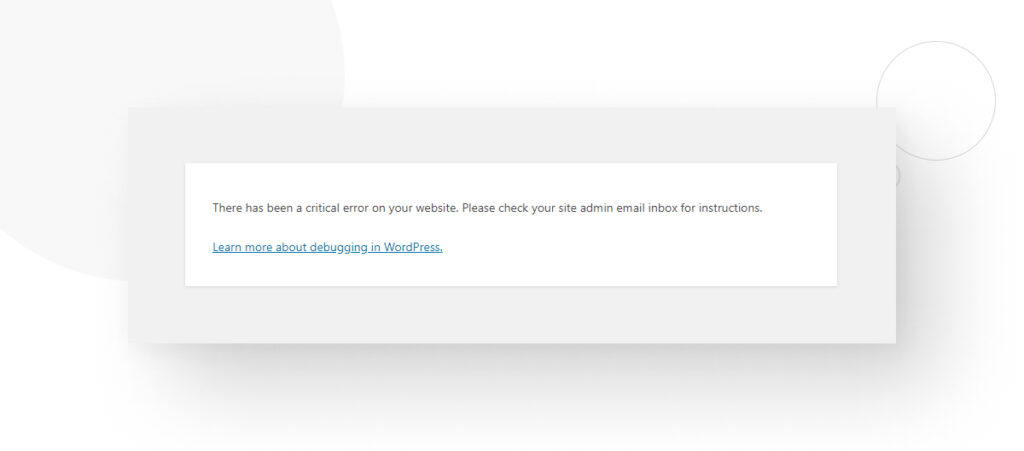
La razón más común por la que esto sucede es que tu sitio de WordPress no tiene un límite de tiempo de PHP lo suficientemente largo para realizar la actualización.
PHP es el lenguaje en el que WordPress está principalmente escrito, y el límite de tiempo es la cantidad de tiempo asignado para ejecutar un script antes de interrumpir el proceso. En la mayoría de los casos, el límite de tiempo predeterminado es de 30 segundos.
Si tu límite de tiempo de PHP predeterminado no es suficiente para ejecutar el script de actualización, es posible que veas el mensaje de error mencionado y la actualización fallará.
Otras Causas Comunes
Además del límite de tiempo de PHP, otros factores pueden resultar en un error de tiempo de espera durante la actualización, tales como:
- Límite de memoria. PHP también tiene un límite de memoria, que por defecto suele ser de 64 megabytes (MB) pero varía dependiendo de tu proveedor de hosting y plan. Si este límite es muy bajo, puede que no haya suficientes recursos para completar el proceso de actualización.
- Límites de recursos del servidor. Algunos entornos de hosting tienen límites estrictos en el uso de CPU, número de procesos y conexiones a bases de datos. Las actualizaciones que consumen muchos recursos pueden causar errores de tiempo de espera.
- Mala conexión a internet. Una conexión a internet lenta o inestable entre tu sitio de WordPress y el servidor puede interrumpir el proceso de actualización, conduciendo a errores de tiempo de espera.
- Archivos de actualización grandes. Si la actualización es lo suficientemente grande, puede provocar un tiempo de espera.
- Carga del servidor de bases de datos. Si el servidor de base de datos está bajo una carga pesada o no responde lo suficientemente rápido, es posible obtener un error de tiempo de espera porque las actualizaciones dependen de operaciones de base de datos.
- Falta de permisos. En casos raros, alguien puede haber editado los permisos de los usuarios, resultando en la imposibilidad de WordPress para actualizar los archivos necesarios y un error de tiempo de espera.
Con estas posibles causas en mente, avancemos a lo que podés hacer para evitar que WordPress genere un error de tiempo de espera durante las actualizaciones.
Importante: Hacé una Copia de Seguridad de Tu Sitio Antes de Arreglar Errores de Tiempo de WordPress Durante Actualizaciones
Es esencial crear copias de seguridad cada vez que estés a punto de realizar algún cambio significativo en tu sitio, como instalar temas, plugins, nuevas versiones de WordPress, o resolver errores como tiempos de espera durante actualizaciones.
Te proporciona un punto de control al que podés volver si algo sale mal, permitiéndote revertir consecuencias no deseadas e intentar nuevamente.
Hay varias maneras de crear copias de seguridad, pero usar plugins es uno de los métodos más fáciles. Nuestro equipo ha utilizado el plugin de copia de seguridad UpdraftPlus, y es muy confiable.
Leé nuestra guía de copias de seguridad para un paso a paso sobre cómo hacer una copia de seguridad de tu sitio de WordPress.
6 Métodos para Arreglar el Error de Tiempo de WordPress Durante Actualizaciones
Método #1: Desactivar Todos los Plugins y Tratar de Actualizar de Nuevo
El primer método es uno de los más simples, ya que solo tenés que desactivar todos los plugins antes de actualizar. Acá tenés la guía paso a paso.
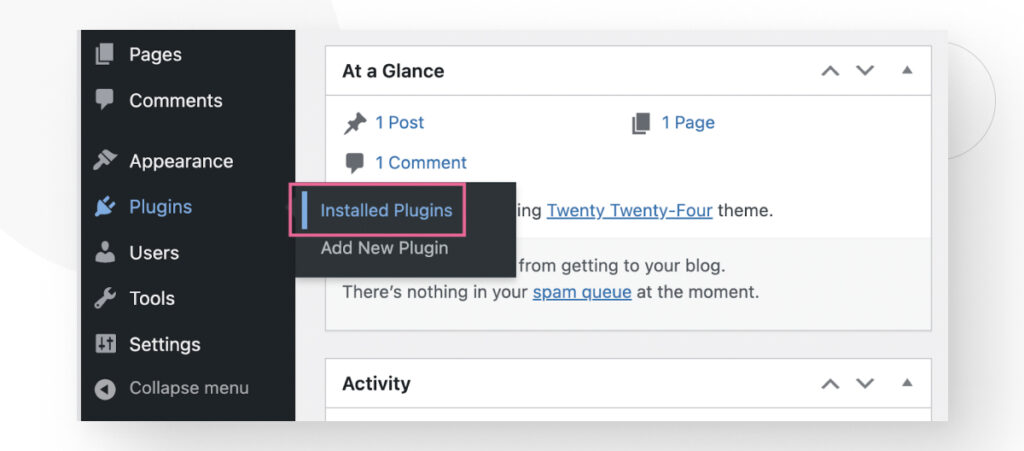
Desde el panel de administración, andá a Plugins > Plugins Instalados.
Hacé clic en la caja blanca vacía en la parte superior para seleccionar todos los plugins.
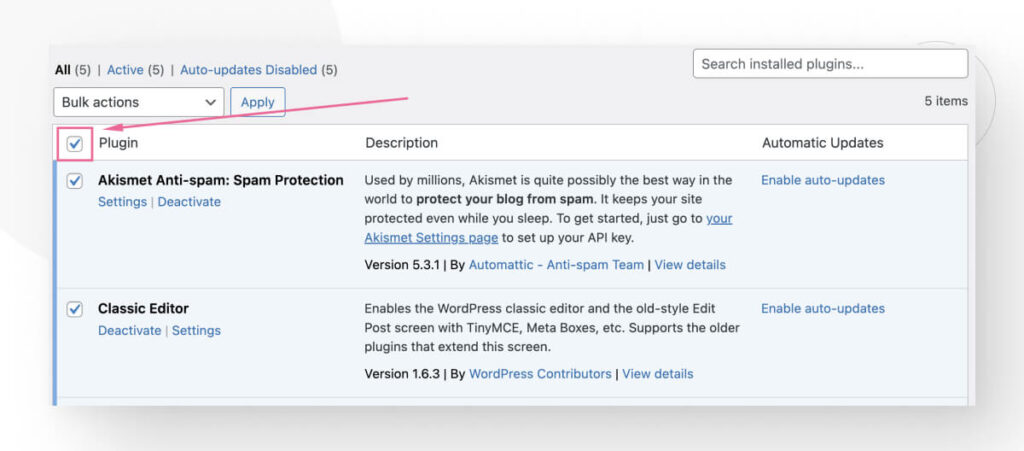
Si estás actualizando un plugin, desmarcá ese plugin específico.
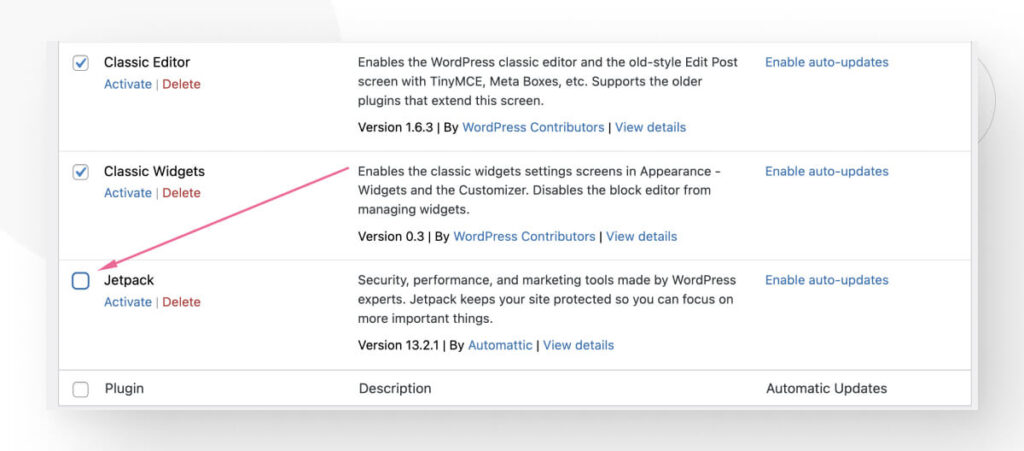
Ahora andá al menú Acciones masivas y seleccioná Desactivar.
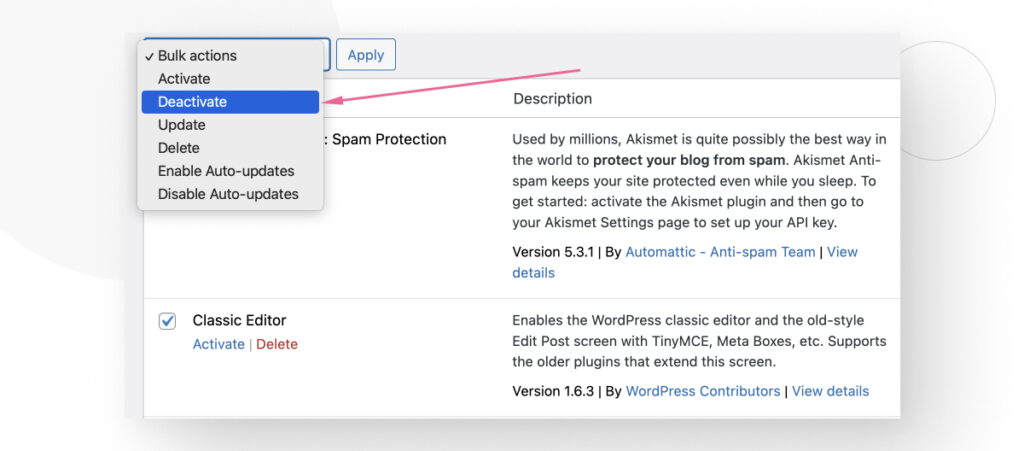
En este punto, todos los plugins excepto el que estás tratando de actualizar estarán desactivados.
Ahora podés volver al panel de administración y navegar a Escritorio > Actualizaciones para realizar la actualización, ya sea un tema, plugin o versión de WordPress.
Desactivar todos los plugins de WordPress antes de las actualizaciones puede ayudarte a evitar errores de tiempo de espera porque a veces uno de tus plugins puede ser incompatible con la actualización que estás realizando, interrumpiendo el proceso. Desactivar todos los plugins puede ayudarte a sortear la incompatibilidad.
Método #2: Contactar a Tu Proveedor de Hosting
Si probaste el primer método y no funcionó, lo mejor que podés hacer es contactar a tu proveedor de hosting web, especialmente si no tenés las habilidades técnicas para solucionar el problema por vos mismo. Es probable que tu proveedor sepa cuál es el problema y tome las medidas apropiadas para resolverlo.
Por ejemplo, el equipo de soporte técnico de tu proveedor puede aumentar el límite de tiempo para los scripts de PHP, detectar plugins incompatibles, o descubrir otro problema sobre el cual no tenés conocimiento.
Además de brindar ayuda a los propietarios de sitios que pueden no tener la experiencia técnica para resolver el problema, contactar a tu proveedor puede ser la única manera de resolver el problema en algunos casos.
Eso se debe a que algunos proveedores, especialmente si tenés un plan de hosting compartido, no permiten que los clientes realicen los cambios que solucionarían el problema. Debés contactar al soporte técnico, y ellos lo harán.
Método #3: Aumentar Manualmente el Límite de Tiempo de PHP
Si tenés algunas habilidades técnicas y querés intentarlo, la primera solución es aumentar el límite de tiempo de PHP, ya que es la causa más común de errores de tiempo de espera durante las actualizaciones.
Estas son 3 maneras de editar manualmente el límite de tiempo de PHP para ejecutar scripts. Todas tienen el mismo efecto, por lo que es cuestión de cuál te resulta más cómodo usar.
Editar el Archivo .htaccess
Editar el archivo .htaccess es probablemente el método más fácil para aumentar manualmente los límites de tiempo de PHP porque muchos plugins de SEO te permiten acceder y modificarlo rápidamente.
En este caso, usaremos Yoast SEO porque es el plugin de SEO más popular, y es probable que ya lo tengas. Después de instalar y activar Yoast SEO, andá a Yoast > Herramientas desde el panel de control.
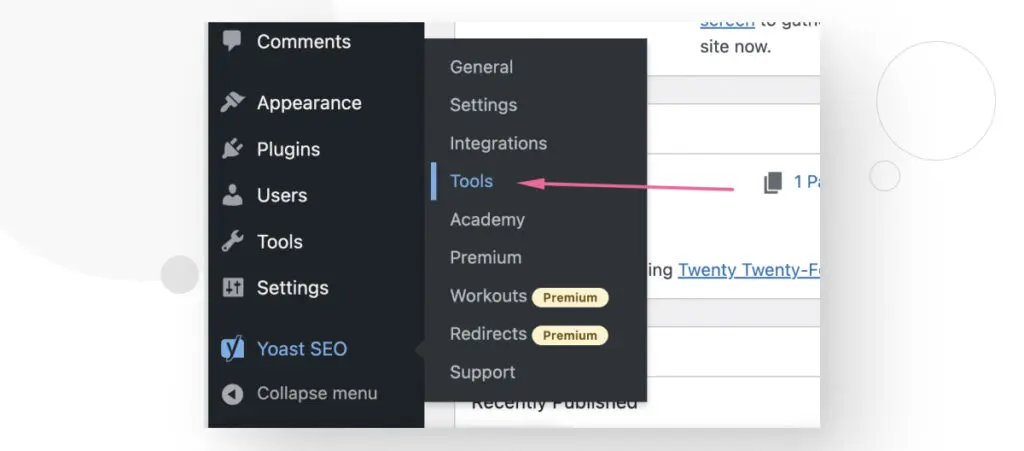
En la pantalla de Herramientas, desplazate hacia abajo hasta que veas el enlace Editor de Archivos y hacé clic en él.
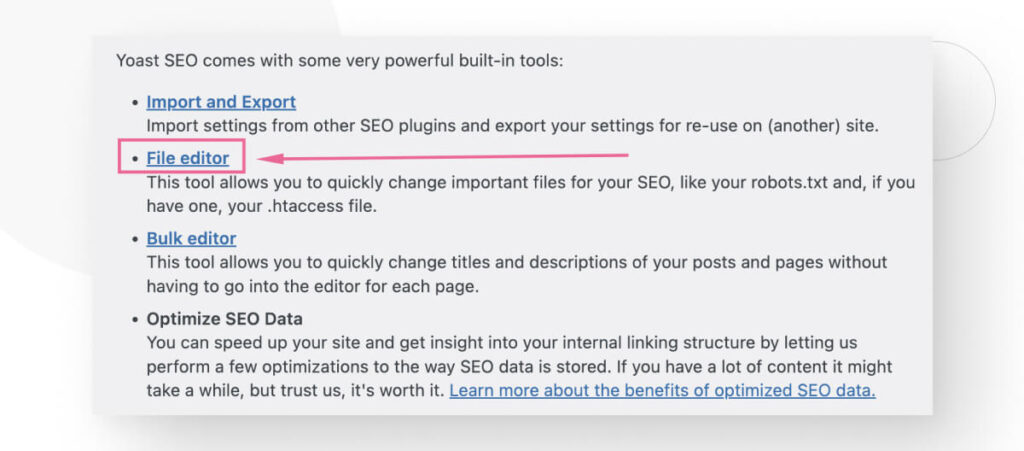
Ahora desplazate hacia abajo hasta que veas un cuadro de texto etiquetado como archivo .htaccess.
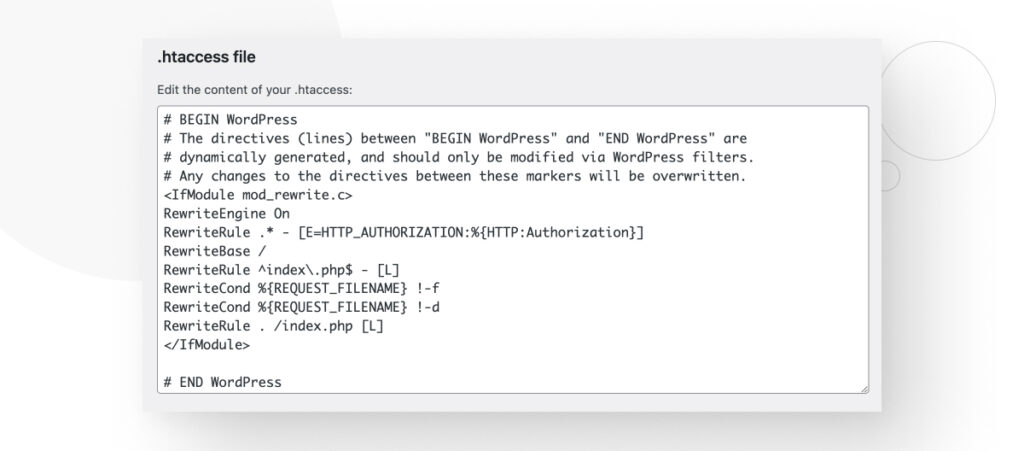
Todo lo que tenés que hacer para aumentar el límite de tiempo de PHP es agregar la línea max_execution 300 debajo de </IfModule>. Después de tu edición, el final del archivo debería lucir algo así:
</IfModule>

max_execution 300

#END WordPress
Ahora el límite de tiempo de PHP es de 300 segundos en lugar de 30 segundos.
Si no usás Yoast SEO, recordá que otros plugins de SEO también te permiten editar el archivo .htaccess.
Editar el Archivo wp-config.php
Una alternativa al método .htaccess es aumentar el tiempo de espera de PHP editando el wp-config.php en su lugar.
Para acceder y editar archivos principales como wp-config.php, deberás conectarte a tu sitio utilizando un cliente FTP como FileZilla, explorar los archivos de tu sitio con un panel de control de hosting web como cPanel, o navegar a través del administrador de archivos de Windows/Mac/Linux si tenés una instalación local.
Usaremos cPanel en este ejemplo, pero el proceso es el mismo para todos los métodos.
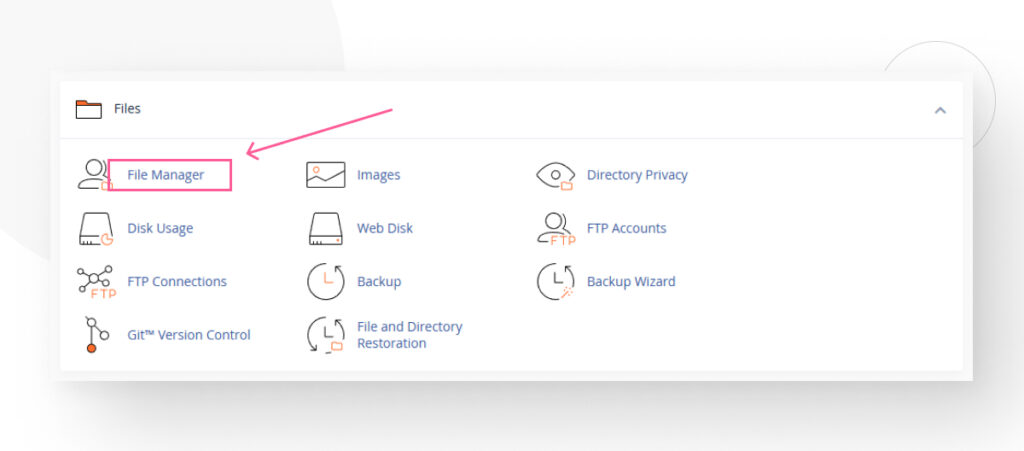
Iniciá sesión en tu cuenta de cPanel. Desde el panel principal, andá a la sección Archivos y hacé clic en Administrador de Archivos.
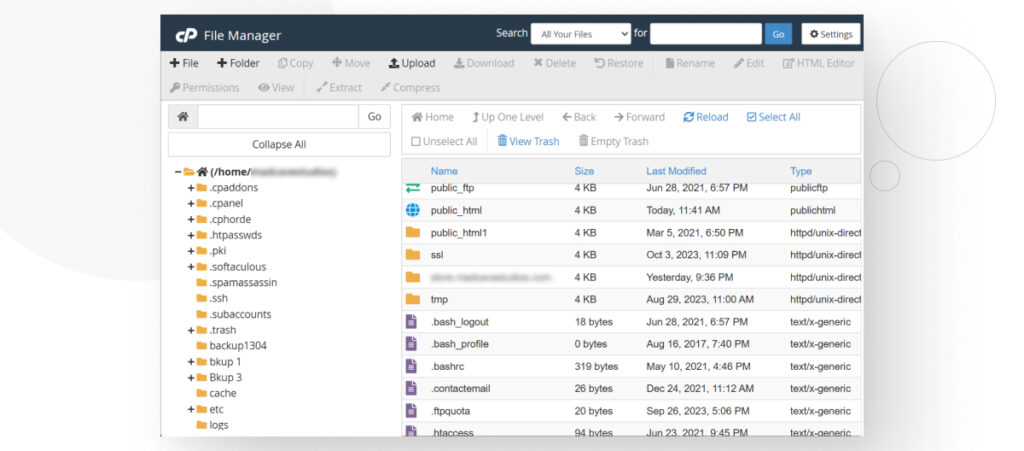
En la pantalla siguiente, andá al directorio public_html. En algunos casos, puede tener un nombre diferente, como / o root, public, root_html, o el nombre de tu sitio web.
public_html contiene el directorio raíz de WordPress con las tres carpetas principales (wp-admin, wp-content, y wp-includes) y el resto de los archivos principales.
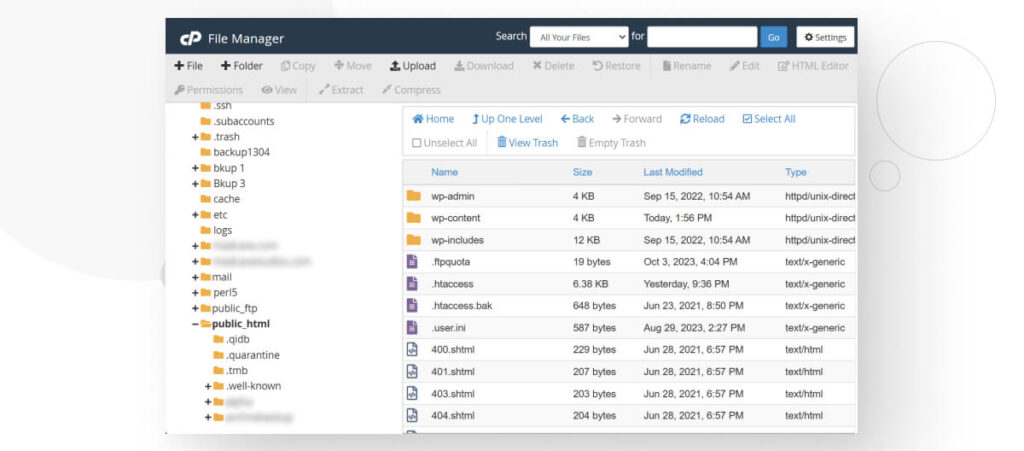
Entre los otros archivos, encontrarás wp-config.php. Hacé clic derecho en el archivo y seleccioná Ver/Editar. El archivo se abrirá y verás código PHP.
Al igual que en el método anterior, todo lo que tenés que hacer es agregar una línea de código en la parte inferior del archivo:
set_time_limit(300);Esta línea de código incrementa el límite de tiempo de PHP a 300 segundos.
Editar el Archivo php.ini
Finalmente, podés editar el archivo php.ini para obtener los mismos resultados.
Para acceder al archivo php.ini, primero iniciá sesión en tu cuenta de cPanel. Desde el panel principal, andá a la sección Archivos y hacé clic en Administrador de Archivos.

En la pantalla siguiente, no vayas al directorio public_html como lo hicimos antes. El archivo php.ini estará fuera de public_html junto a varios otros archivos.

Hacé clic derecho en el archivo y seleccioná Ver/Editar. Agregá la siguiente línea en la parte inferior del archivo:
max_execution_time 300;Una vez más, esto aumenta el límite de tiempo de PHP a 300 segundos.
Método #4: Aumentar el Límite de Memoria de WordPress
Como mencionamos, tu sitio puede agotar el tiempo durante las actualizaciones si WordPress no tiene suficiente memoria asignada para tales procesos. Algunas actualizaciones pueden ser intensivas en recursos, y podés necesitar más memoria que la memoria predeterminada para ejecutarlas con éxito.
Aumentar el límite de memoria es similar a aumentar manualmente el límite de tiempo de PHP, ya que todo lo que tenés que hacer es agregar o modificar una línea.
Para hacerlo, utilizá cPanel, FileZilla, o tu administrador de archivos local para navegar a la carpeta principal de WordPress (la que contiene las carpetas wp-admin, wp-content, y wp-includes), hacé clic derecho en wp-config.php y seleccioná Ver/Editar.
Una vez dentro del archivo, usá CTRL + F o CMD + F para buscar WP_MEMORY_LIMIT. Si lo encontrás, se verá así:
define('WP_MEMORY_LIMIT', '64M');Simplemente cambiate 64M por 128M o 256M para aumentar tu límite de memoria PHP. 128M debería ser suficiente para la mayoría de los sitios y 256M debería ser suficiente para los sitios que ejecutan plugins que consumen muchos recursos.
Si no podés encontrar la línea, simplemente tenés que copiarla y pegarla. Debes insertarla por encima de la línea que dice /* Eso es todo, ¡deja de editar! ¡Feliz publicación! */, que está cerca del final del archivo. Debería verse así:
define('WP_MEMORY_LIMIT', '256M');

/* Eso es todo, ¡deja de editar! ¡Feliz publicación! */
Un límite de memoria PHP bajo es un problema común en proveedores de hosting relativamente baratos porque a menudo ofrecen recursos limitados. Si aumentar el límite de memoria a través del archivo wp-config.php no funciona, contactá a tu proveedor de hosting e informales de la situación.
Método #5: Modificar los Permisos de Archivos
Este es un problema menos común, pero si tu sitio tiene múltiples administradores con acceso al backend, uno de los usuarios puede haber modificado los permisos de archivo de tal manera que WordPress no puede editar los archivos necesarios.
Esto puede suceder porque las carpetas que contienen los archivos que WordPress necesita editar para realizar la actualización están en modo solo lectura, lo que significa que nadie puede editarlas, solo ver su contenido.
Para modificar los permisos de archivos, deberás acceder a tu sitio a través de FileZilla o cPanel.
Si usás cPanel, iniciá sesión en tu cuenta de cPanel, andá a la sección Archivos y hacé clic en Administrador de Archivos desde el panel principal. Navegá a la carpeta public_html, hacé clic derecho en la carpeta wp-content y luego seleccioná Cambiar Permisos.
Cambiá los permisos de la carpeta para que se vean así:
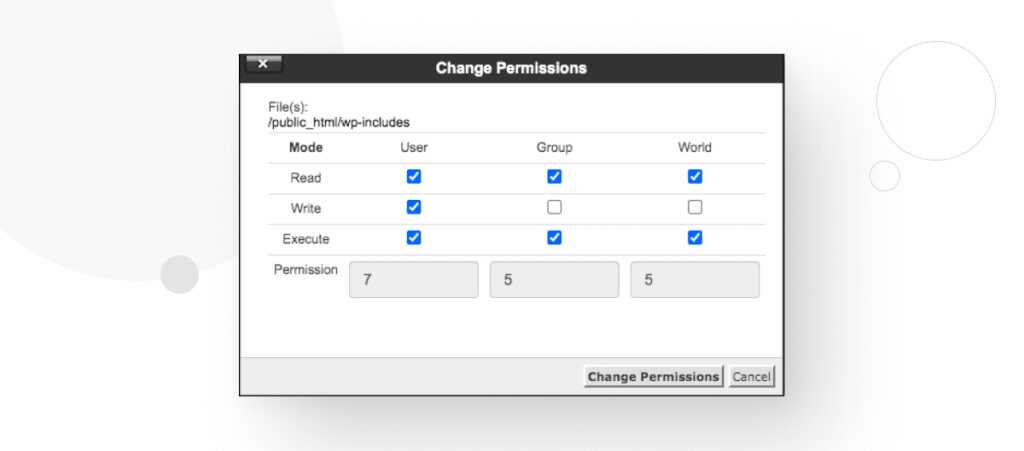
Podés marcar casillas específicas individualmente o escribir 755 abajo. Ambas funcionan y el resultado es que ahora tu usuario tendrá permiso para modificar los archivos en la carpeta wp-content (la carpeta que contiene plugins y temas) durante el proceso de actualización.
No necesariamente necesitás saber qué significan estos números, pero los permisos de archivo determinan quién puede ver, modificar y ejecutar archivos de WordPress. Además, estos permisos se aplican a los administradores del sitio, grupos de usuarios y el resto del mundo.
Los permisos de archivo varían dependiendo de la carpeta, con algunas carpetas teniendo permisos más o menos restrictivos que otras. Para obtener más información sobre los permisos de archivo en WordPress, leé la guía oficial de WordPress.
Método #6: Mejorar Tu Plan de Hosting
Si todo lo demás falla, puede que simplemente hayas alcanzado los límites de los recursos de tu plan de hosting y sea hora de mejorarlo para obtener más poder de procesamiento, memoria, límites de tráfico, etc. Probá múltiples soluciones antes de esto, ya que no querés gastar más dinero en hosting a menos que lo necesites.
Arreglar Errores de Tiempo de WordPress Durante Actualizaciones
Los errores de tiempo de WordPress durante las actualizaciones pueden ser muy frustrantes porque hay múltiples causas posibles, así que tenés que ir una solución a la vez o contactar a tu proveedor de hosting. Como primera opción, recomendamos desactivar todos los plugins y tratar de actualizar de nuevo.
Si eso no funciona, intentá un arreglo manual aumentando el límite de tiempo de PHP o el límite de memoria de WordPress o modificando los permisos de los archivos. Alternativamente, podrías simplemente pedirle a tu proveedor de hosting que resuelva el problema por vos.
Si encontraste útil este post, leé nuestro blog para obtener más conocimientos y guías sobre WordPress!
Artículos relacionados
Paso a paso / 11 min de lectura
Paso a paso / 11 min de lectura
¿Qué hacer si al actualizar a PHP 8.1 se rompe tu sitio WordPress?
PHP es el lenguaje de programación en el cual está principalmente escrito WordPress. Se ejecuta en el servidor web que hospeda tu sitio, y al actualizarlo regularmente, mejora el rendimiento…
Leer más
Paso a paso / 8 min de lectura
Paso a paso / 8 min de lectura
¿Cómo limpiar tu carpeta de subidas de WordPress?
La carpeta de Subidas de WordPress se encuentra en wp-content y contiene todos los archivos multimedia, como imágenes, videos y documentos, que subís a través de la Biblioteca de Medios…
Leer más
Paso a paso / 11 min de lectura
Paso a paso / 11 min de lectura
Cómo solucionar el error “Falló la verificación de cookies” en WordPress
El error “cookie check failed” es un mensaje que aparece en algunos sitios de WordPress, impidiendo que los usuarios accedan a parte o todo el contenido y que los administradores…
Leer más
Paso a paso / 5 min de lectura
Paso a paso / 5 min de lectura
Cómo eliminar los posts que vienen por defecto en WordPress
Si recién empezaste un nuevo sitio de WordPress, es probable que te hayas encontrado con publicaciones y páginas de ejemplo como "¡Hola, Mundo!" y "Página de Muestra". Al personalizar tu…
Leer más
Troubleshooting / 13 min de lectura
Troubleshooting / 13 min de lectura
WordPress no se Muestra Correctamente en Móviles: 5 Soluciones
A veces, tu sitio de WordPress no se muestra correctamente en dispositivos móviles a pesar de funcionar bien en el escritorio. Esto puede ser frustrante y difícil de solucionar porque…
Leer más