How to Fix WordPress Timeout Errors During Updates: 6 Solutions
If you’re facing WordPress timeout errors during an update for your plugins, themes, or WordPress version, you know how frustrating this problem can be. You can’t update your software and may not even understand where the issue comes from, so you can’t fix it.
This article will be a guide to what this problem is and how to fix it.
Key Takeaways
- WordPress may throw a timeout error during updates because of a low PHP time limit, a low WordPress memory limit, a poor internet connection, an overloaded server, or a lack of proper file permissions.
- To solve the problem, you can deactivate all plugins before retrying the update or contact your web hosting provider.
- Additionally, you can perform manual fixes by accessing WordPress core files and increasing the PHP time limit of the WordPress memory limit.
What Causes WordPress Updates to Timeout?
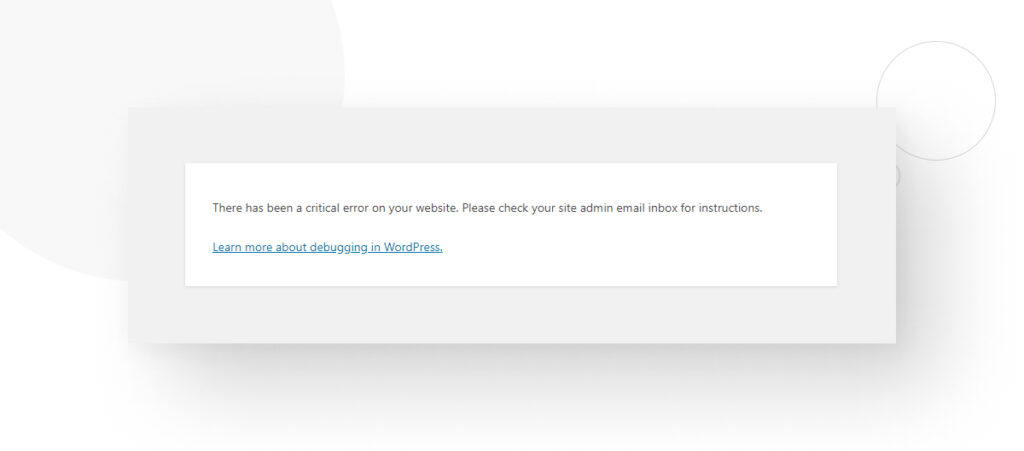
Several factors may cause your site to throw a timeout error while updating your plugins, themes, or WordPress versions. When it happens, you may see an error message like the following: There has been a critical error on your website.
The most common reason this happens is that your WordPress site doesn’t have a long enough PHP time limit to perform the update.
PHP is the language WordPress is primarily written in, and the time limit is the amount of time allocated to run a script before interrupting the process. In most cases, the default time limit is 30 seconds.
If your default PHP time limit isn’t enough to run the update script, you may see the error message above, and the update will fail.
Other Common Causes
In addition to the PHP time limit, other factors may result in a timeout error when updating, such as:
- Memory limit. PHP also has a memory limit, which by default is usually 64 megabytes (MB) but varies depending on your web host and plan. If this limit is too low, there may not be enough resources to complete the update process.
- Server resource limits. Some hosting environments have strict limits on CPU usage, number of processes, and database connections. Resource-intensive updates can cause timeout errors.
- Poor internet connection. A slow or unstable internet connection between your WordPress site and the server can disrupt the update process, leading to timeout errors.
- Large update files. If the update is large enough, it may result in a timeout.
- Database server load. If the database server is under heavy load or not responding quickly enough, you may get a timeout because updates rely on database operations.
- Lack of permissions. In rare cases, someone may have edited user permissions, resulting in WordPress’s inability to update the necessary files and a timeout error.
With these potential causes in mind, let’s move on to what you can do to stop WordPress from throwing a timeout error during updates.
Important: Back Up Your Site Before Fixing WordPress Timeout Errors During Updates
It’s essential to create backups whenever you’re about to make any significant change to your site, such as installing themes, plugins, or new WordPress versions, or troubleshooting errors like timeouts during updates.
It gives you a checkpoint you can return to if anything goes wrong, allowing you to reverse unintended consequences and try again.
There are several ways to create backups, but using plugins is one of the easiest methods. Our team has used the backup plugin UpdraftPlus, and it’s very reliable.
Read our backup guide for a step-by-step on how to back up your WordPress site.
6 Methods to Fix the WordPress Timeout Error During Updates
Method #1: Deactivate All Plugins and Try to Update Again
The first method is one of the simplest, as all you have to do is deactivate all plugins before updating. Here’s the step-by-step guide.
From the admin dashboard, go to Plugins > Installed Plugins.

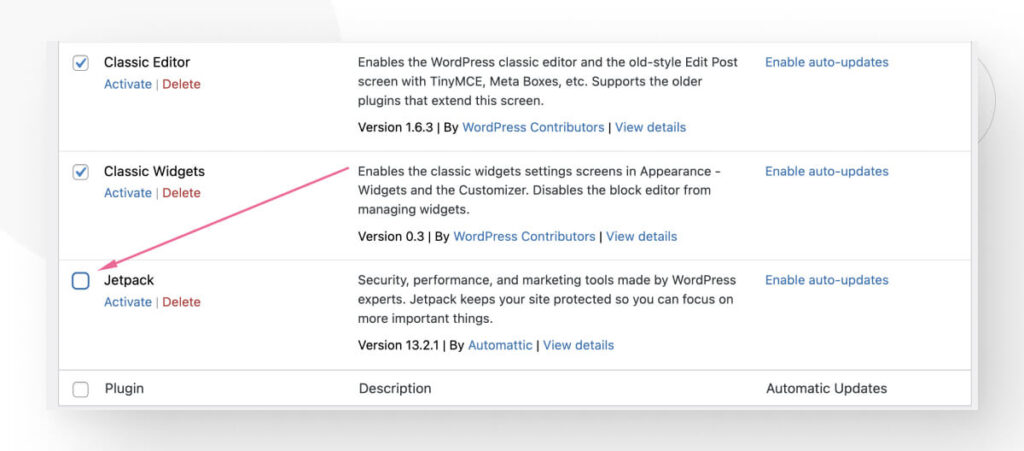
Click on the empty white box at the top to select all plugins.
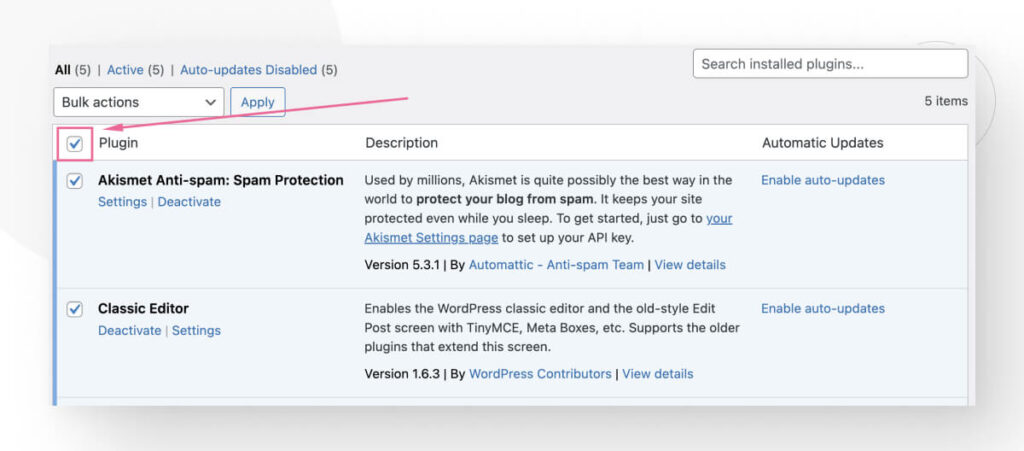
If you’re updating a plugin, uncheck that specific plugin.
Now go to the Bulk actions menu and select Deactivate.
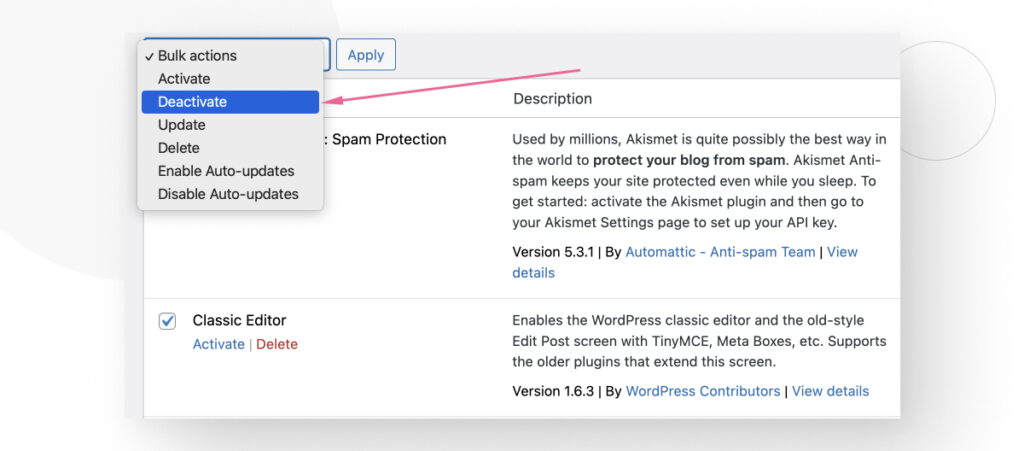
At this point, all plugins except the plugin you’re trying to update will be deactivated.
Now, you can go back to the admin dashboard and navigate to Dashboard > Updates to perform the update, whether it is a theme, plugin, or WordPress version.
Deactivating all WordPress plugins before updates can help you avoid timeout errors because sometimes one of your plugins may be incompatible with the update you’re performing, crashing the process. Deactivating all plugins may help you bypass the incompatibility.
Method #2: Contact Your Web Hosting
If you tried the first method and it didn’t work, the next best thing to do is contact your web hosting provider, especially if you don’t have the technical skills to troubleshoot the issue on your own. Your provider will likely know what the problem is and take the appropriate steps to solve it.
For example, your provider’s tech support team may increase the timeout limit for PHP scripts, spot incompatible plugins, or discover another problem you don’t know about.
In addition to providing help for site owners who may not have the technical expertise to solve the problem, contacting your provider may be the only way to solve the problem in some cases.
That’s because some providers, especially if you have a shared hosting plan, do not allow clients to make the changes that would solve the issue. You must contact tech support, and they’ll do it.
Method #3: Increase the PHP Timeout Limit Manually
If you have some technical skills and want to give it a go yourself, the first solution to try is increasing the PHP timeout limit since it’s the most common cause of timeout errors during updates.
These are the 3 ways to manually edit the PHP time limit for executing scripts. They all have the same effect so it’s a matter of which one you feel the most comfortable using.
Edit the.htaccess File
Editing the .htaccess file is probably the easiest method for manually increasing PHP time limits because many SEO plugins allow you to quickly access and modify it.
In this case, we’ll use Yoast SEO because it’s the most popular SEO plugin, and you may already have it. After installing and activating Yoast SEO, go to Yoast > Tools from the dashboard.
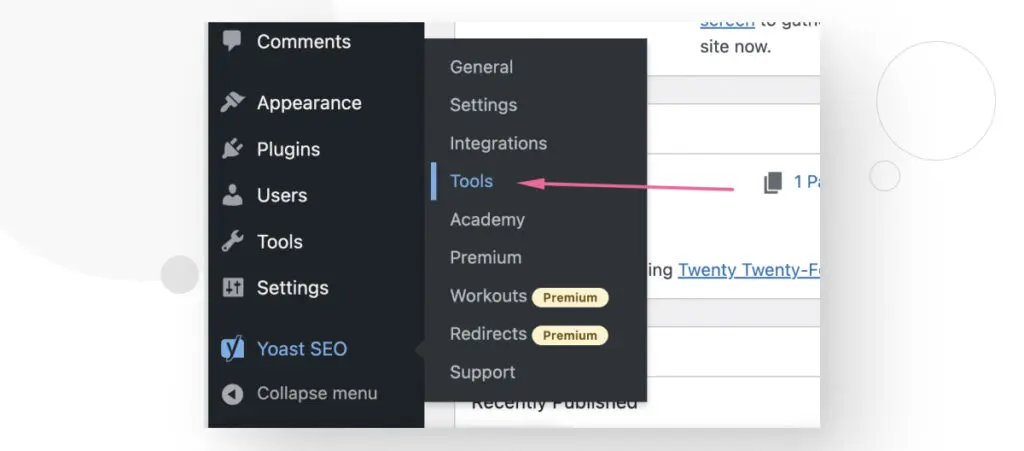
On the Tools screen, scroll down until you see the File Editor link and click on it.

Now scroll down until you see a text box labeled .htaccess file.
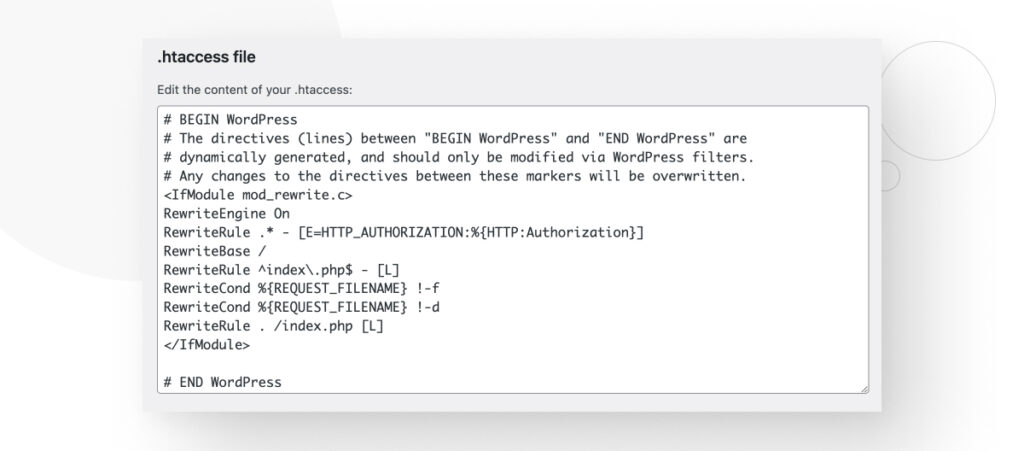
All you have to do to increase the PHP time limit is add the line max_execution 300 below </IfModule>. After your edit, the bottom of the file should look something like this:
</IfModule>

max_execution 300

#END WordPress
Now the PHP time limit is 300 seconds instead of 30 seconds.
If you don’t use Yoast SEO, remember that other SEO plugins also allow you to edit the .htaccess file.
Edit the wp-config.php File
An alternative to the .htaccess method is to increase the PHP timeout limit by editing the wp-config.php instead.
To access and edit core files like wp-config.php, you’ll have to connect to your site using an FTP client like FileZilla, explore your site’s files with a web hosting control panel like cPanel, or browse through your Windows/Mac/Linux file manager if you have a local installation.
We’ll use cPanel in this example, but the process is the same for all methods.
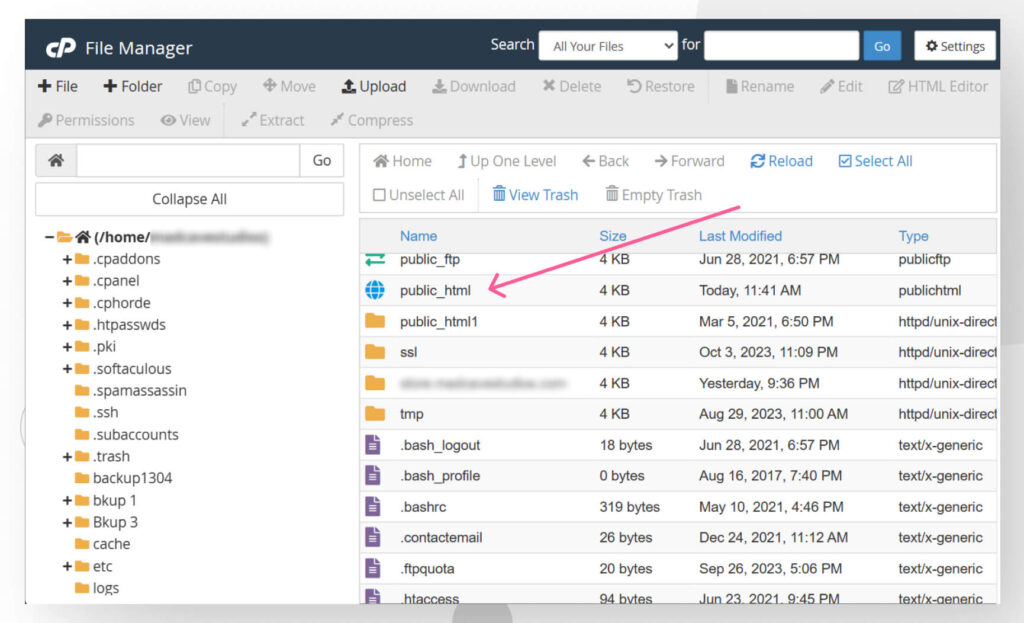
Log in to your cPanel account. From the main dashboard, go to the Files section and click File Manager.

On the following screen, go to the public_html directory. In some cases, it may have a different name, such as / or root, public, root_html, or your website’s name.

public_html contains the root WordPress directory with the three main folders (wp-admin, wp-content, and wp-includes) and the rest of the core files.
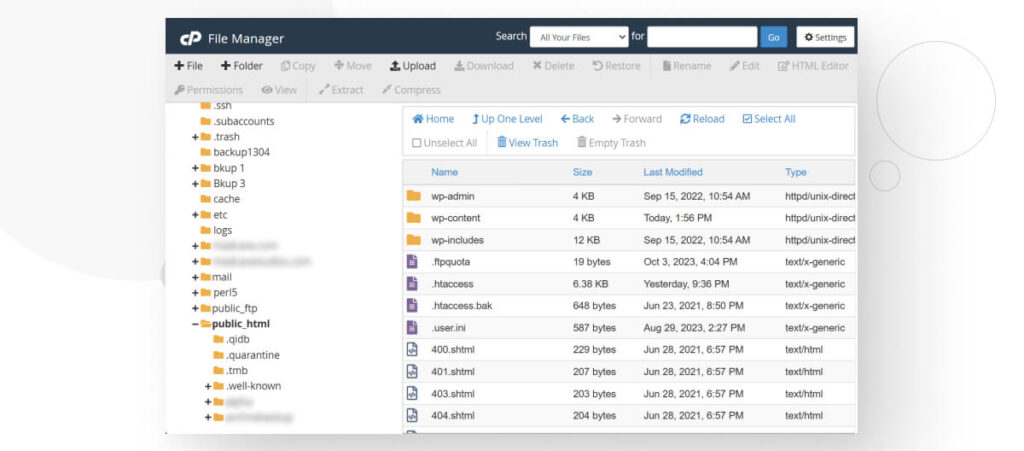
Among the other files, you will find wp-config.php. Right-click the file and select View/Edit. The file will open, and you will see PHP code.
Like in the previous method, all you have to do is add one line of code at the bottom of the file:
set_time_limit(300);This line of code increases the PHP time limit to 300 seconds.
Edit the php.ini File
Finally, you can edit the php.ini file to get the same results.
To access the php.ini file, first log in to your cPanel account. From the main dashboard, go to the Files section and click File Manager.
On the following screen, do not go to the public_html directory like we did before. The php.ini file will be outside public_html along with several other files.
Right-click the file and select View/Edit. Add the following line at the bottom of the file:
max_execution_time 300;Once again, this increases the PHP time limit to 300 seconds.
Method #4: Increase the WordPress Memory Limit
As we mentioned, your site may time out during updates if WordPress doesn’t have enough memory allocated for such processes. Some updates can be resource-intensive, and you may need more memory than the default memory to run them successfully.
Increasing the memory limit is similar to manually increasing the PHP time limit, as all you have to do is add or modify a line.
To do so, use cPanel, FileZilla, or your local file manager to navigate to the WordPress core folder (the one with the wp-admin, wp-content, and wp-includes folders), right-click wp-config.php, and select View/Edit.
Once inside the file, use CTRL + F or CMD + F to search for WP_MEMORY_LIMIT. If you find it, it’ll look like this:
define('WP_MEMORY_LIMIT', '64M');Simply change 64M to 128M or 256M to increase your PHP memory limit. 128M should be enough for most sites and 256M should be enough for sites that run resource-intensive plugins.
If you can’t find the line, you’ll simply have to copy and paste it. You must insert it above the line that says /* That's all, stop editing! Happy publishing. */, which is near the end of the file. It should look like this:
define('WP_MEMORY_LIMIT', '256M');

/* That's all, stop editing! Happy publishing. */
A low PHP memory limit is a common problem in relatively cheap hosting providers because they often offer limited resources. If increasing the memory limit via the wp-config.php file doesn’t work, contact your web host and inform them of the situation.
Method #5: Modify File Permissions
This is a less common problem, but if your site has multiple admins with backend access, one of the users may have modified the file permissions in such a way that WordPress can’t edit the necessary files.
This may happen because the folders containing the files WordPress needs to edit to perform the update are read-only, meaning that no one can edit them but only view their contents.
To modify file permissions, you must access your site via FileZilla or cPanel.
If you use cPanel, log in to your cPanel account, go to the Files section, and click File Manager From the main dashboard. Navigate to the public_html folder, right-click the wp-content folder, and then select Change Permissions.
Change the folder’s permissions to look like this:
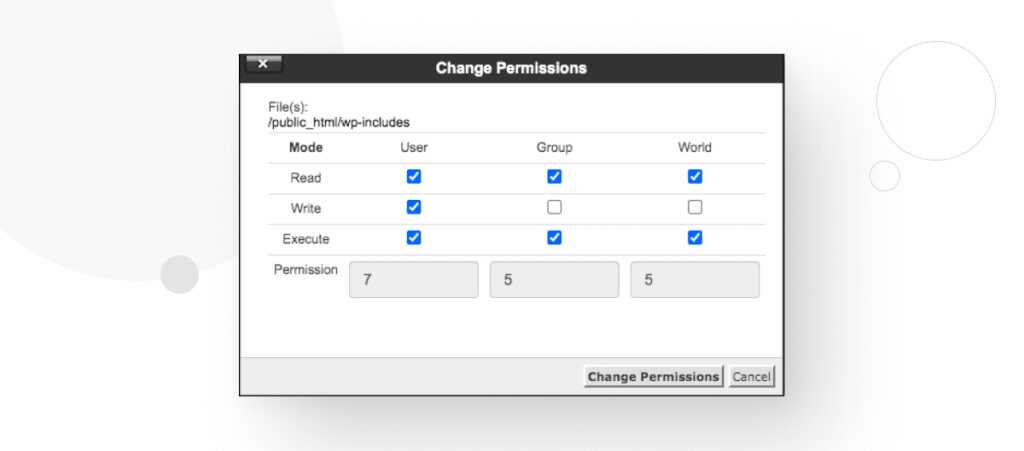
You can check specific boxes individually or type 755 below. Both work and the result is that now your user will have permission to modify the files in the wp-content folder (the folder containing plugins and themes) during the update process.
You don’t necessarily need to know what these numbers mean, but file permissions determine who can view, modify, and execute WordPress files. Additionally, these permissions apply to site admins, groups of users, and the rest of the world.
File permissions vary depending on the folder, with some folders having more or less restrictive permissions than others. To learn more about file permissions in WordPress, read WordPress’s official guide.
Method #6: Upgrade Your Hosting Plan
If all else fails, it may just be that you’ve reached the limits of your hosting plan’s resources and it’s time to upgrade it for more processing power, memory, traffic caps, etc. Try multiple solutions before this, though, as you don’t want to spend more money on hosting unless you need to.
Fix WordPress Timeout Errors During Updates
WordPress timeout errors during updates can be very frustrating because there are multiple possible causes, so you have to either go one solution at a time or contact your hosting provider. As a first option, we recommend deactivating all plugins and trying to update again.
If that doesn’t work, try a manual fix by increasing the PHP time limit or WordPress memory limit or modifying file permissions. Alternatively, you could simply ask your hosting provider to resolve the issue for you.
If you found this post useful, read our blog for more WordPress insights and guides!
📬 Get WordPress updates to your inbox
Sign up for WC Blog updates and never miss a post!