- Blogs
- Paso a paso
- Cómo gestionar las etiquetas Noindex en WordPress con Yoast SEO
Paso a paso / 7 min de lectura
Cómo gestionar las etiquetas Noindex en WordPress con Yoast SEO

Gestionar las etiquetas noindex en WordPress es uno de los ajustes de SEO más comunes que realizan los administradores, propietarios y desarrolladores. Si bien es posible editar el HTML de tu sitio para agregar la etiqueta noindex, esto lleva más tiempo y es más propenso a errores humanos.
Por eso, te recomendamos usar Yoast SEO, el plugin de SEO más popular, para agregar o eliminar etiquetas noindex. Es más rápido, sencillo y menos propenso a errores.
En este artículo, te guiaremos sobre cómo utilizar Yoast SEO para gestionar etiquetas noindex en varios tipos de contenido de WordPress, incluidos posts, páginas, entradas personalizadas, categorías y más.
Puntos Clave
- Con Yoast SEO, podes gestionar rápida y fácilmente las etiquetas noindex en WordPress sin necesidad de programar.
- Podes manejar las etiquetas noindex para cada tipo de contenido en WordPress utilizando Yoast SEO.
¿Qué es la Etiqueta noindex?
noindex es una etiqueta HTML que indica a los robots de los motores de búsqueda (“crawlers”) que no indexen una página web específica, evitando que aparezca en los resultados de búsqueda.
La etiqueta noindex está relacionada con las tres funciones principales que realizan los motores de búsqueda como Google y Bing: rastreo, indexación y clasificación.
- Rastreo es explorar la internet recorriendo el código y el contenido de cada URL que los crawlers de los motores de búsqueda pueden encontrar. Un “crawler” o “araña web” es el software que usan los motores de búsqueda para rastrear páginas.
- Indexación es almacenar y organizar el contenido explorado durante el proceso de rastreo.
- Clasificación es proporcionar el contenido más relevante para la consulta del buscador. Lo que ves en los resultados de búsqueda es lo que el motor de búsqueda clasificó de más a menos relevante para tu consulta.
Cuando un crawler indexa una página web (agregándola al índice, una base de datos extensa de páginas rastreadas), compite con otras páginas para clasificarse en los resultados de búsqueda para palabras clave específicas.
La etiqueta noindex evita que esa página sea añadida al índice, evitando así que aparezca en los resultados de búsqueda.
Usar Yoast SEO para Gestionar la Etiqueta noindex
Yoast SEO es el plugin de optimización de motores de búsqueda (SEO) más popular de WordPress. Ofrece un conjunto completo de herramientas diseñadas para mejorar el SEO y una de sus características es gestionar la etiqueta noindex.
Usando Yoast SEO, los usuarios de WordPress pueden fácilmente configurar y eliminar la etiqueta noindex en páginas individuales, publicaciones, categorías y tipos de entradas personalizadas. Esto asegura que los motores de búsqueda ignoren el contenido que los propietarios del sitio no quieren mostrar en los resultados de búsqueda.
Yoast SEO proporciona una interfaz fácil de usar para ajustar las etiquetas noindex sin necesidad de editar directamente el código HTML del sitio. Esto lo hace accesible para usuarios sin experiencia técnica y más conveniente para desarrolladores de WordPress.
Descubramos cómo configurar y eliminar el tipo noindex en varios tipos de contenido utilizando Yoast SEO.
Cómo Gestionar la Etiqueta noindex en Diversos Tipos de Publicaciones de WordPress con Yoast SEO
Páginas o Publicaciones Individuales
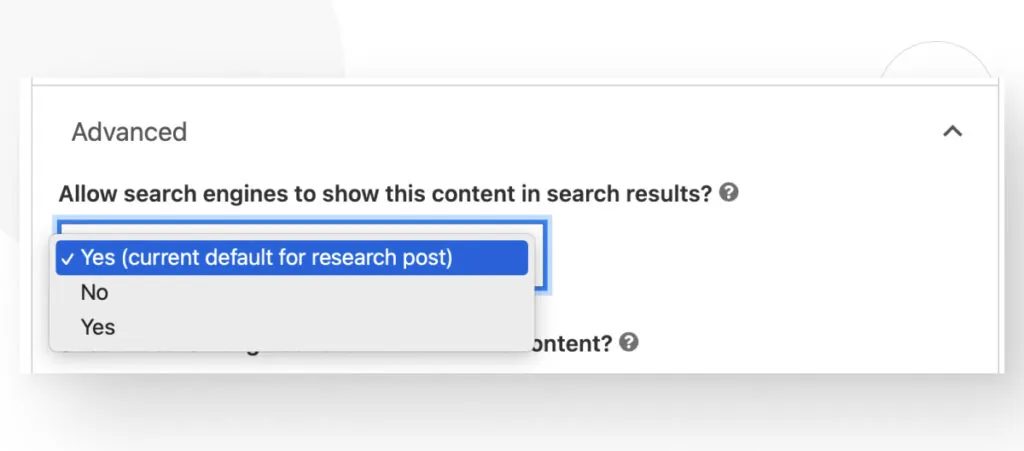
Para aplicar una etiqueta noindex usando las configuraciones de Yoast SEO, andá al post o página que querés mantener fuera de los resultados de búsqueda (el proceso es el mismo para páginas y posts), desplazate hacia abajo y hacé clic en la pestaña Avanzado.
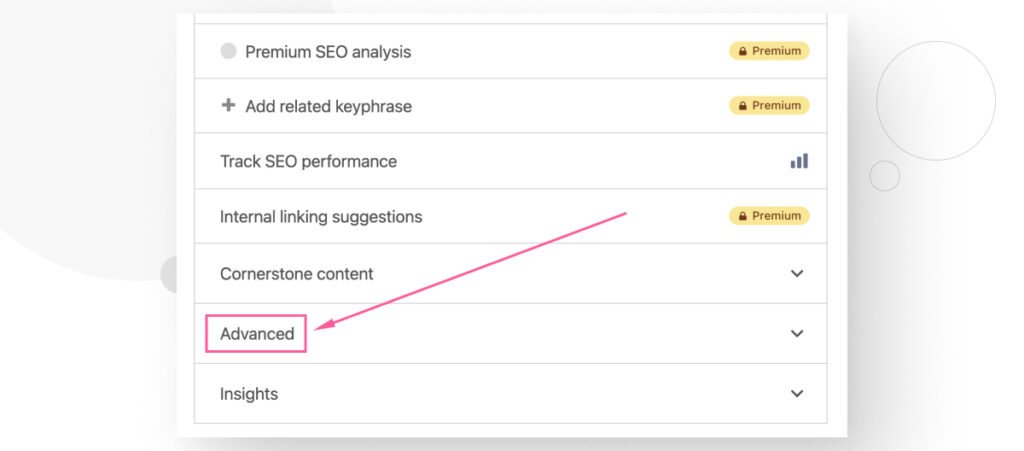
La opción ¿Permitir que los motores de búsqueda muestren este contenido en los resultados de búsqueda? determina si tu post tiene una etiqueta noindex.
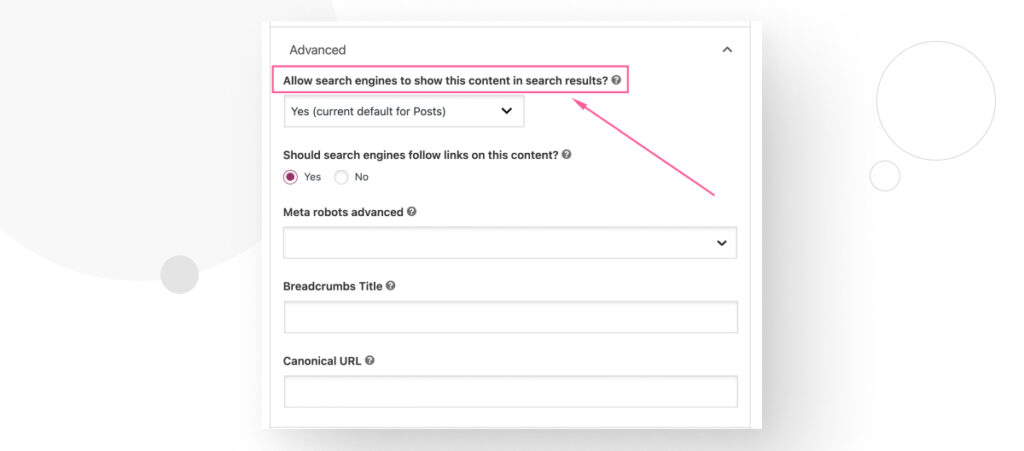
Hacé clic en el menú desplegable y seleccioná Sí o No.
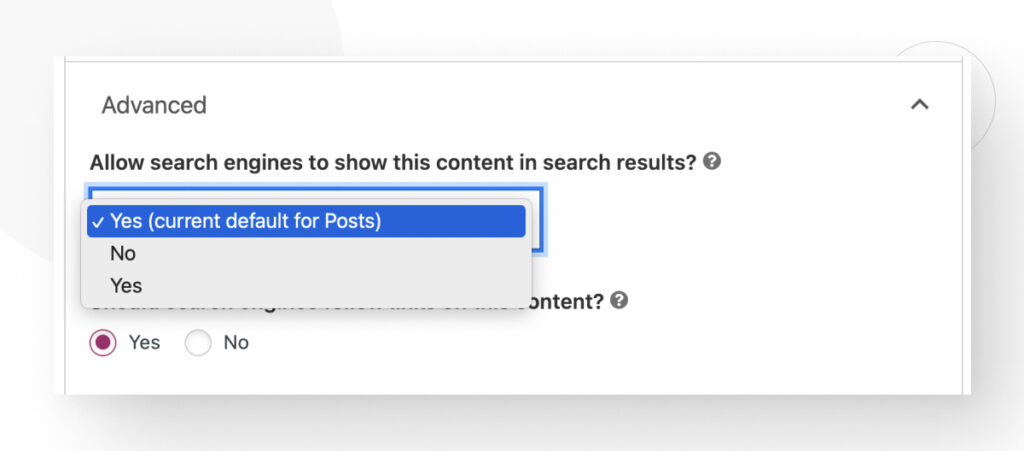
Sí significa que tu post o página no tendrá la etiqueta noindex, porque estás diciendo, “Sí, quiero que este contenido aparezca en los resultados de búsqueda.”
No significa que tu página o post tendrá la etiqueta noindex y no aparecerá en los resultados de búsqueda.
Tipos de Contenido
Si querés agregar o eliminar la etiqueta noindex de todos los posts, páginas o la página principal, andá a Yoast SEO > Configuraciones en la barra lateral izquierda del escritorio.
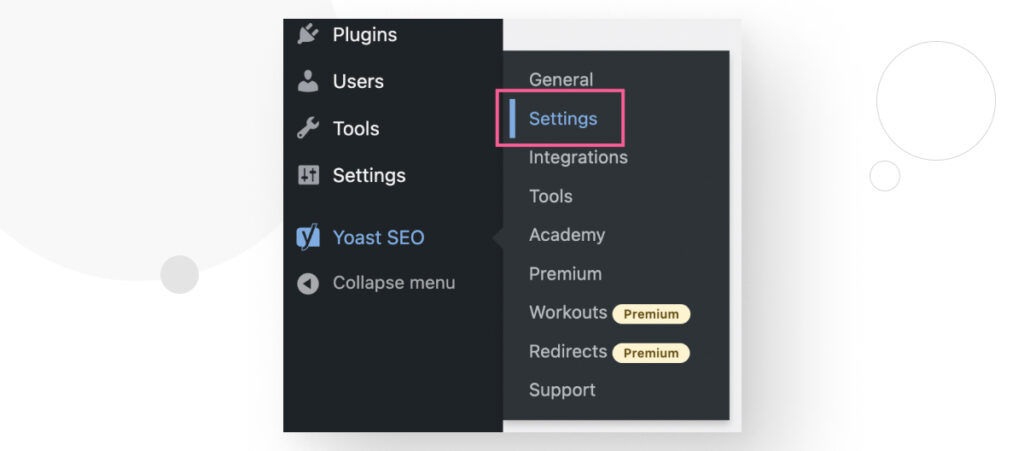
En la barra lateral de Yoast, hacé clic en Páginas, Posts, o Página Principal.
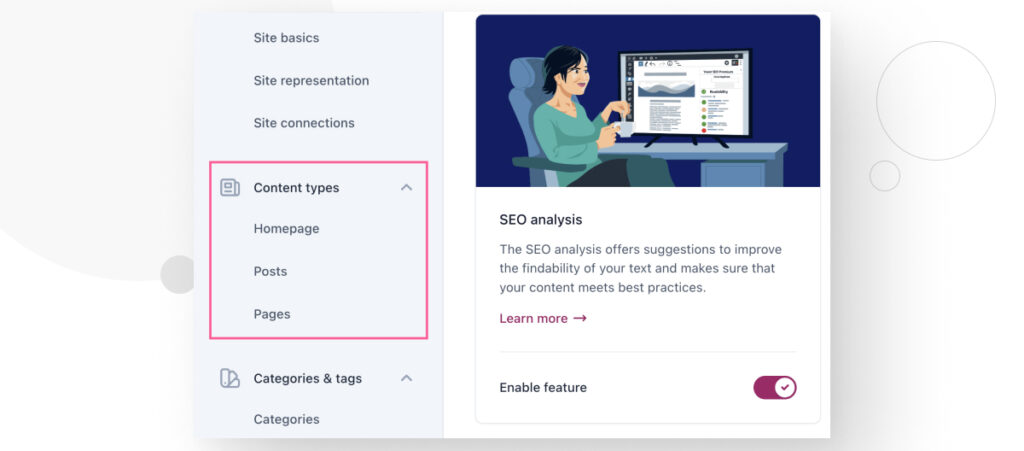
Andá a la sección Mostrar X en los resultados de búsqueda y activá o desactivá el interruptor. Recordá que si haces esto, cada post o página en (o tu página principal) tu sitio ganarán o perderán la etiqueta noindex, así que usá esta configuración con cuidado.
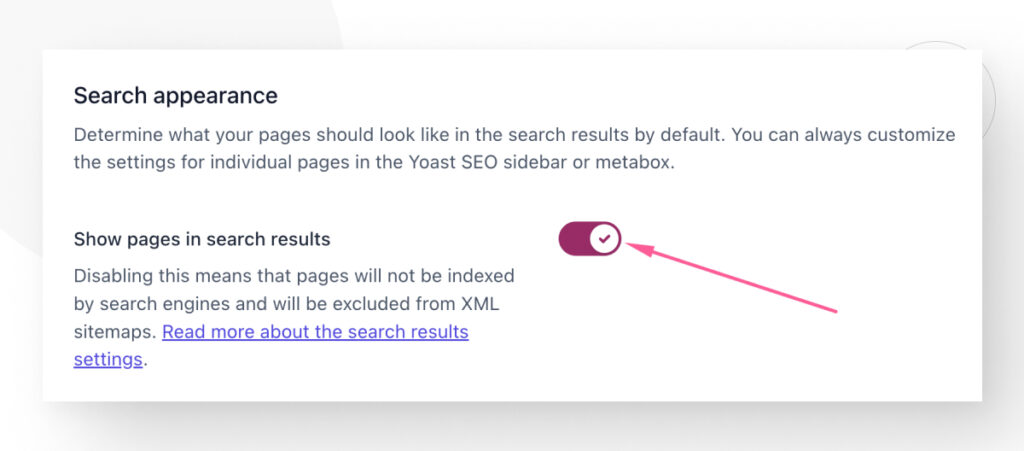
El proceso es el mismo para la página principal y las publicaciones.
Categorías, Etiquetas y Otras Taxonomías
El mismo proceso funciona para categorías, etiquetas, archivos de autores, archivos de fechas, archivos de formatos, páginas especiales como la página 404 y páginas de medios.
Andá a Yoast SEO > Configuraciones en la barra lateral izquierda del escritorio. Activá o desactivá el interruptor para agregar o eliminar la etiqueta noindex.
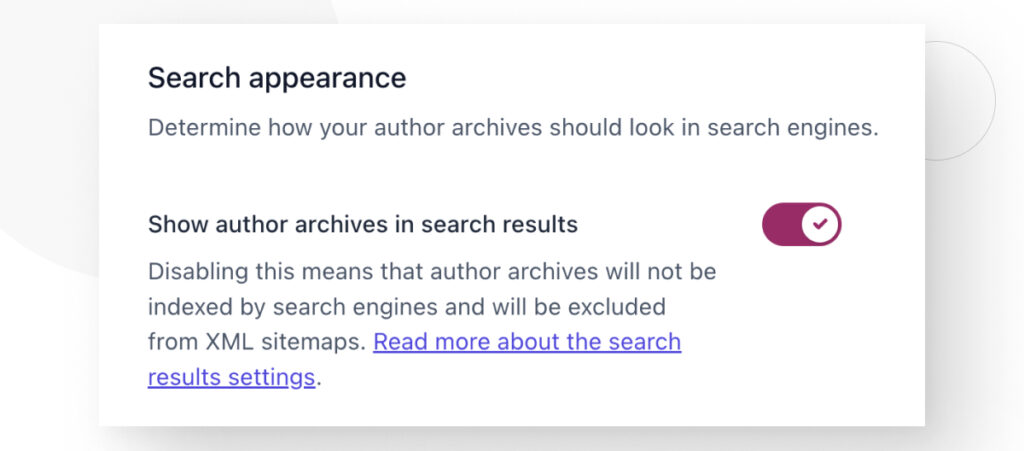
Recordá que las siguientes taxonomías contienen la etiqueta noindex por defecto:
- Archivos de fechas.
- Archivos de formatos.
- La página 404.
- Páginas de medios.
Entradas Personalizadas Individuales
Una vez que hayas creado una publicación personalizada, el proceso para noindexarla es el mismo que para publicaciones y páginas individuales. Accedé a esa publicación personalizada en Gutenberg, desplazate hacia abajo hasta la pestaña Avanzado y seleccioná Sí o No en el menú desplegable ¿Permitir que los motores de búsqueda muestren este contenido en los resultados de búsqueda?
Todas las Publicaciones de un Tipo de Entrada Personalizada Específico
Si querés noindex cada publicación de un tipo de entrada personalizada específico, podés agregar la siguiente función al archivo functions.php de tu theme.
/**
 * Agregar noindex para el tipo de entrada personalizada "investigación"
 */
function yoast_research_no_index( $string = '' ) {
    $post_type = get_post_type();
    if ( $post_type ) {
        $post_type_data = get_post_type_object( $post_type );
        if ( 'research' === $post_type_data->rewrite['slug'] ) {
            $string = 'noindex';
        }
    }
    return $string;
}

add_filter( 'wpseo_robots', 'yoast_research_no_index', 999 );
Esta función se engancha al filtro wpseo_robots de Yoast SEO, verifica el tipo de publicación actual y aplica la etiqueta noindex a cada publicación etiquetada como investigación.
Tene en cuenta que esta función aplica automáticamente la etiqueta noindex a cada publicación dentro de un tipo de entrada personalizada específico, así que hace backups y úsala con precaución.
Páginas de Autores Individuales
Si querés que la página de un autor específico no aparezca en los resultados de búsqueda, podés hacerlo a través de las configuraciones integradas de WordPress. No necesitas Yoast SEO para hacerlo, pero lo dejamos en esta guía por si acaso.
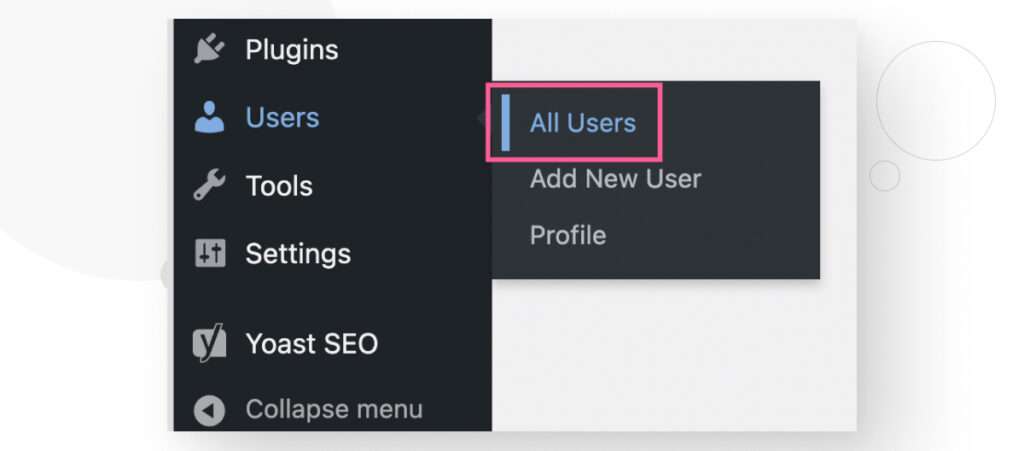
En el escritorio, andá a Usuarios > Todos los Usuarios.
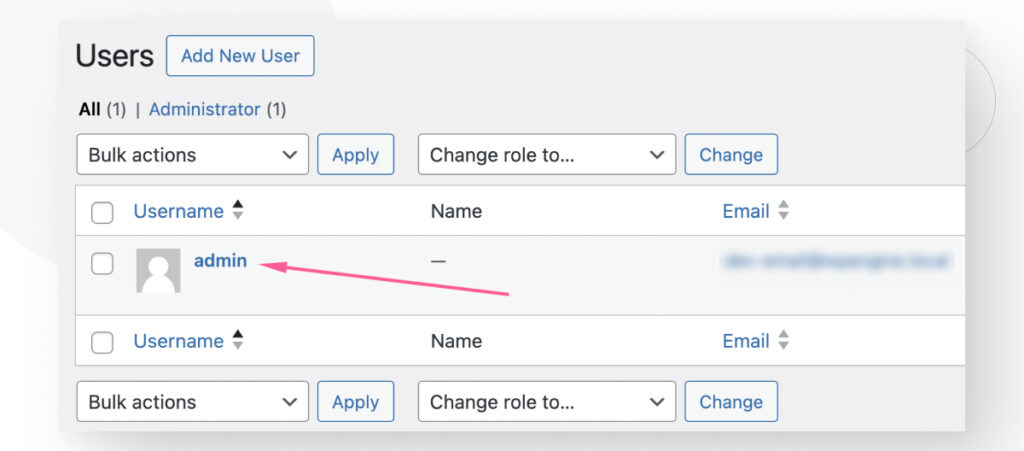
Hacé clic en el autor cuya página no querés mostrar en los resultados de búsqueda.
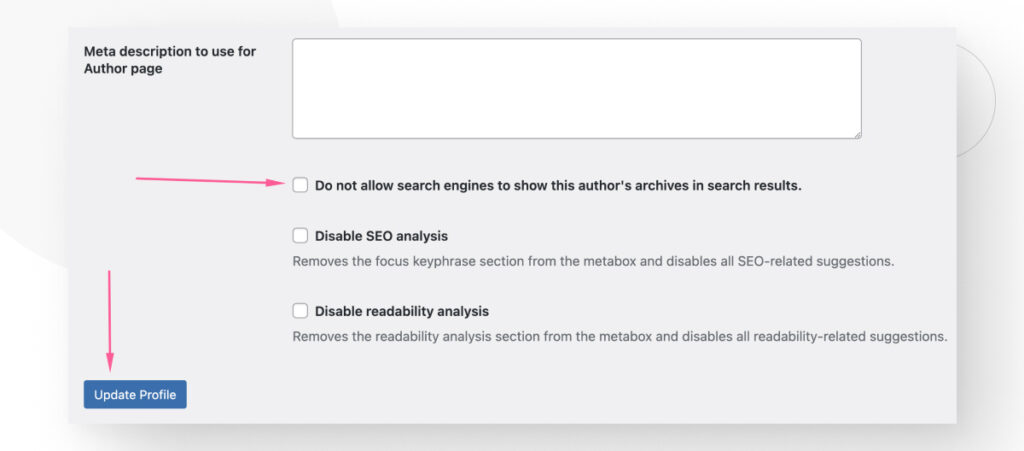
Desplazate hacia abajo y marca No permitir que los motores de búsqueda muestren los archivos de este autor en los resultados de búsqueda, luego hacé clic en Actualizar Perfil.
Todo tu Sitio
Finalmente, también podes utilizar las configuraciones integradas de WordPress para noindexar todo tu sitio.
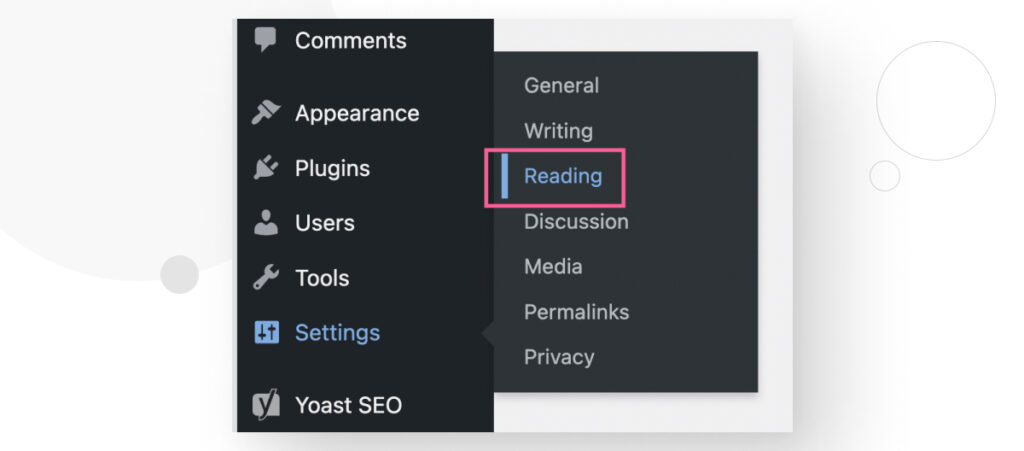
En el escritorio, andá a Configuraciones > Lectura.
Desplazate hacia abajo y marca Disuadir a los motores de búsqueda de indexar este sitio, luego hacé clic en Guardar Cambios.
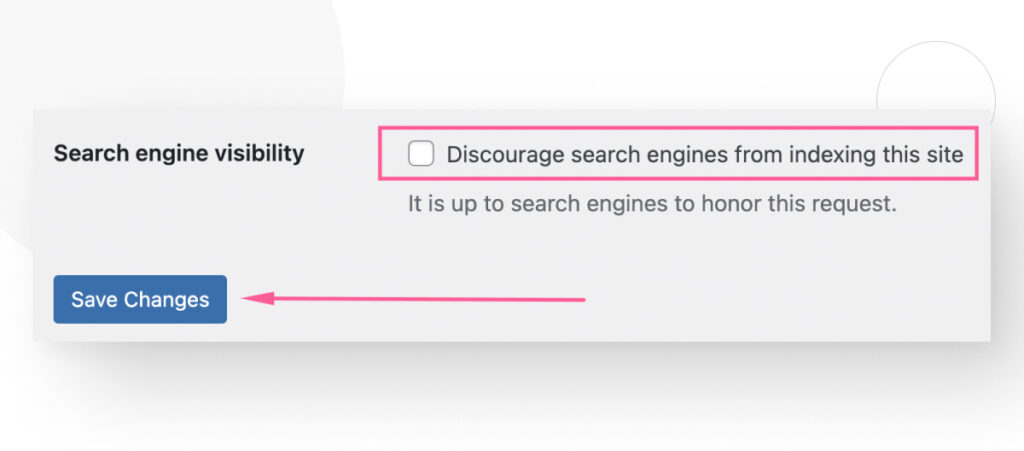
Recordá que esto es más una sugerencia para los motores de búsqueda y pueden o no seguirla.
Yoast SEO Te Permite Gestionar Fácilmente las Etiquetas noindex en WordPress
Yoast SEO es el plugin de SEO más popular para WordPress. Facilita mucho a los propietarios de sitios y desarrolladores ajustar el SEO del sitio sin escribir código.
Uno de los ajustes más comunes que realizan los propietarios, administradores y desarrolladores es configurar o eliminar la etiqueta noindex. En este artículo, aprendimos cómo gestionar etiquetas noindex en varios tipos de contenido e incluso en todo tu sitio.
Esperamos que ahora sepas cómo gestionar las etiquetas noindex y puedas comenzar a mejorar el SEO de tu sitio. Si encontraste útil este post, leé nuestro blog y recursos para más ideas y guías!
Related Articles

WordPress Seo / 4 min de lectura
WordPress Seo / 4 min de lectura
Cómo desactivar el indexado de Google en un sitio de WordPress
Ya sea que quieras que tu sitio web solo por invitación se mantenga privado o que estés probando tus habilidades de desarrollo web y quieras evitar el tráfico, hay varias…
Read More
WordPress Seo / 14 min de lectura
WordPress Seo / 14 min de lectura
¿Qué es un consultor de SEO para WordPress?
Un consultor de SEO para WordPress es una agencia especializada en optimizar el SEO de tu sitio web para ayudarte a atraer más tráfico orgánico y volverte más relevante en…
Read More
Paso a paso / 13 min de lectura
Paso a paso / 13 min de lectura
Cómo configurar y utilizar Link Whisper en WordPress
Link Whisper es un plugin de WordPress que facilita y acelera la creación de enlaces internos al ofrecer sugerencias impulsadas por inteligencia artificial, basadas en un escaneo de todo el…
Read More
Paso a paso / 11 min de lectura
Paso a paso / 11 min de lectura
Yoast SEO para WordPress sin cabeza: cómo configurarlo con GraphQL y Next.js
Como muchos desarrolladores de WordPress headless saben, mejorar el SEO del frontend de tu sitio es muy desafiante cuando se utilizan ciertos frameworks de frontend, como React. Pero en la…
Read More
Paso a paso / 6 min de lectura
Paso a paso / 6 min de lectura
Cómo configurar un mapa de sitio Yoast SEO en WordPress
Yoast SEO es el plugin de SEO más popular. Entre muchas otras funciones, te ayuda a configurar mapas de sitio XML, archivos que los motores de búsqueda utilizan para rastrear…
Read More