- Blogs
- Paso a paso
- Cómo actualizar tu tema de WordPress: probá estos 2 métodos
Paso a paso / 8 min de lectura
Cómo actualizar tu tema de WordPress: probá estos 2 métodos
Actualizar tu tema por primera vez puede ponerte los pelos de punta. Los temas actualizados son esenciales para el mantenimiento y la seguridad, pero un tema incompatible puede romper tu sitio. Lo que necesitás es una guía sencilla para actualizar tu tema de WordPress.
En este artículo, vamos a explorar el proceso de actualizar tu tema de WordPress usando 2 métodos: uno es el proceso básico de simplemente sobrescribir tu tema actual con la actualización, y el otro involucra el uso de temas hijos para preservar cualquier código CSS personalizado que hayas agregado a tu tema.
Vamos a desglosar los pasos y hacerlo lo más sencillo posible para que puedas seguirlo. ¡Vamos al grano!
¿Por qué es importante actualizar tu tema de WordPress?
Al igual que actualizar tus plugins y los archivos centrales de WordPress, actualizar tu tema es una medida de seguridad esencial. Si bien el malware se propaga más a menudo a través de plugins, los hackers todavía pueden infiltrarse en los sitios a través de temas inseguros.
Además de mejorar la seguridad, las actualizaciones de temas de WordPress también proporcionan los siguientes beneficios:
- Compatibilidad. Las actualizaciones mantienen tu tema compatible con las versiones más recientes de WordPress. Si tu tema es incompatible, algunas funciones pueden romperse y tu sitio web podría enfrentar problemas de usabilidad o dejar de funcionar por completo.
- Rendimiento. Las actualizaciones a menudo incluyen mejoras de rendimiento y optimizaciones. El código optimizado y las velocidades de carga mejoradas mejoran no solo el rendimiento de tu tema, sino de todo el sitio.
- Características y funcionalidad. Las actualizaciones pueden introducir nuevas características que se alineen con las tendencias actuales y mejoren la experiencia del usuario.
- Corrección de errores. Las actualizaciones de temas a menudo incluyen correcciones de errores para abordar los problemas informados por los usuarios o descubiertos por los desarrolladores.
Hacé una copia de seguridad antes de proceder
Primero, recordá siempre hacer una copia de seguridad de tu sitio antes de hacer cambios significativos como actualizaciones de núcleo, plugins y temas. Las actualizaciones que entran en conflicto con tu sitio existente pueden romper la funcionalidad y hacer que tu sitio sea inutilizable. Tener copias de seguridad disponibles te permite revertir tu sitio a una versión anterior y ajustar desde allí.
Además de una copia de seguridad, deberías considerar usar un sitio de prueba o crear un entorno local para probar tu sitio después de actualizar tu tema, y luego trasladarlo a producción cuando hayas confirmado que todo funciona correctamente.
Con eso dicho, avancemos a los 2 métodos que podés utilizar para actualizar tu tema de WordPress.
2 métodos para actualizar tu tema de WordPress
Método 1: Actualizá tu tema desde el panel de control
La solución más fácil pero menos personalizada para actualizar tu tema es a través de tu panel de control. Iniciá sesión e ingresá a Panel > Actualizaciones en la barra lateral. Bajá hasta que veas la sección de Temas.
Si alguno de tus temas activos o inactivos tiene una actualización disponible, seleccioná el tema que deseás actualizar y hacé clic en Actualizar Tema, y el tema se actualizará automáticamente. Por otro lado, si tus temas están todos actualizados, verás el mensaje “Tus temas están todos actualizados.”
Importante: Actualizar tu tema usando este método sobrescribirá cualquier código personalizado que hayas agregado. El proceso para actualizar tu tema manteniendo tus cambios personalizados es un poco más complicado, pero nada de qué preocuparse. Seguí leyendo para aprender cómo.
Método 2: Actualizá tu tema personalizado usando un tema hijo
Los temas hijos son subtemas que heredan todas las funciones y estilos del tema padre pero permiten a los desarrolladores modificar el padre sin hacer cambios directos a sus archivos correspondientes. Los temas hijos son una manera segura de modificar temas mientras se preservan los archivos originales intactos.
Además, cualquier actualización que reciba el tema padre también se aplica al tema hijo, pero las modificaciones del tema hijo continúan sobreescribiendo la configuración del tema padre. Básicamente, son una manera de personalizar temas sin tener que rehacer todos los cambios con cada actualización.
Seguí estos pasos para crear un tema hijo y beneficiarte de preservar tus ediciones cada vez que actualices tu tema en el futuro.
Paso 1: Creá una carpeta vacía con un nombre único
En tu computadora, creá una carpeta vacía con un nombre que no coincida con ninguno de los nombres de los temas activos o inactivos actualmente en tu sitio de WordPress. Colocarás todos los archivos necesarios para tu tema hijo en esta carpeta.
Paso 2: Creá los archivos necesarios
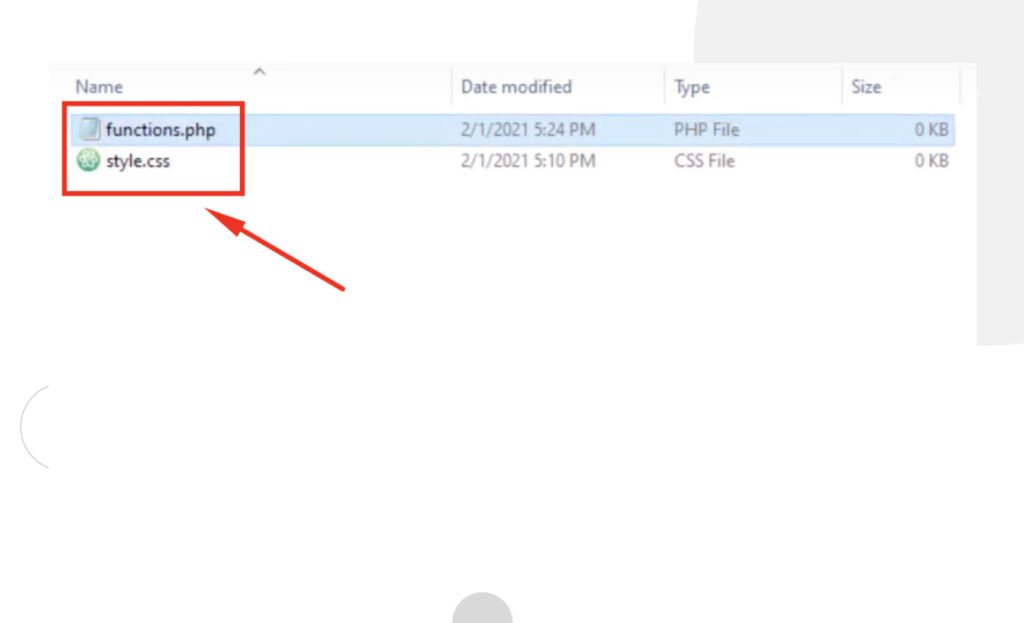
Sólo necesitarás dos archivos para tu tema hijo: functions.php y style.css. Crealos en la carpeta vacía del paso 1. Podés crear dos archivos de texto vacíos y renombrarlos “functions.php” y “style.css” asegurándote de quitar la extensión “.txt”.
Estos archivos están vacíos ahora, pero agregaremos los fragmentos de código necesarios en los siguientes pasos.
Paso 3: Editá el archivo style.css
Ahora que el archivo style.css existe, necesitás agregar el comentario de encabezado requerido en la parte superior del archivo para que la hoja de estilos funcione. Podés usar el editor de texto básico para editar archivos CSS, pero preferentemente deberías usar un editor de código profesional como Visual Studio Code, Sublime Text, o cualquier otro que prefieras.
Agregá el siguiente comentario en la parte superior del archivo style.css de tu tema hijo y modificalo basándote en el tema padre:
/*

Nombre del Tema: Tema Hijo de [nombre_tema_padre]

URI del Tema: [uri_tema]

Descripción: Tema Hijo para [nombre_tema_padre]

Autor: [nombre_autor]

URI del Autor: https://example.com

Plantilla: [tema_padre]

Versión: [versión]

*/
Todos los campos anteriores son editables excepto “Plantilla”, que identifica el tema padre y debe corresponder a su nombre.
Podés ahora agregar tu código CSS personalizado bajo el comentario. Pero por ahora, simplemente guardá los cambios y seguí al siguiente paso.
Paso 4: Encolá las hojas de estilo del tema padre y del tema hijo
Ahora, vamos a asegurarnos de que tu tema hijo herede el estilo del tema padre y se cargue antes que el tema padre sin sobrescribirlo. Para hacerlo, abrí functions.php y agregá el siguiente código:
<?php

function [nombre_tema_padre]__child_theme_enqueue_styles() {

wp_enqueue_style( ‘parent-style’, get_template_directory_uri() . ‘/style.css’ );

}

add_action( ‘wp_enqueue_scripts’, ‘[nombre_tema_padre]__child_theme_enqueue_styles’ );
Reemplazá “[nombre_tema_padre]” por el nombre de tu tema padre.
Tené en cuenta que esta parte del proceso puede poner un poco difícil porque depende de cómo esté codificado tu tema padre. El fragmento de arriba debería funcionar para la mayoría de los temas, pero deberás modificarlo si no es así.
Paso 5: Comprimí la carpeta y subila a WordPress
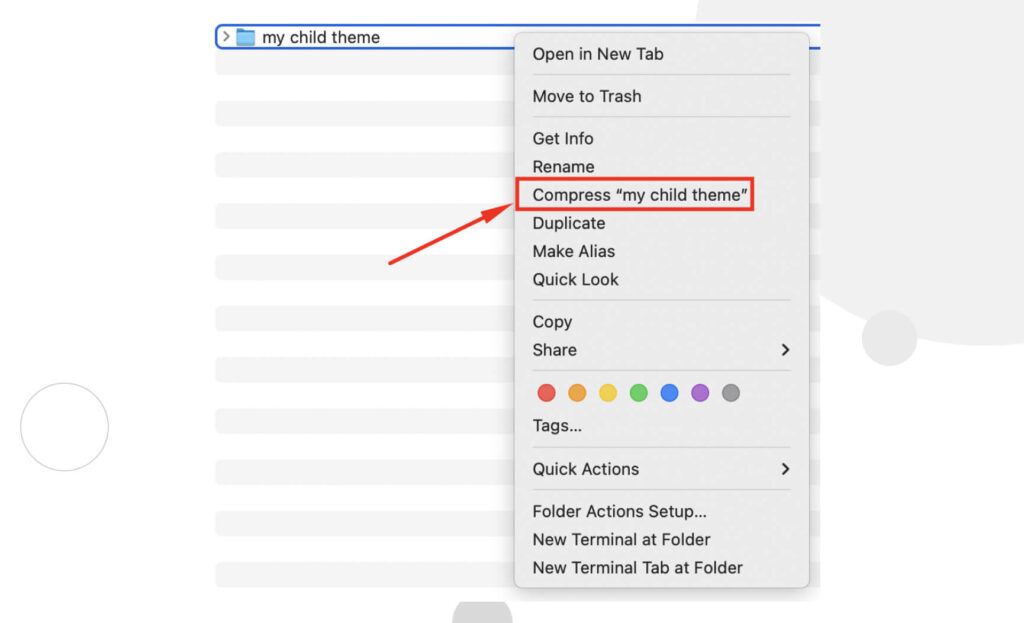
Ahora necesitás crear un archivo comprimido de la carpeta que contiene los archivos del tema hijo. Necesitarás instalar 7zip, WinRAR, o cualquier otro programa similar en Mac o Windows. Una vez instalado, hacé clic derecho sobre tu carpeta y seleccioná Comprimir. En Mac, se ve así:
Ahora es momento de subir la carpeta a WordPress como lo harías al subir cualquier otro tema. Andá a Apariencia > Temas desde el panel de control y hacé clic en Añadir Nuevo.
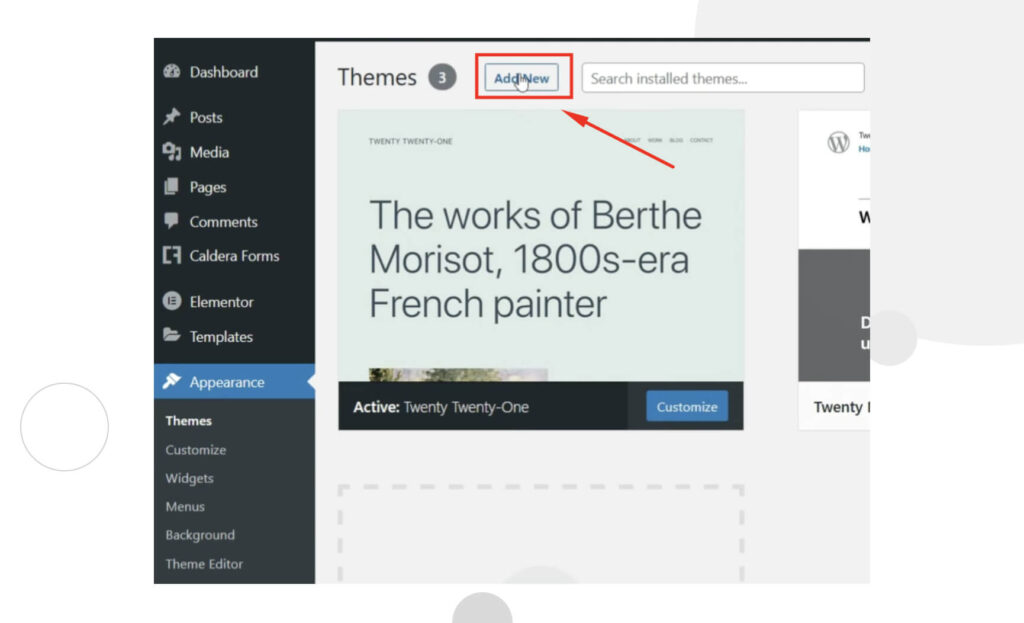
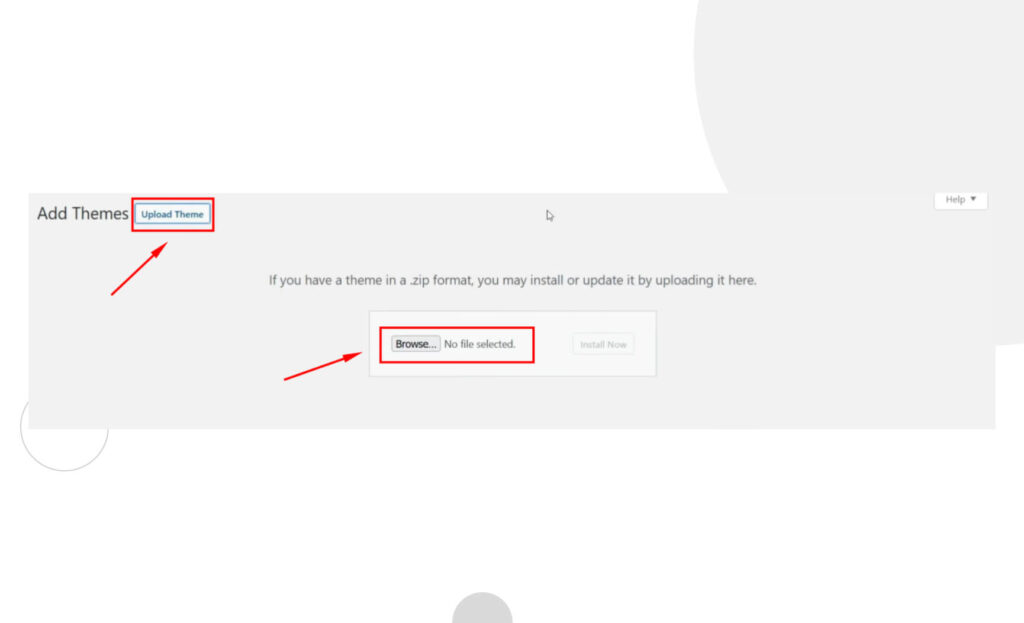
En la siguiente pantalla, hacé clic en Subir Tema. Navegá hasta la ubicación de tu tema y seleccioná la carpeta comprimida que acabás de crear.
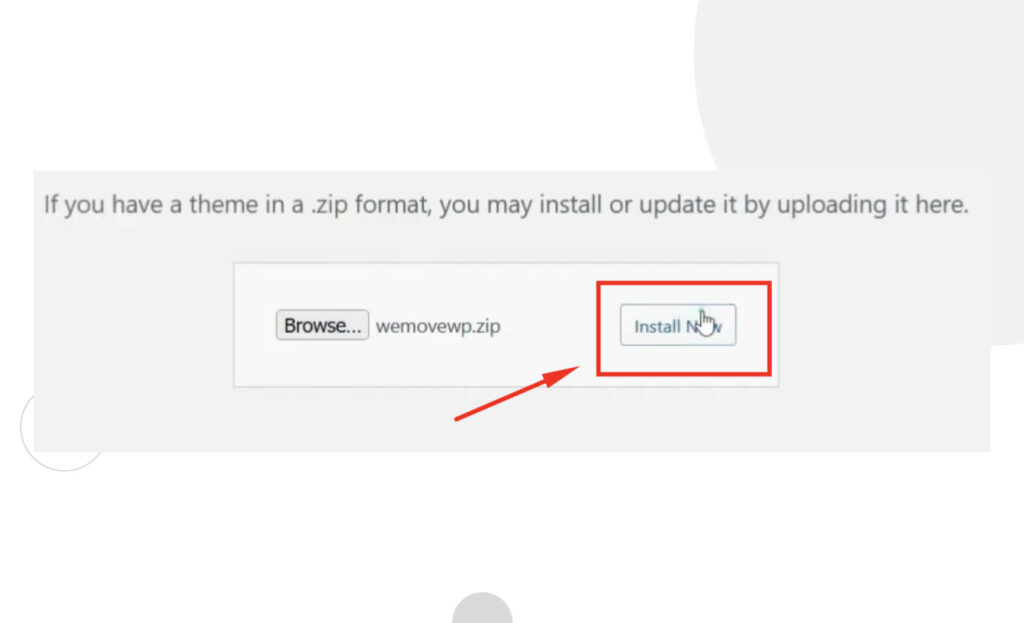
Una vez subido, hacé clic en Instalar Ahora.
En la siguiente pantalla, verás un mensaje indicando que este tema requiere de un tema padre e identificará al padre si ya está instalado. Hacé clic en Activar para activar tu tema hijo.
Ahora el código personalizado de tu tema hijo se reflejará en tu sitio, y de ahora en adelante podés actualizar tu tema sin preocuparte por perder tu código personalizado.
Paso 6: Verificá que todo funcione correctamente
Como mencionamos antes, deberías probar tu tema actualizado en un entorno de desarrollo/prueba o local para asegurarte de que tu sitio funciona correctamente. Si notás algún problema con el frontend o la funcionalidad, podés intentar arreglarlo o revertir a tu copia de seguridad y reiniciar el proceso.
Mantené tus temas actualizados
Actualizar tu tema mejora la seguridad, funcionalidad y rendimiento. Usar el panel de administración e implementar temas hijos son dos de los métodos más populares para actualizar tus temas.
El problema al actualizar tu tema a través del tablero es que la actualización sobrescribirá los archivos actuales del tema, eliminando cualquier código CSS personalizado. Este método es genial si usás un tema predefinido sin optimizaciones ni otras modificaciones, ya que no tendrás que preocuparte por el código personalizado.
Por otro lado, si modificaste un tema gratuito o premium, querrás mantener esos cambios después de la actualización. Para hacerlo, uno de los métodos más populares es crear un tema hijo que herede características del tema padre (el que querés modificar). De esta manera, podés editar el tema hijo para modificar el comportamiento del tema padre sin realmente cambiar ninguno de sus archivos. Ojalá encontraste útil la información de este artículo, ¡y ahora puedas actualizar tu tema sin problemas!
Related Articles
Paso a paso / 11 min de lectura
Paso a paso / 11 min de lectura
¿Qué hacer si al actualizar a PHP 8.1 se rompe tu sitio WordPress?
PHP es el lenguaje de programación en el cual está principalmente escrito WordPress. Se ejecuta en el servidor web que hospeda tu sitio, y al actualizarlo regularmente, mejora el rendimiento…
Read More
Paso a paso / 8 min de lectura
Paso a paso / 8 min de lectura
¿Cómo limpiar tu carpeta de subidas de WordPress?
La carpeta de Subidas de WordPress se encuentra en wp-content y contiene todos los archivos multimedia, como imágenes, videos y documentos, que subís a través de la Biblioteca de Medios…
Read More
Paso a paso / 11 min de lectura
Paso a paso / 11 min de lectura
Cómo solucionar el error “Falló la verificación de cookies” en WordPress
El error “cookie check failed” es un mensaje que aparece en algunos sitios de WordPress, impidiendo que los usuarios accedan a parte o todo el contenido y que los administradores…
Read More
Paso a paso / 5 min de lectura
Paso a paso / 5 min de lectura
Cómo eliminar los posts que vienen por defecto en WordPress
Si recién empezaste un nuevo sitio de WordPress, es probable que te hayas encontrado con publicaciones y páginas de ejemplo como "¡Hola, Mundo!" y "Página de Muestra". Al personalizar tu…
Read More
Troubleshooting / 13 min de lectura
Troubleshooting / 13 min de lectura
WordPress no se Muestra Correctamente en Móviles: 5 Soluciones
A veces, tu sitio de WordPress no se muestra correctamente en dispositivos móviles a pesar de funcionar bien en el escritorio. Esto puede ser frustrante y difícil de solucionar porque…
Read More