How to update your WordPress theme: try these 2 methods

Updating your theme for the first time can be nerve-wracking. Updated themes are essential for maintenance and security, but an incompatible theme can break your site. What you need is a beginner-friendly guide for how to update your WordPress theme.
In this article, we’ll explore the process of updating your WordPress theme using 2 methods: one is the basic process of simply overwriting your current theme with the update, and the other involves child themes to preserve any CSS custom code you’ve added to your theme.
We’ll break down the steps and make it as beginner-friendly as possible for you to follow. Let’s get into it!
Why is it important to update your WordPress theme?
Like updating your plugins and WordPress core files, updating your theme is an essential security measure. While malware spreads to WordPress sites most often through plugins, hackers can still infiltrate sites through insecure themes.
In addition to improving security, WordPress theme updates also provide the following benefits:
- Compatibility. Updates keep your theme compatible with newer WordPress releases. If your theme is incompatible with more recent WordPress releases, some functions may break, and your website could face usability issues or stop working altogether.
- Performance. Theme updates often include performance improvements and optimizations. Optimized code and enhanced loading speeds improve performance not only for your theme but your entire site.
- Features and functionality. Updates may introduce new features that account for current trends and improve user experience.
- Bug fixes. Theme updates often include bug fixes to address issues reported by users or discovered by developers.
Back up your site before moving forward
First, remember to always back up your site before making significant changes like core, plugin, and theme updates. Updates that conflict with your existing site can break functionality and make your site unusable. Having backups available lets you roll back your site to a previous, working version and adjust from there.
In addition to a backup, you should consider using a staging site or creating a local environment to test your site after updating your theme, then pushing it to PROD when you’ve confirmed everything works fine.
That said, let’s move on to the 2 methods you can use to update your WordPress theme.
2 methods to update your WordPress theme
Method 1: Update your theme from the dashboard
The easiest but least customized solution to update your theme is through your dashboard. Log in and go to Dashboard > Updates on the sidebar. Scroll down until you see the Themes section.
If any of your active or inactive themes have an update available, select the theme you want to update and click on Update Theme, and the theme will update automatically. On the other hand, if your themes are all up to date, you’ll see the message “Your themes are all up to date.”
Important: Updating your theme using this method will overwrite any custom code you’ve added. The process to update your theme while keeping your custom changes is a bit more complicated, but nothing to be intimidated by. Keep reading to learn how.
Method 2: Update your custom theme using a child theme
Child themes are sub-themes that inherit all functions and styles of the parent theme but allow developers to modify the parent without making direct changes to its corresponding files. Child themes are a safe way to modify themes while preserving the original files intact.
Additionally, any update the parent theme receives also applies to the child theme, but the child theme’s modifications continue to override the parent theme’s settings. Essentially, they’re a way to customize themes without having to redo all changes with every update.
Follow these steps to create a child theme and benefit from preserving your edits every time you update your theme moving forward.
Step 1: Create an empty folder with a unique name
In your computer, create an empty folder with a name that doesn’t match any of the names of the active or inactive themes currently on your WordPress site. You’ll place all the necessary files for your child theme in this folder.
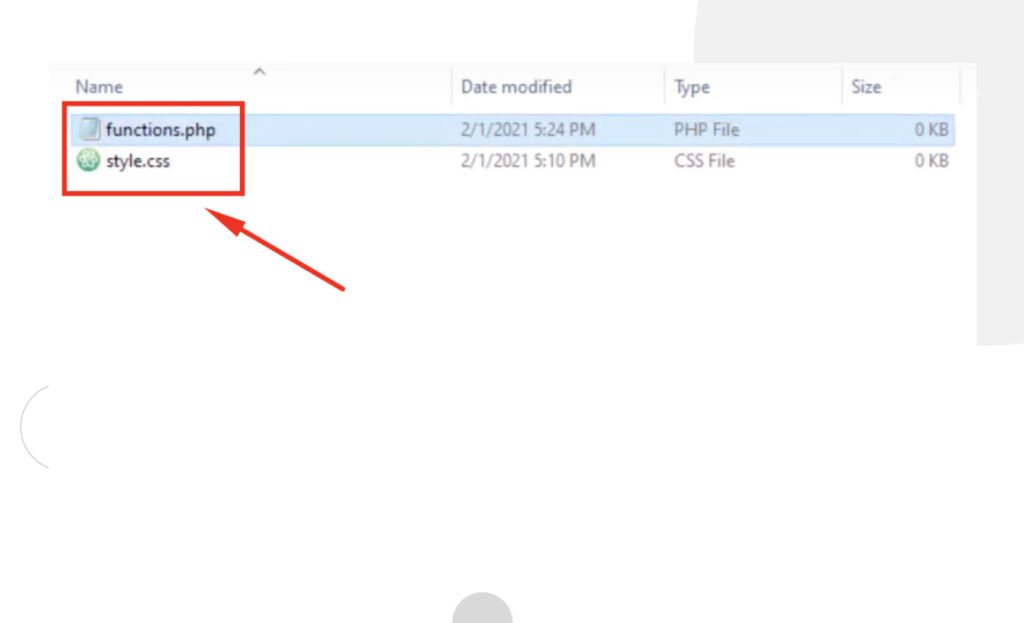
Step 2: Create the necessary files
You’ll only need two files for your child theme: functions.php and style.css. Create them in the empty folder from step 1. You can create two empty text files and rename them “functions.php” and “style.css” making sure to strip the “.txt” extension.
These files are empty right now, but we’ll add the necessary code snippets in the following steps.
Step 3: Edit the style.css file
Now that the style.css file exists, you’ll need to add the required header comment at the top of the file for the stylesheet to work. You can use the basic text editor to edit CSS files, but you should preferably use a professional code editor like Visual Studio Code, Sublime Text, or whichever other you prefer.
Add the following comment at the top of your child theme’s style.css file and modify it based on the parent theme:
/*

Theme Name: [parent_theme_name] Child Theme

Theme URI: [theme_uri]

Description: Child Theme for [parent_theme_name]

Author: [author_name]

Author URI: https://example.com

Template: [parent_theme]

Version: [version]

*/
All the above fields are editable except for “Template,” which identifies the parent theme and must correspond to its name.
You can now add your custom CSS code under the comment. For now, however, just save the changes and move on to the next step.
Step 4: Enqueue the parent and child theme’s stylesheets
Now, we’ll ensure your child theme inherits the parent theme’s styling and is loaded before the parent theme without overwriting it. To do it, open functions.php and add the following code:
<?php

function [parent_theme_name]__child_theme_enqueue_styles() {

wp_enqueue_style( ‘parent-style’, get_template_directory_uri() . ‘/style.css’ );

}

add_action( ‘wp_enqueue_scripts’, ‘[parent_theme_name]__child_theme_enqueue_styles’ );
Replace “[parent_theme_name]” with your parent theme’s name.
Keep in mind that this part of the process may get a little tricky because it depends on how your parent’s theme is coded. The snippet above should work for most themes, but you’ll need to modify it if it doesn’t.
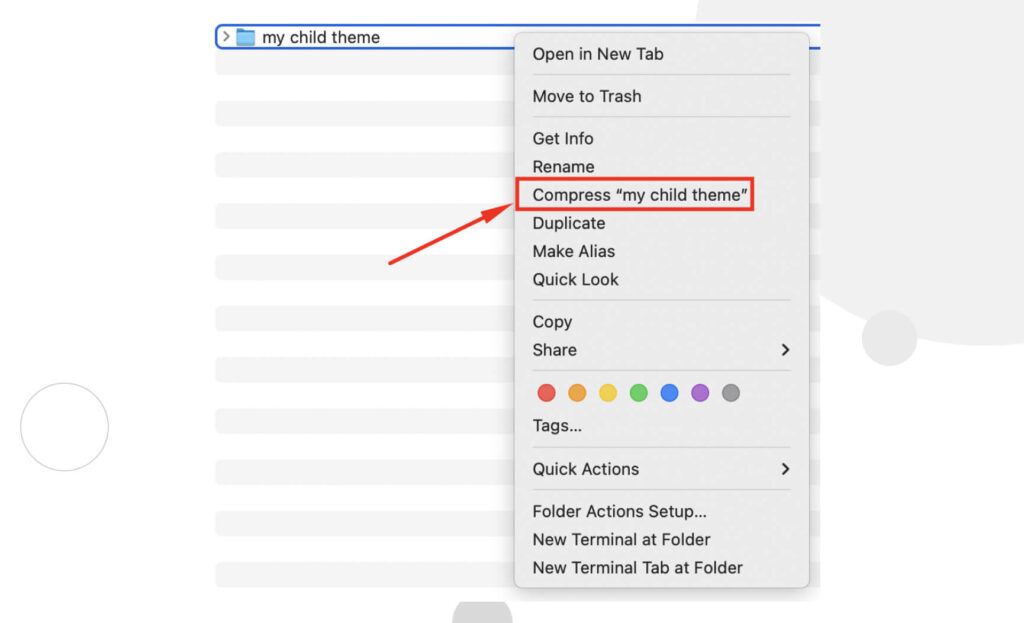
Step 5: Compress the folder and upload it to WordPress
Now you need to create a compressed archive of the folder containing the child theme’s files. You’ll need to install 7zip, WinRAR, or any other similar program on Mac or Windows. Once installed, right-click your folder and select Compress. On Mac, it looks like this:
Now it’s time to upload the folder into WordPress like you would when uploading any other theme. Go to Appearance > Themes from the dashboard and click Add New.
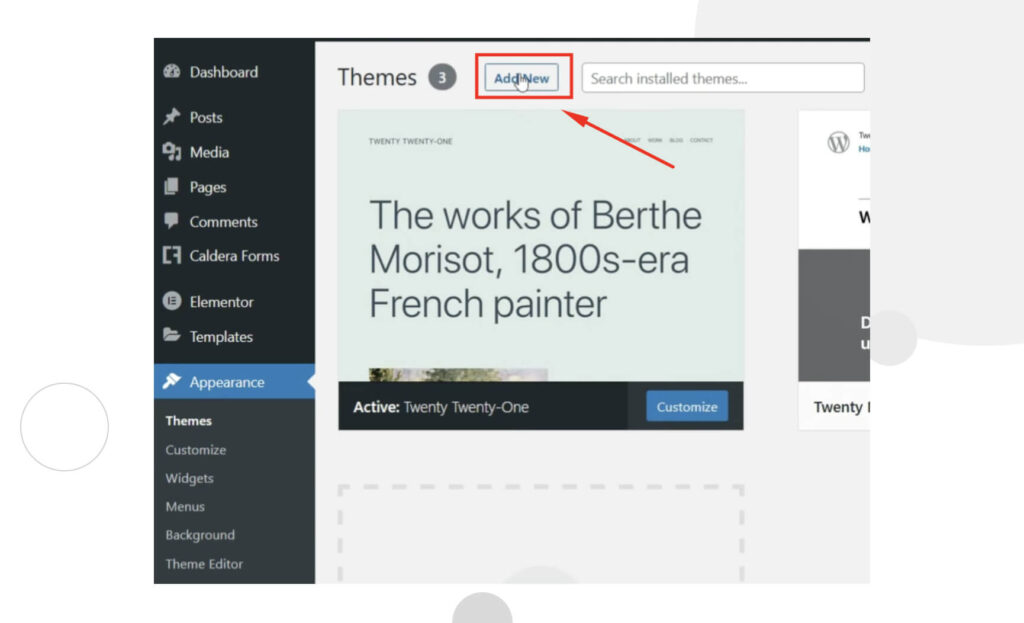
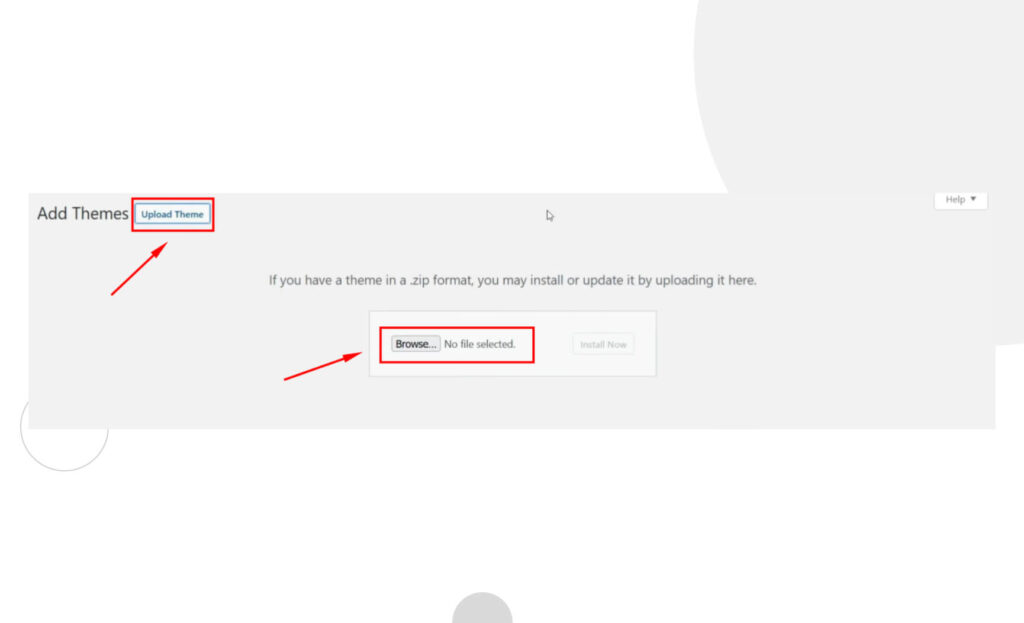
On the following screen, click on Upload Themes. Browse to your theme’s locations and select the compressed folder you just created.
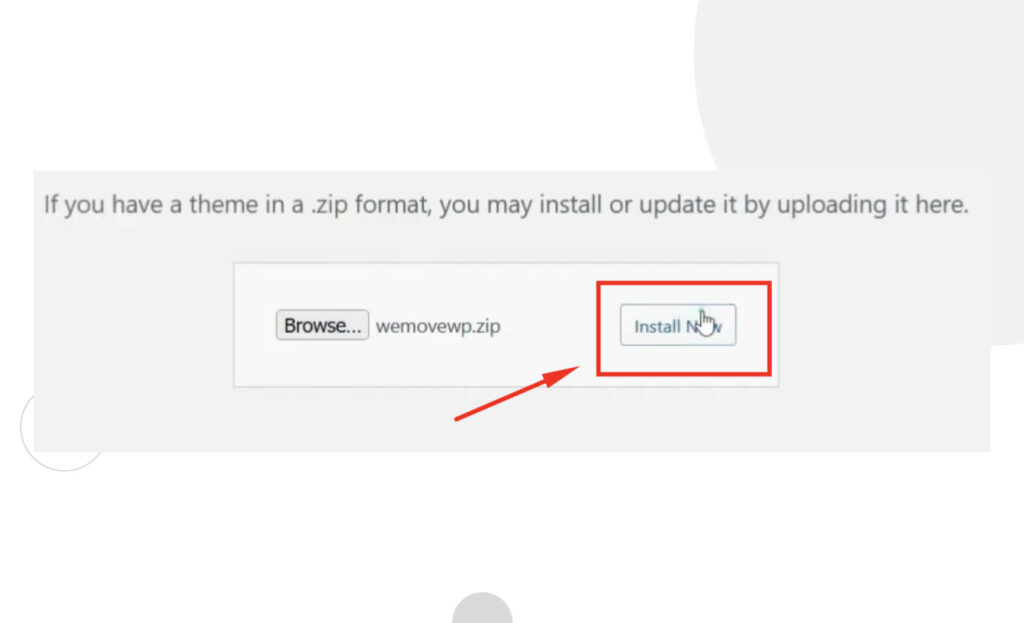
Once uploaded, click on Install Now.
In the following screen, you’ll see a message telling you that this theme requires a parent theme and will identify the parent if it’s already installed. Click on Activate to activate your child theme.
Now your child theme’s custom code will reflect on your site, and from now on, you can update your theme without worrying about losing your custom code!
Step 6: Check everything’s working properly
As we mentioned above, you should test your updated theme on a DEV/STG or local environment to make sure your site works properly. If you notice any problem with the frontend or functionality, you can try fixing it or roll back to your backup and restart the process.
Keep your themes updated
Updating your theme enhances security, functionality, and performance. Using the admin dashboard and implementing child themes are two of the most popular methods to update your themes.
The issue with updating your theme through the dashboard is that the update will overwrite the current theme files, wiping out any custom CSS code. This method works great for you if you’re using a preset theme with no optimizations or any other modification, as you won’t have to worry about custom code.
On the other hand, if you’ve modified a free or premium theme, you’ll want to keep those changes after the update. To do that, one of the most popular methods is creating a child theme that inherits traits from the parent theme (the one you want to modify). This way, you can edit the child theme to modify the parent theme’s behavior without actually changing any of its files. Hopefully, you found the information in this article helpful, and you can now update your theme without issues!
📬 Get WordPress updates to your inbox
Sign up for WC Blog updates and never miss a post!