Can You Run Multiple Blogs on WordPress?

Yes, it is possible for you to run multiple blogs on the same WordPress site at the same time.
However, WordPress doesn’t support multiple individual blogs by default, so you have 2 options if you want to create multiple blogs you can manage from the same WordPress installation:
- Using WordPress’s multisite feature. The multisite feature allows you to create a network of sites you can manage from the same dashboard. Each site has its own individual blog.
- Alternatively, you could create new categories for your blog, and each category would have its own archive page. While you won’t technically have multiple blogs, having separate categories may be enough for your needs.
Let’s explore the step-by-step process of setting up these features.
Key Takeaways
- WordPress does not allow you to run multiple blogs by default, but there are ways to get around this limitation.
- The first option is creating multiple categories and linking to each category separately through your menus. It’ll create the illusion of separate blogs.
- The second option is setting up a multisite network, where each site will have its own separate, completely independent blog.
Should You Create a Multisite Network or Multiple Categories?
If you want to run multiple blogs, your main options are:
- Creating a multisite network and managing each site’s blog individually.
- Creating various categories under the same blog and linking to each individually.
If you have an existing site that you want to mostly keep as it is without adding an extra layer of management and maintenance, we recommend that you create multiple categories.
Creating multiple categories retains your site’s current structure and simply adds what is essentially a new archive that users can access from a menu.
On the other hand, creating a multisite network is significantly more complicated, takes more steps, and requires more ongoing management and maintenance.
You should take the multisite option if you’re training to become a WordPress developer. It’ll give you useful experience you can use to solve client problems in the future.
Once you’ve decided, keep reading for a step-by-step guide on how to set up each option.
How to Set Up Multiple Multiple WordPress Categories
We’ll start with the guide for setting up multiple WordPress categories because it is significantly easier than setting up multiple sites under the same network.
In case you’re unaware, categories are a way to organize and group your posts based on similar topics or themes. They help structure your content, making it easier for users to find related posts and navigate your site.
For the purposes of this post, their most useful feature is that when you create a new category, WordPress automatically creates an archive for every post in that category.
This archive allows you to effectively have multiple blogs if you direct users to visit each category separately.
Let’s get into the steps to make this happen.
Step #1: Create New Categories
Go to Posts > Categories. On the right, you will see a list of existing categories. If you haven’t created categories before, the only category will be Uncategorized.
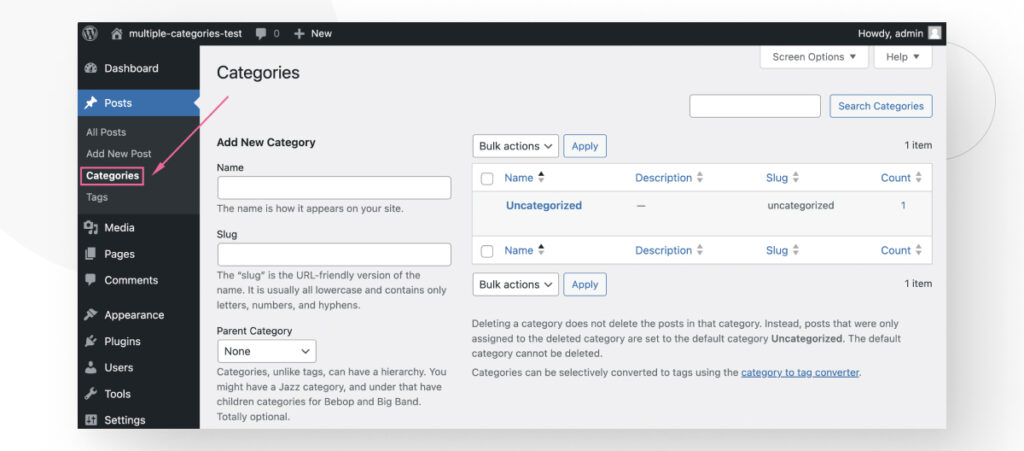
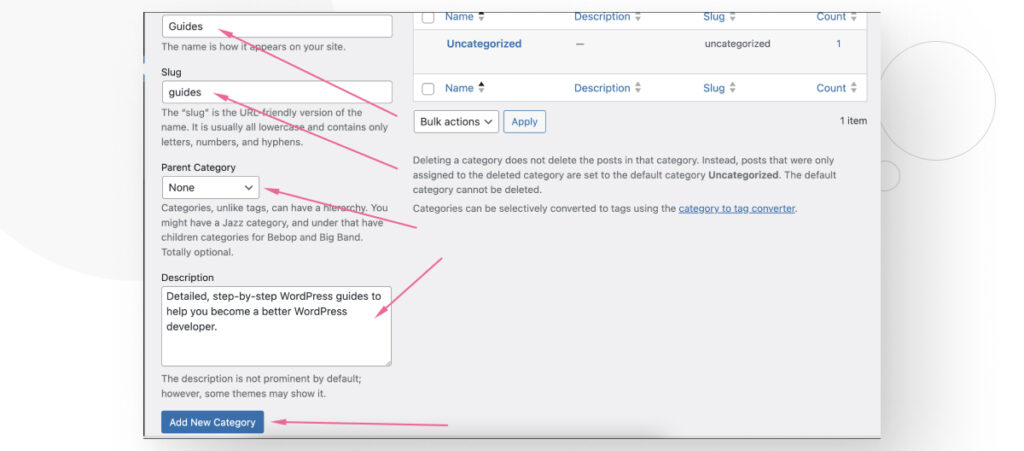
Create a new category by filling in the following fields:
- Name. A name for your category.
- Slug. A URL element that is usually the same as the name but in lowercase.
- Parent Category. Categories are hierarchical, so you can create a larger category with multiple subcategories. Parent categories are optional, and you can make every category independent of the others if you prefer.
- Description. A short description for what the posts in this category will contain. This field is also optional, but it’s worth adding a description.
Here’s an example of a category named Guides. After filling in the fields, click Add New Category.
We also added a second custom category named Developer Resources.
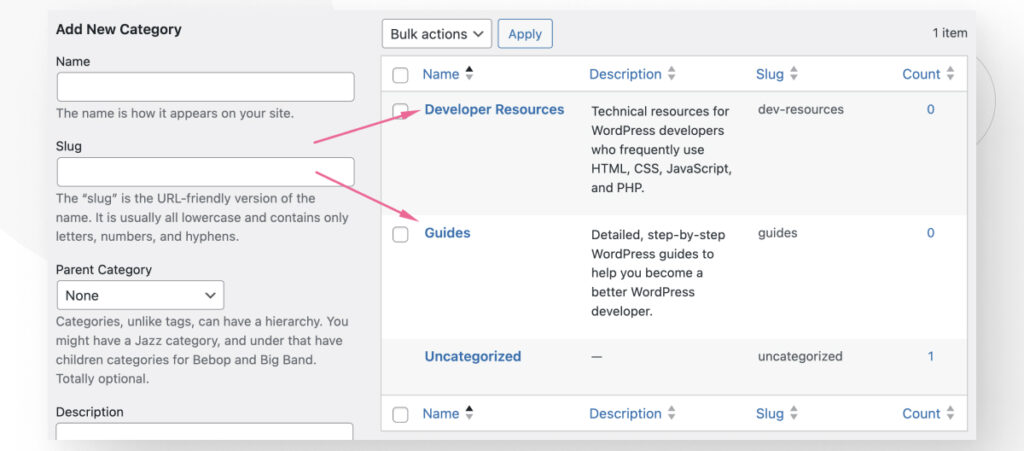
Now, you can create content and categorize it appropriately. However, you must also direct users to these category archives as if they were different blogs.
That’s what we’ll do in the next step.
Step #2: Create Links to the New Categories in Your Menus
Now, we’ll edit your site’s menus to direct users to the archive page for each category.
This will prevent users from accessing your blog and seeing every post from every category in the same place.
Go to Appearance > Menu. Give your menu a name, select a location (header or footer), and click Create Menu.
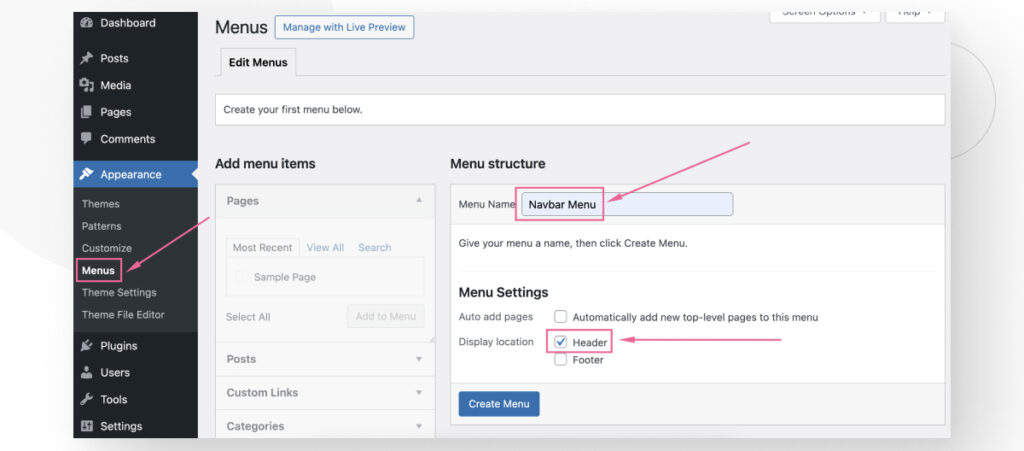
Once you’ve created a menu, it’s time to add elements to it. Click on the dropdown menu for Categories, and select the categories you just created. Click on Add Menu to add these categories to your menu. Finally, click on Save Menu.
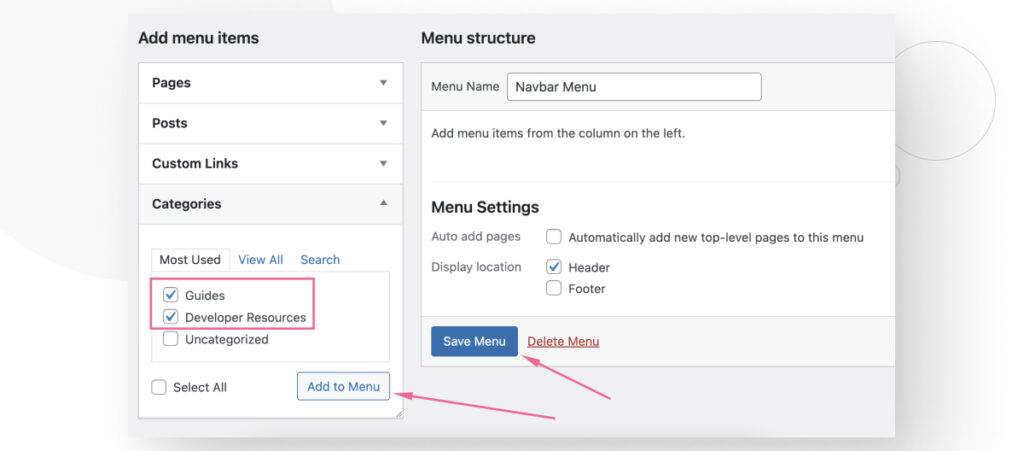
Now, your site has separate menu elements for each category archive.
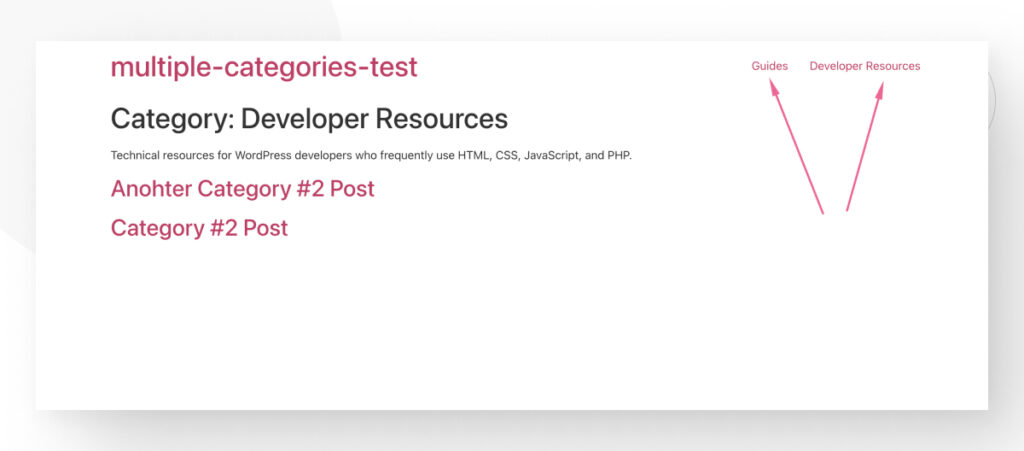
While this is not the same as having 2 separate sites with independent blogs, it’s the easiest way to give the impression that you do.
How to Set Up Multiple WordPress Blogs With Multisite
There are 2 ways to set up WordPress multisite. One setup works for new installations, and the other works for existing installations.
So, if you want to create a new site with multiple blogs, we recommend following the steps on “How to Set Up Multisite on a New Installation.”
Alternatively, if you have an existing site and want to turn it into a multisite, follow the steps in the “How to Set Up Multisite on an Existing Installation.”
With that said, let’s start with the steps for an existing installation.
How to Set Up Multisite on an Existing Installation
If you have an existing single WordPress instance and want to turn it into a multisite network, follow these steps.
Step 1: Back Up Your Site
Back up your site before making any significant changes like switching from an individual to a multisite installation. It’ll allow you to have a checkpoint you can come back to if anything goes wrong or you change your mind.
Step 2: Edit Your wp-config.php File
After that, you need to edit your wp-config.php file. Using a code editor or FTP client, go to app/public and edit wp-config.php. Find the line that says /* That's all, stop editing! Happy publishing. */ and paste the following snippet above it.
/* Multisite */
define( 'WP_ALLOW_MULTISITE', true );

/* That's all, stop editing! Happy publishing. */
This step enables the Network Setup item in your Tools menu. But before going there, follow the next step.
Step 3: Deactivate Plugins
Deactivate all your plugins by going to Plugins > Installed Plugins and deactivating them individually or in bulk. Now we’re ready to set up the multisite network.
Step 4: Set Up Your Multisite Network
Go to Tools > Network Setup. In this section, you can choose the domain structure (subdomain or subdirectory), the network’s title, and admin email address. Click Install.
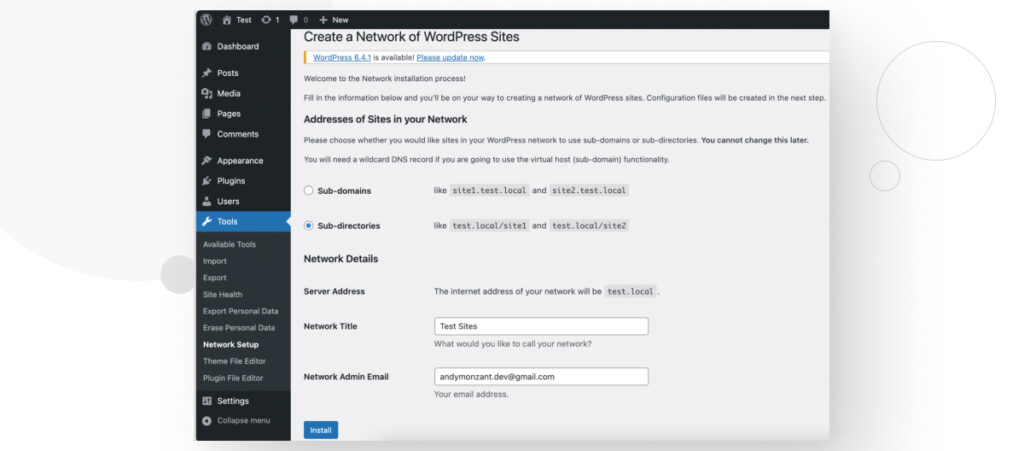
The next screen has a PHP snippet you’ll have to paste in wp-config.php.
Again, find the line that says /* That's all, stop editing! Happy publishing. */ and paste the snippet above it.
The snippet varies depending on your specific installation, so it will likely look different than this screenshot.
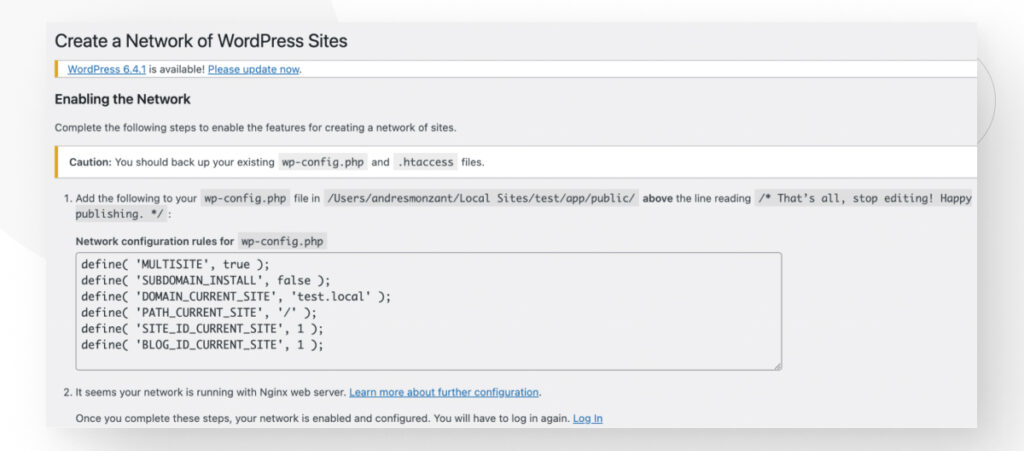
After pasting the snippet, you’re almost done. If your installation runs on an Nginx server, follow these instructions.
If it runs on an Apache server, paste the additional provided snippet in .htaccess. You can access this file via FTP or using a plugin like Yoast SEO, which has a File Editor feature that allows you to edit .htaccess.
After that, the setup will be complete and you can start creating new sites, each with its own blog!
Step 5: Set Up Your New Site(s)
Now your site is up and running!
To create a new subsite navigate to My Sites > Network Admin > Sites.
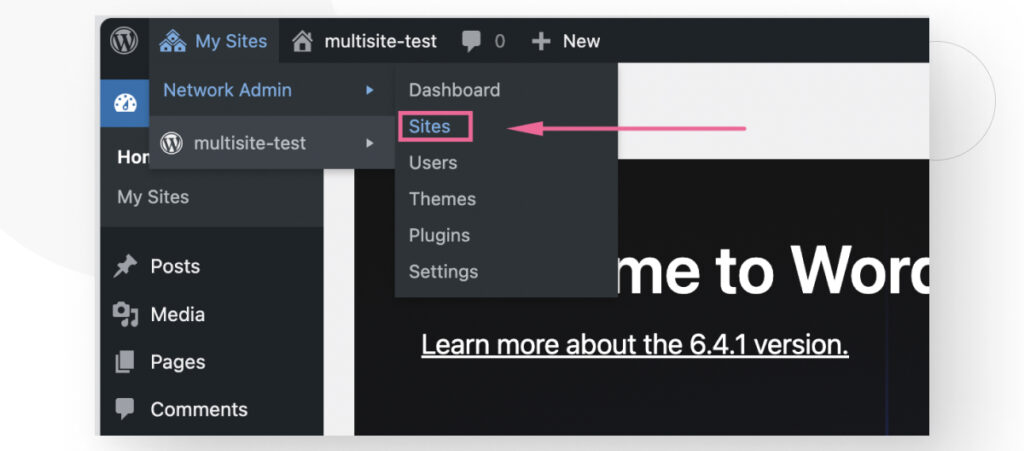
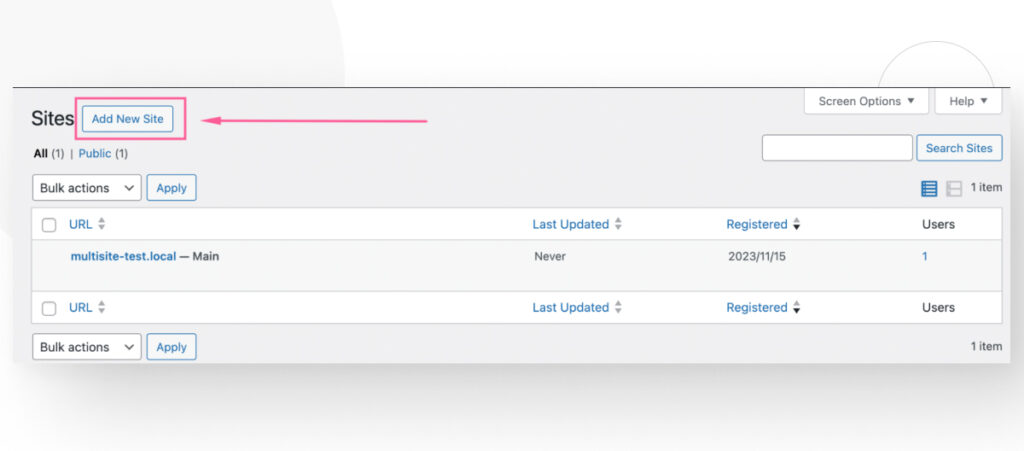
On the following screen, you’ll see a list of existing sites. You should only see one site since you haven’t created others yet.
Click on Add new site.
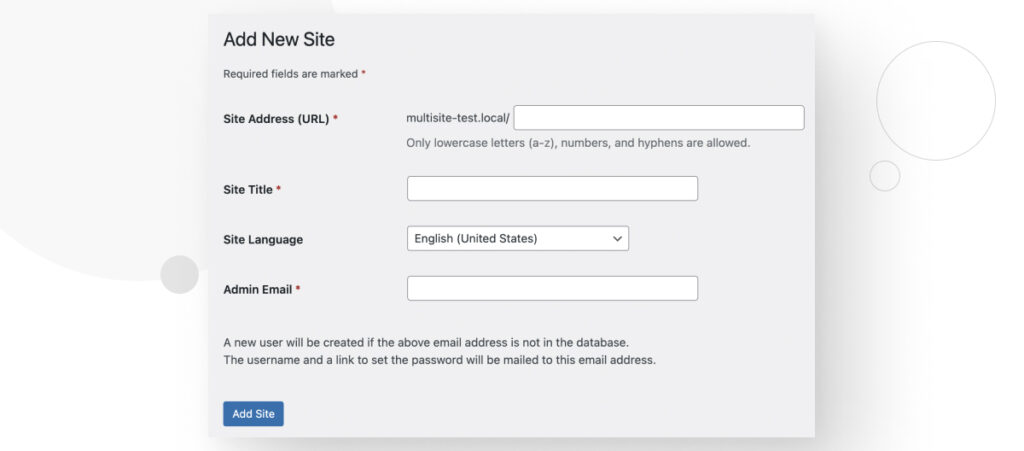
Here you can edit your new subsite’s settings and create it by clicking the Add site button.
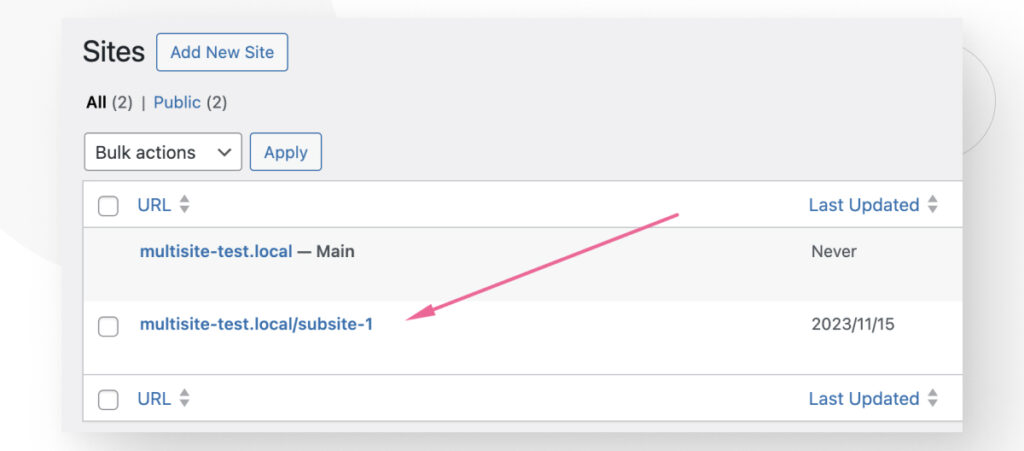
You’ll see the newly-created site in the Sites section.
Step 6: Access Your New Site(s) and Start Blogging
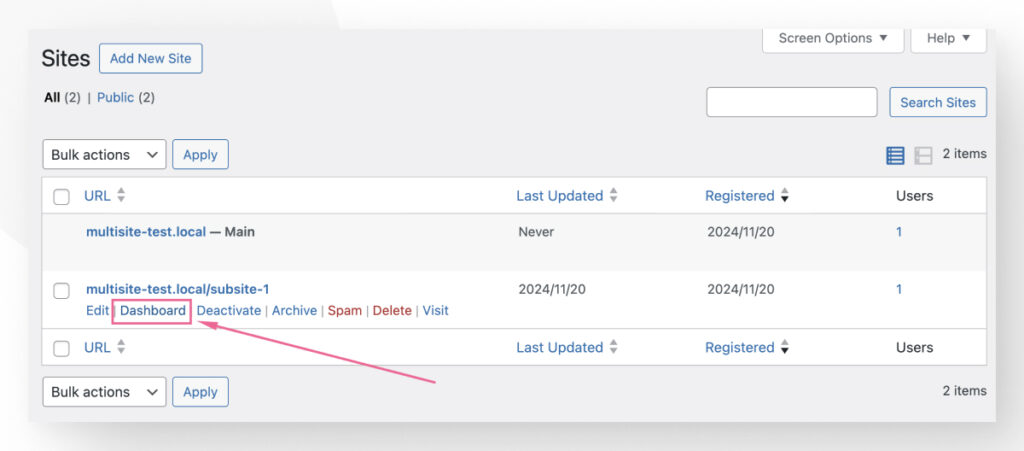
Now that your sub-sites are operational, you can access each site’s dashboard from the My Sites > Network Admin > Sites menu.
Under each site, click on Dashboard to access that site’s dashboard.
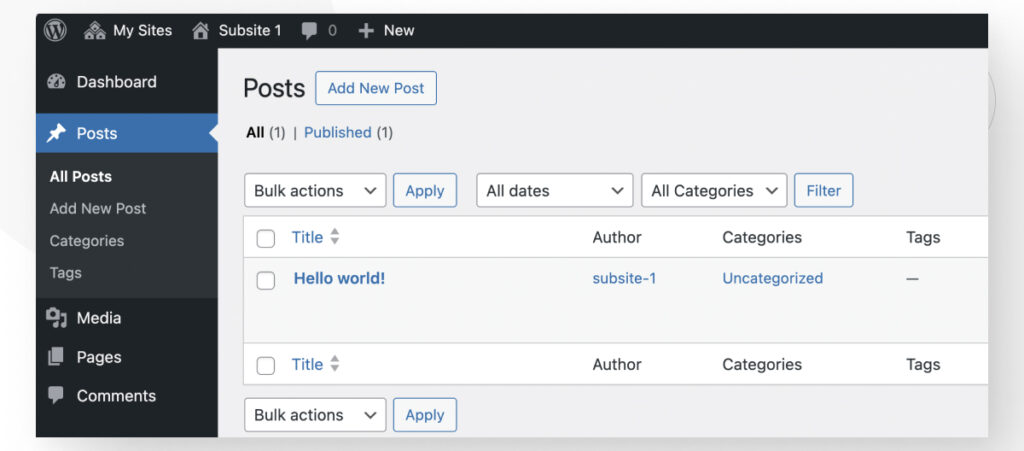
From the dashboard, you can go to Posts > All Posts and start creating new posts on your new, separate blog!
How to Set Up Multisite on a New Installation
Step 1: Download and Install Local
For a new installation, we recommend using a local environment with Local.
Local is an application for Mac, Windows, and Linux that allows you to set up a WordPress site in minutes, and you can later export these WordPress sites into a live server to make your site available to the world.
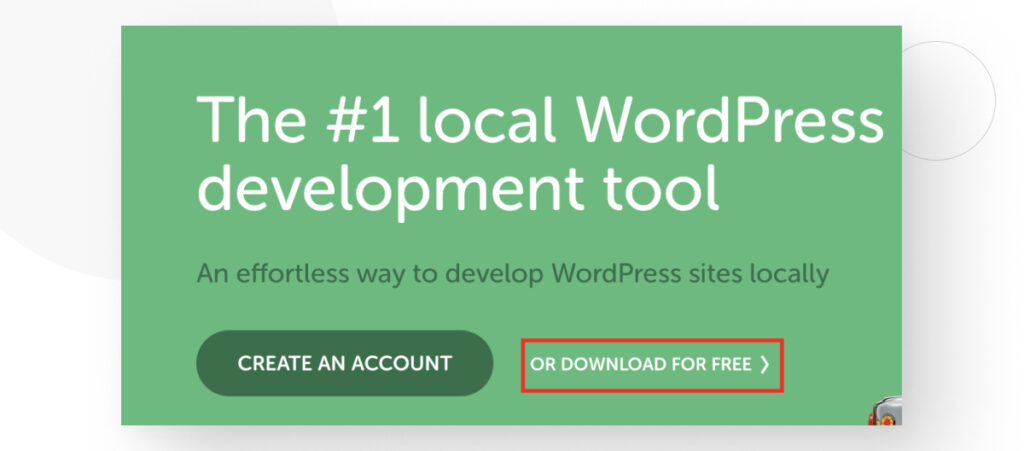
To start using the app, go to Local’s official site and click Download for free. After inputting some user information, you can download Local on your computer.
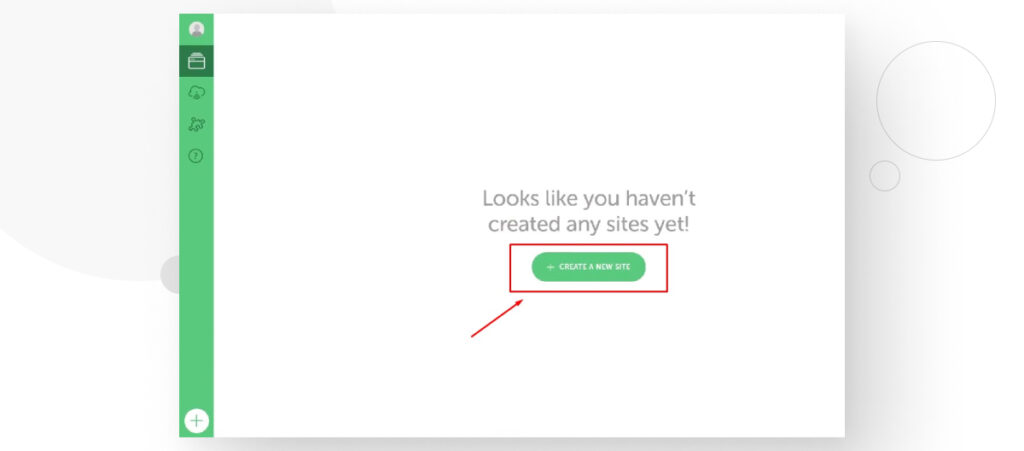
Once downloaded, follow the installation prompts to install it on your computer. When installed, open Local and click on Create a new site.
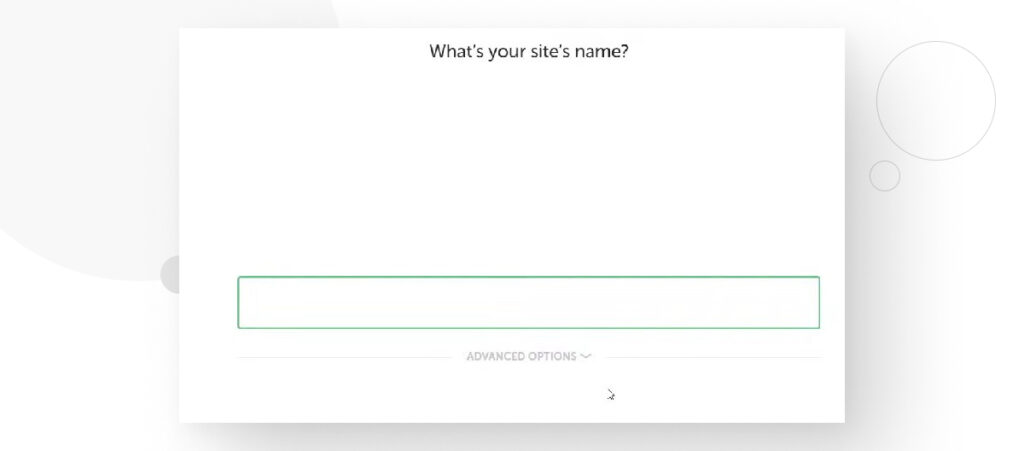
Step 2: Name Your Site
On this screen, you’ll be prompted to name your site. Keep in mind that this name is only for reference within Local.
If you ever push this local environment to a server, it won’t affect your live site.
Step 3: Choose an Environment
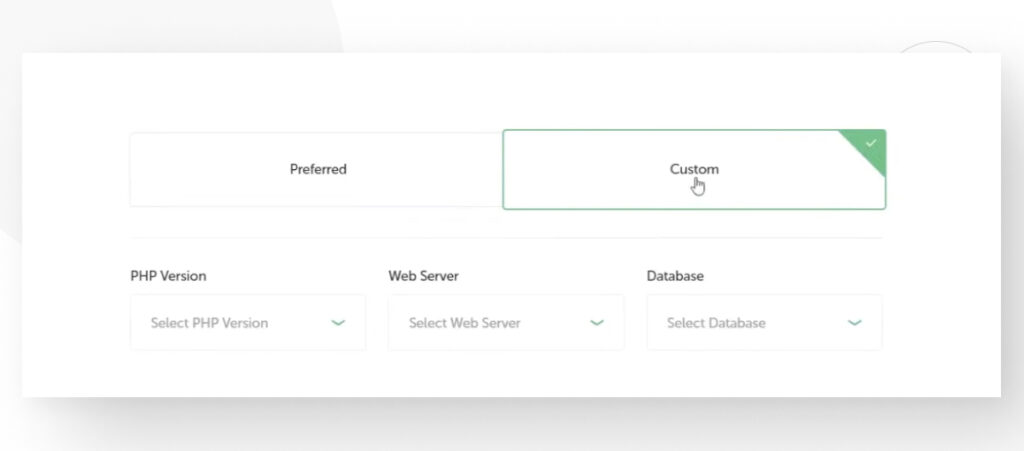
Now you’re in the Choose your environment section, where you can choose the PHP version, web server type, and database your site will use.
You can choose Preferred for the recommended settings or Custom if you want a specific combination of settings.
Click Continue.
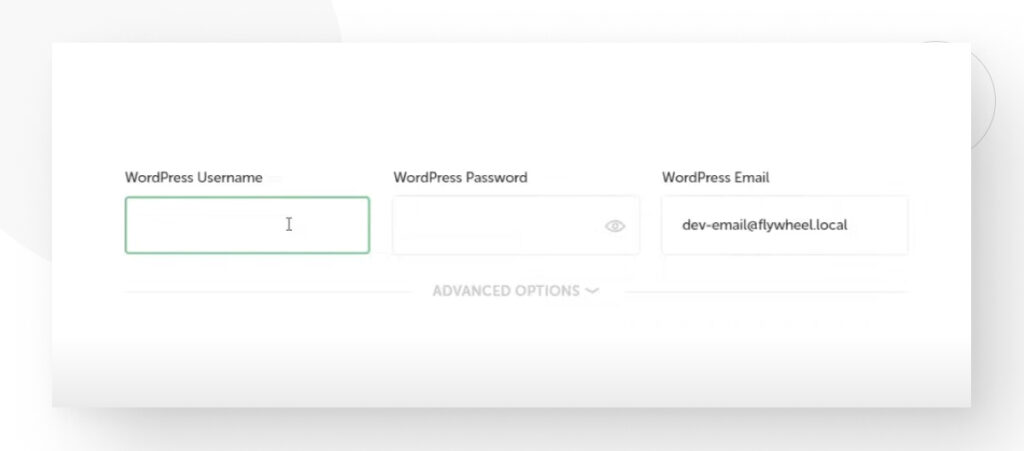
Step 4: Create Your Username and Password
Now it’s time to create your admin password and username, which you’ll use to log in locally, just as you would on a live server.
Step 5: Configure Multisite
This is the part where you set up your multisite. Click on Advanced Options.
On the dropdown menu Is this a WordPress Multisite?, select whether you want your subsites to be subdirectories or subdomains.
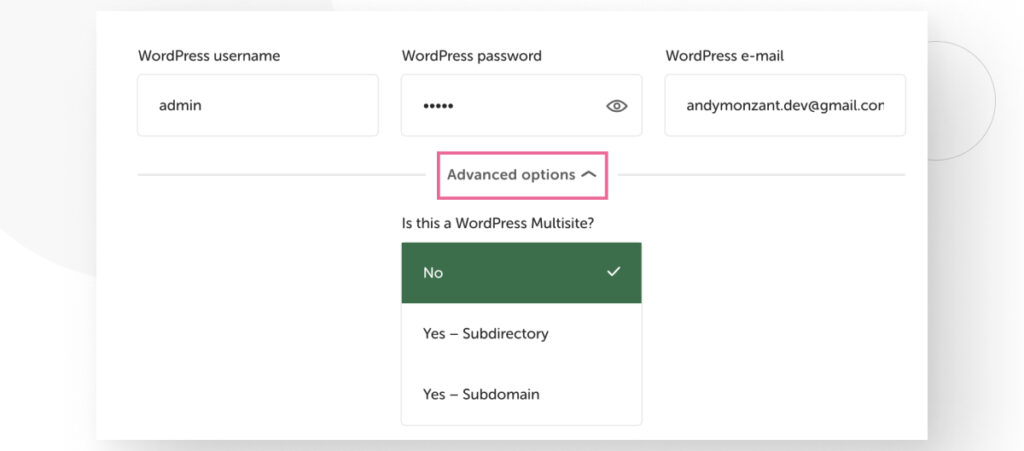
Finally, click on Add site in the bottom-right corner to create your site.
Step 6: Set Up Your New Site(s)
Now your site is up and running! To create a new subsite navigate to My Sites > Network Admin > Sites.

On the following screen, you’ll see a list of existing sites. You should only see the site you just created.
Click on Add new site.

Here you can edit your new subsite’s settings and create it by clicking the Add site button.

You’ll see the newly created site in the Sites section.
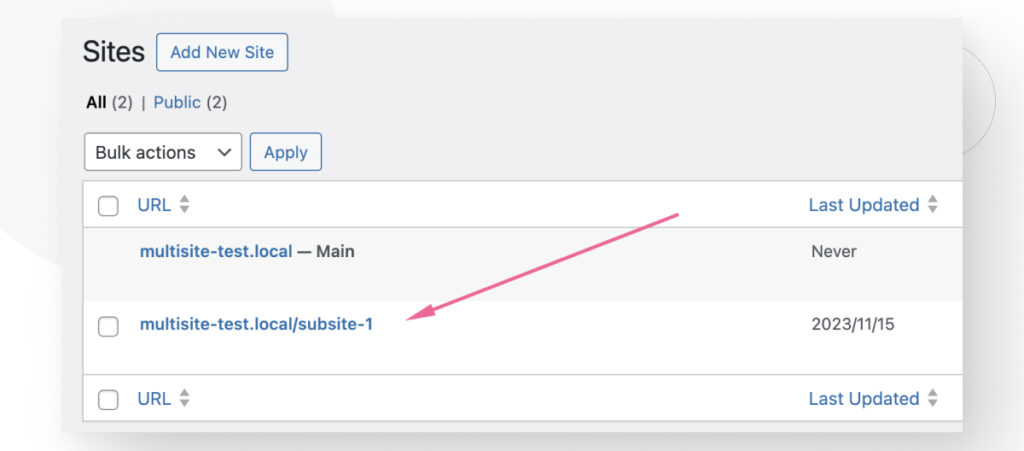
When creating multisite instances locally, keep in mind that Local doesn’t support domain mapping.
Other than that, subdirectories require no additional steps to work properly, but subdomains take a bit more effort. To fully enable subdomains, follow these steps.
Step 7: Enable Subdomains (if Necessary)
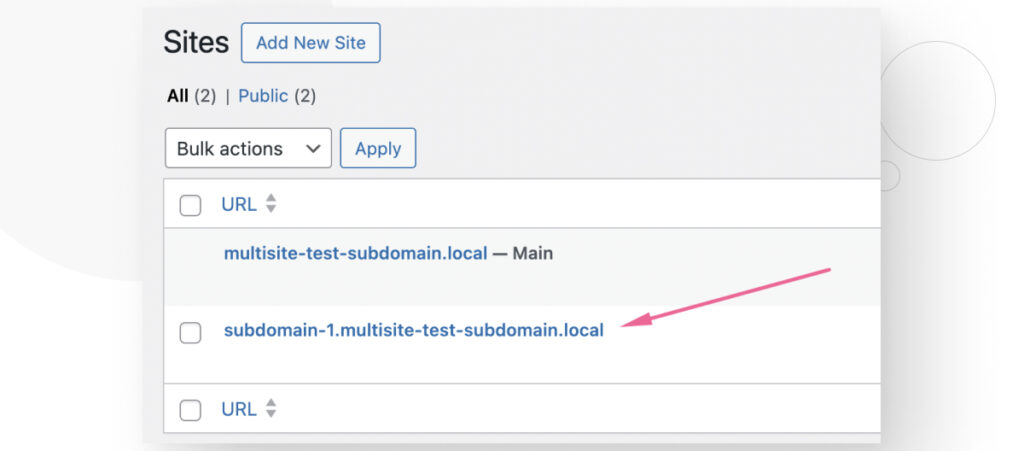
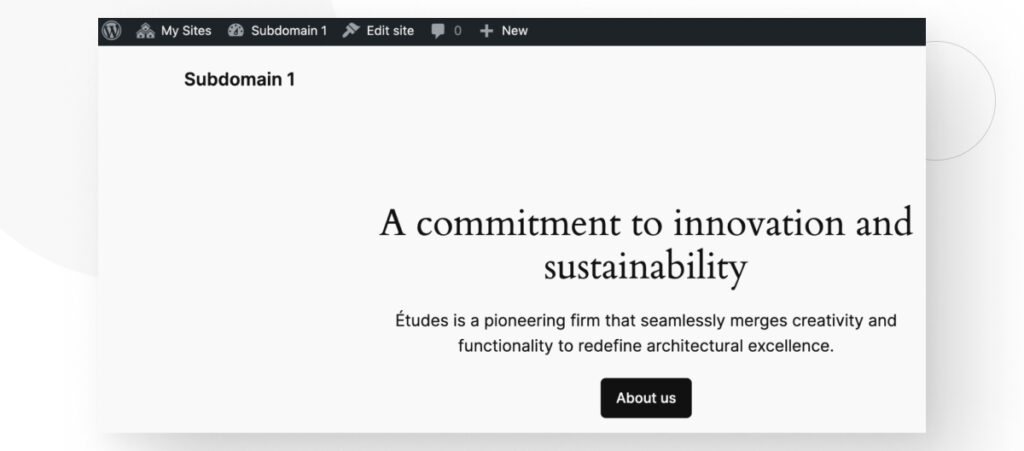
After creating a multisite instance and selecting the Yes – Subdomain in Advanced settings, create a new subsite. You’ll see your newly created subdomain in the Sites section. Notice the subdomain.multisitenetwork.com format.
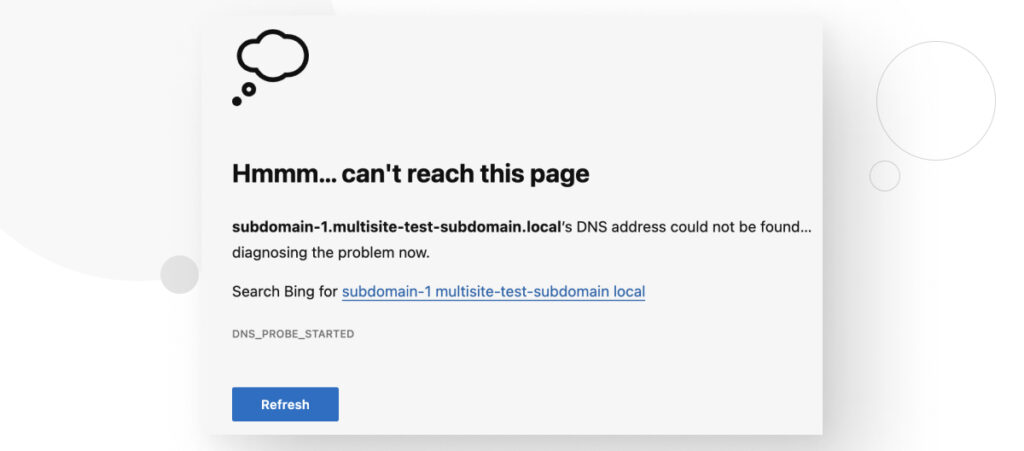
If you visit your new subdomain, you’ll see an error screen.
To fix this, navigate to Local and click the Sync MultiSite domains to hosts file button.
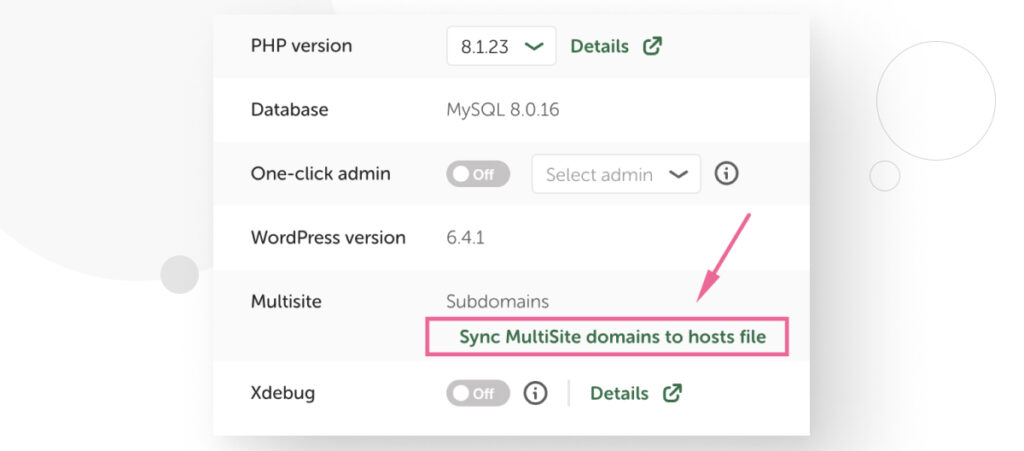
This will fully enable subdomains, and you’ll be able to edit and visit them normally.
Step 8: Access Your New Site(s) and Start Blogging
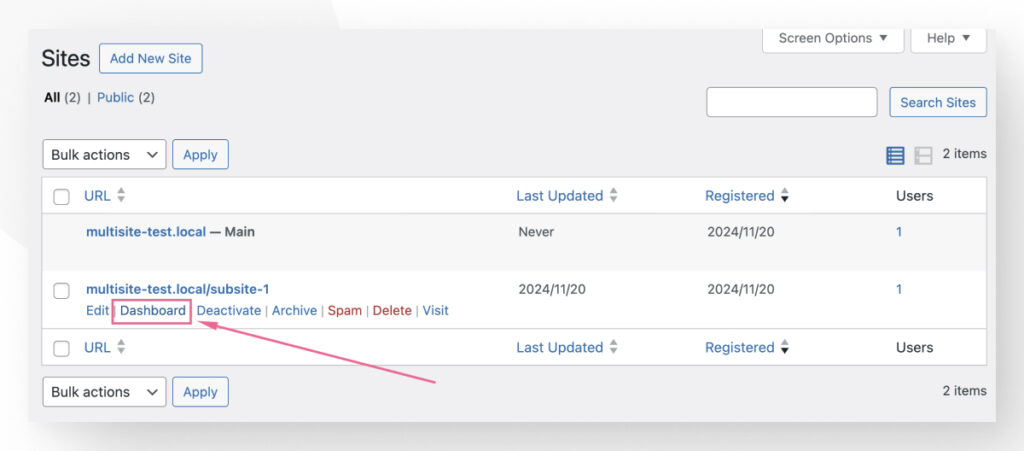
Now that your sub-sites are operational, you can access each site’s dashboard from the My Sites > Network Admin > Sites menu.
Under each site, click on Dashboard to access that site’s dashboard.
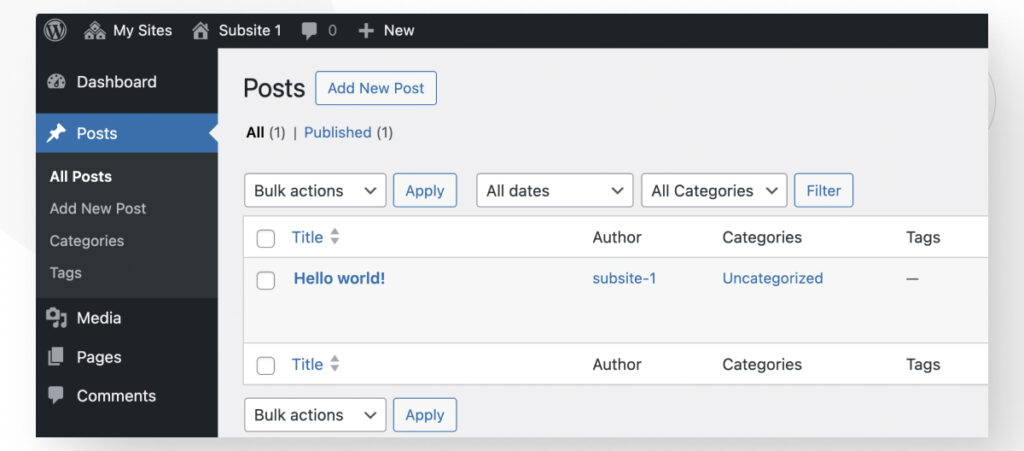
From the dashboard, you can go to Posts > All Posts and start creating new posts on your new, separate blog!
WordPress Allows You to Run Multiple Blogs in Various Ways
While WordPress doesn’t provide the option of running multiple blogs by default, the platform is flexible enough to allow you to effectively run multiple blogs if you know what you’re doing.
You can do it by creating various categories and linking to each category separately. Alternatively, you can set up a multisite network, where every site will have its own individual, separate blog.
Choose whichever option best suits your needs and capabilities. Creating categories is the most beginner-friendly and fastest method.
On the other hand, setting up a multisite network may be a useful experience if you want to become a professional WordPress developer who can handle everything the platform has to offer. It’s your choice!
If you found this post useful, read our blog and developer resources for more insights and guides!
Related Articles
How to... / 5 min read
How to... / 5 min read
How to Make a Subscriber Into an Admin on WordPress?
While it's not the most common situation, at some point, you may find yourself needing to make a Subscriber into an Admin on your WordPress site. Maybe you need to…
Read More
How to... / 3 min read
How to... / 3 min read
How to Grant Secure Access to a Not Live WordPress Site During Development
When developing a WordPress site, you often need to collaborate with multiple developers and grant access to the website owner so they can review the progress themselves. However, granting access…
Read More
Industry Insights / 11 min read
Industry Insights / 11 min read
Do You Need a Web Developer to Build a WordPress Site?
If you’re building a WordPress site or considering building one, you wonder whether you need a web developer to create it or you can do it yourself. The answer can…
Read More
How to... / 6 min read
How to... / 6 min read
How to Change the Bottom Padding Dimensions on WordPress Blocks
If you're learning to modify your WordPress site's layouts and design, you may be wondering how to change the bottom padding dimensions of some of its elements. If that's the…
Read More
How to... / 10 min read
How to... / 10 min read
How to Disable the “Similar Posts” Section in WordPress Blogs
If you’re diving deeper into customizing your site, you may be wondering how to disable the “Similar Posts” section that appears on the bottom, sidebar, or footer of your WordPress…
Read More