- Blogs
- WordPress 101
- How to back up your WordPress site? 3 effective methods in 2024
WordPress 101 / 14 min read
How to back up your WordPress site? 3 effective methods in 2024

Learning to back up your WordPress site is an important security measure that guarantees you can minimize time and resources lost if your website goes down irreparably.
It can happen due to a security breach, an incompatible integration with a plugin, and many more reasons. Regular backups will help you be ready for these inconveniences and have a plan of action for when they happen.
This article will explore the following:
- The basic file structure of WordPress sites gives you context on what exactly you’ll back up.
- The different types of backups.
- The pros and cons of each method.
- Our preferred method is based on our experiences as developers.
Let’s get into it.
What does your WordPress site consist of?
Before describing the various ways to back up your WordPress site, let’s explore the fundamentals files that make it possible.
Your WordPress site consists of two major components: your root directory and your database.
WordPress root directory
The main folder or directory contains the foundational PHP and JS files, subdirectories, themes, plugins, and other files that make up the site. The WordPress root directory is located in the server where your site is hosted, usually in a folder called root, public, root_html, or your website’s name.
Specifically, the root directory contains 3 folders and several other files of various formats, but mostly .php. The 3 folders are wp-admin, wp-content, and wp-includes.
- Wp-admin contains the data from your dashboard.
- Wp-content contains your data from your themes, plugins, and media uploads.
- Wp-includes contains all the WordPress functions necessary for your website actually to run (posting, widgets, and more).
The remaining files outside the subdirectories also contain crucial data for your website. wp-config.php, for example, contains functions for connecting to the database and global settings.
WordPress database
The WordPress database contains the content of your website in the form of tables. Those tables include your posts, individual web pages, tags, comments, passwords, configuration settings, and more.
The database operates on MySQL-like databases, such as MySQL, MariaDB, and AuroraDB.
3 methods to backup your WordPress site
Now that we have a better idea of what we’ll be backing up let’s move on to the 3 main backup methods for your WordPress site.
How to backup your WordPress site manually
Most hosting providers give you access to cPanel, so we’ll use cPanel for the root directory backup. Then we’ll use phpMyAdmin to back up your database.
Manually backing up your WordPress root directory with cPanel
1. Login to your cPanel account.
2. Go to File Manager > public_html. You are now in your root directory.
3. Select all subdirectories and loose files, then right-click on them and select Compress. You can also simply right-click public_html from the root and press Compress.
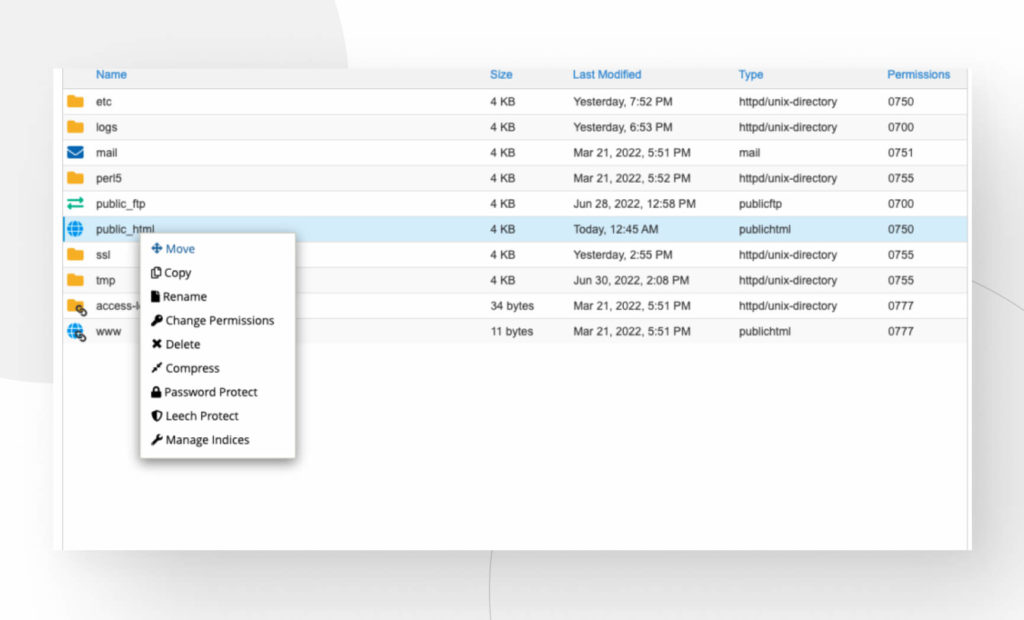
4. A menu will appear. Out of the options available, select Zip Archive and then click on Compress Files in the lower right corner of the menu. This will create a compressed .zip file containing all files in your root directory.
5. Right-click the archive and press Download.
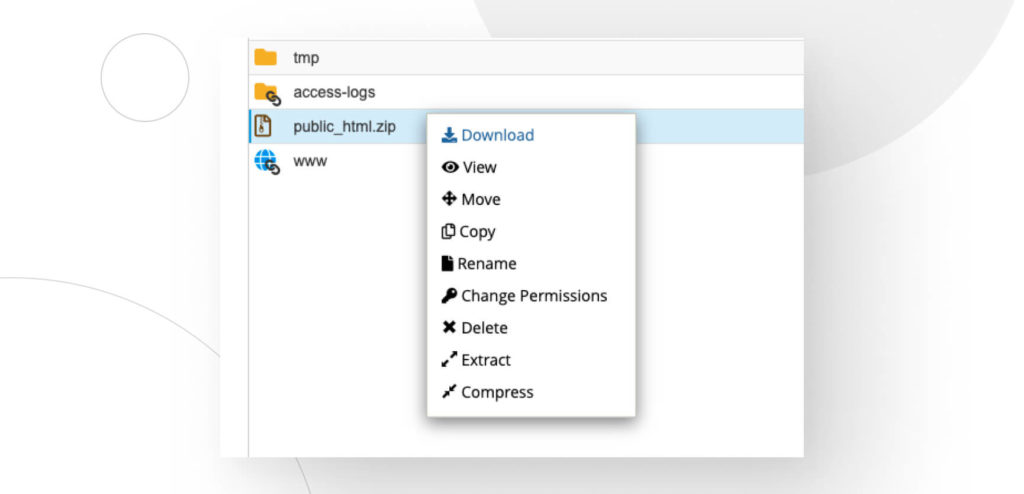
That’s it! You’ve now created a manual backup of your root directory. If you’re going to use this method frequently, it’s best to label each backup appropriately to keep track of its contents. Keep in mind that you can directly download every file from public_html without compressing them, but putting them all in an archive makes moving them around much more manageable.
Finally, you should keep each backup in multiple locations (your drive, an external drive, cloud storage, etc.) to prevent an unfortunate event from wiping out your site’s history.
Restoring your root directory’s manual backup with cPanel
- Login to your cPanel account.
- Find the Backup Wizard and click on it.
- Click on the Restore button. You’ll be given several options. To restore your root directory, choose Home Directory.
- Click on Choose File and explore your folders until you find the .zip file containing the backup for your root directory.
- After choosing your backup, click on Upload.
Manually backing up your WordPress database with phpMyAdmin
To download all of your current databases without compression, follow these steps:
1. Login to phpMyAdmin on your server.
2. On the left-side panel, click on your WordPress database. It’ll likely be named just like your website. You’ll see all the tables inside your WordPress website.
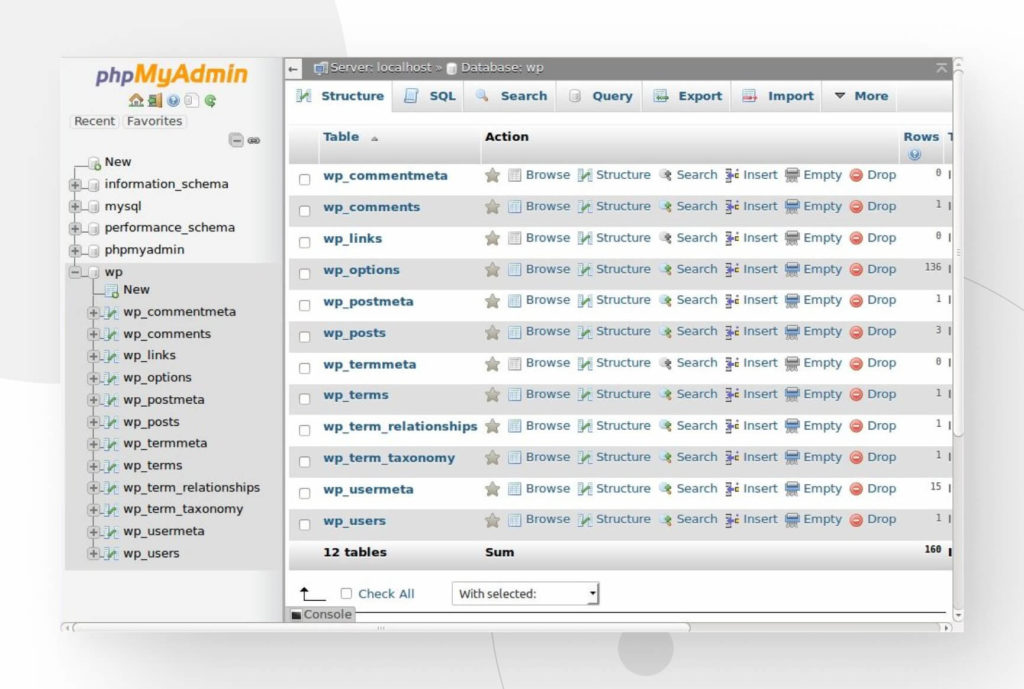
3. Go to the Export tab. Select Quick on “Export method” and select SQL from the “Format” dropdown menu. If you need your database to be in a specific format, choose it. For most people, SQL will be fine.
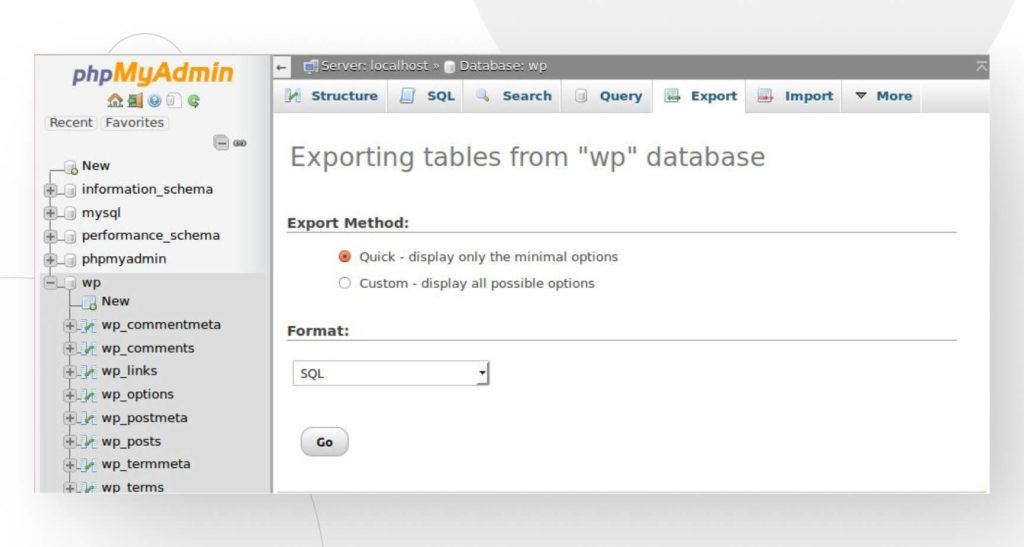
4. Click on Go.
Done! Now your database has been fully downloaded. You can also select Custom on “Export method” to personalize what you download. But if you want to back up everything, the fastest way is to select Quick.
Restoring your databases’ manual backup with phpMyAdmin
You must follow a few simple steps to restore a database you manually backup. Keep in mind that when you load a database, you manually backed up, and you’ll overwrite the current database.
These are the steps:
- Login to phpMyAdmin on your server.
- On the left-side panel, click on your WordPress database. Again, it’ll likely be named just like your website.
- Go to the Import tab. Click on Choose file. Explore your folders and select your database backup.
- Click on Go.
Now you’ve overwritten your current database with the previously backed-up database.
Backing up your WordPress site with a plugin
There are multiple plugins to create backups; let’s explore 5 of the most popular ones to understand their pros and cons and help you make a more informed decision when choosing.
Jetpack Security
Pros
- Jetpack Security is an all-in-one plugin that includes VaultPress, a backup plugin.
- Daily and real-time backups
- Spam filters
- Security scans
- Easy restoration
- Site migration
- Activity log
- Intuitive interface.
- Created by Automatic, the company behind WordPress.com. Compatibility is not an issue.
- Beginner-friendly.
- Great overall resource for agencies managing multiple clients from a single WordPress.com account.
Cons
- Effectively, it lacks monthly plans. Only yearly plans are available.
- Your site may become heavyweight if you enable all Jetpack Security features.
- Not available for WordPress.org users, only for WordPress.com users.
Pricing
- VaultPress on its own: $60 per year.
- Jetpack Security: $20 per month, billed yearly ($240 per year).
BackupBuddy
Pros
- Real-time backups.
- Off-site backups.
- Scheduled backups.
- Multiple cloud storage options.
- Beginner-friendly UI.
- Malware scan features.
- Migration features.
- Compatibility with most WordPress hosting services.
Cons
- No free trial option. Premium-only.
- Pricing is annual only.
- Does not support WordPress multisite.
Pricing
- $99 to $299 per year.
- $749 per year for the WordPress Web Designer’s Toolkit, which contains all iThemes services.
UpdraftPlus
Pros
- The free version offers many features.
- Restoration features in addition to backups.
- Multiple consumer-focused cloud options, including Google Drive, Dropbox, Microsoft OneDrive, and Backblaze.
- Multiple business-focused cloud options, including Amazon S3, Google Cloud Storage, and Microsoft Azure Storage.
- Migrate websites and clone them for staging.
- Scheduled backups, with the option to apply different frequencies for the database and the root directory.
- Automatic backup when updating plugins and themes.
- The premium version allows you to restore backups from other backup plugins.
Cons
- Doesn’t offer real-time backups.
- It can be costlier than others, especially when buying separate extra functionalities.
- More geared towards smaller websites.
- No security scanning or malware monitoring.
- Yearly plans only.
Pricing
- $70 to $399 per year.
Blog Vault
Pros
- 7-day free trial.
- 24/7 support.
- Beginner-friendly.
- Works for sites of all sizes.
- Compatible with all major web hosts and hundreds of others.
- Advanced monitoring.
- Real-time backups for WooCommerce sites.
- Reliable and easy-to-use migration features.
- Easy staging site setup.
Cons
- Downloaded backups have to be restored manually.
- Demands FTP access.
- Prices can be high.
Pricing
- $89 – $299 per year for 1 site.
- $199 – $899 for 3 sites.
- $399 – $1999 for 10 sites.
- $100 – $500 for add-ons such as real-time backup, which is not available for all plans.
BackWPup
Pros
- The free version is one of the most complete free WordPress backup plugins.
- Supports multisite backups.
- Multiple external storage options.
- Option to include/exclude folders for the backups.
- Restoration script.
- Log files for developers.
Cons
- No real-time backups.
- Mostly a backup plugin with limited migration features compared to alternatives.
- Lacks a migration wizard. Requires manual migrations for remote sites.
- No option to selectively export data tables.
- Only yearly paid plans.
Pricing
- $69 per year for 1 WordPress installation, all the way up to $349 for 100 installations.
How to restore your backup
We’ve used UpdraftPlus, and it’s very reliable, so we’ll be using it for this example. Other plugins will have similar but probably slightly different steps.
Here’s how you restore a backup with UpdraftPlus.
- On your website’s dashboard, go to Settings > UpdraftPlus Backups.
- In the section Existing backups, you’ll have a list of backups UpdraftPlus has created. Each backup will have a Restore button to restore that specific backup. Select the backup you want to restore and click Restore.
- Now you’ll be given the option to restore specific file types: Plugins, Themes, Uploads, Other, and Database. Check every type to perform a full restore, then click Restore.
- On the following screen, click Restore, and the process will begin.
- Wait for the restoration to complete. You’ll get a “Restore successful” message at the end.
Finally, click on Return to UpdraftPlus configuration to finish the process.
How to back up your WordPress site with your web host provider
Multiple web host providers offer the option of creating website backups in a few clicks. Many web hosting providers make regular backups (daily, weekly, etc.), so you need to configure those for the frequency that works best for you.
You can also manually perform a backup if you want to preserve the website before making a major change, such as installing a new plugin or migrating to another web hosting provider. The exact steps will vary depending on your web host, but here’s how you can do it with WPEngine.
- Login to your account and open Backup Points in the User Portal.
- Click Backup Now.
- A panel will pop up, prompting you to input a description for the backup and a list of email addresses that will be notified when the backup is complete.
- Click on Create Backup. The environment of the backup depends on the environment the website belonged to at the time of the backup. If you’re backing up a production website, you’ll read Create Production Backup, for example.
Restore a backup with your web host provider
Again, we’ll be using WPEngine.
- Login to your account and open Backup Points in the User Portal.
- Select a backup from the backup list and click Restore.
- A pop-up will appear. In Restore to, you’ll select the environment to which you’ll restore this backup. In Restore with database, select “Yes” or “No” to restore your database (or not). Finally, in Send notification to, choose the email that’ll receive the notification when the backup is done.
- Click on Restore backup.
The restore may take a few minutes or a few hours, depending on the size of your website.
Pros and cons of backing up your WordPress website
Manually
Pros of backing up your WordPress website manually
- It’s perfectly effective and requires no additional investment.
Cons of backing up your WordPress website manually
- It’s the least time-efficient method because you’ll have to do it every time you need a backup instead of relying on automated processes.
- More prone to human error, leading to potentially incomplete backups.
- May expose your website to security threats if the storage location is compromised.
- They almost always require a manual restoration, which takes more time and is more prone to human error.
- Over time, you may lose track of how each backup differentiates from one another unless you document them extensively.
With a plugin
Pros of backing up your WordPress website with a plugin
- Straightforward and time-efficient.
- Less technical knowledge is required.
- Certain plugins can perform real-time backups for e-commerce sites, letting you roll back your site without losing any orders.
- Certain plugins keep several backups at a time (like three or five) in case you need to roll back to a specific past version of your site. Keep in mind that the oldest backup will be replaced with the newest one every time a backup is made.
Cons of backing up your WordPress website with a plugin
- A large number of backup plugins are available, and their multiple plans and options can be overwhelming.
- Free plans may not back up all your data or some other limitation. If you want a good product, you’re stuck paying a fee.
- Some of the paid plans can be a significant investment. Choose wisely.
- Sometimes backups are saved on the same server as your WordPress site. If an incident compromises your website, it may compromise the backup, too. Choose a plugin with external storage options.
With your web hosting provider
Pros of backing your site with your web host provider
- Straightforward and time-efficient.
- Less technical knowledge is required.
- You take advantage of a quick and easy-to-use web hosting feature without investing in an additional plugin or taking the time to do it manually.
- Certain providers store multiple backups at a time.
Cons of backing your site with your web host provider
- Backups may be saved on the same server as the website.
- You may utilize too much server storage space if you’re not careful where the backup is stored.
- Providers may not preserve your backups for long, forcing you to manually save important backups before they are replaced.
Which backup option do we use and recommend?
The go-to option for us as a development agency is using our web host provider, WPEngine. It’s been the most cost-efficient and convenient option because it integrates into our everyday web management duties.
Whenever possible, back up with your hosting provider. But remember to store the backups in an external space, not on the same server.
Our second option would be a premium plugin if you are unsatisfied with the backup terms your web host provider offers or want an extra backup option. We’ve used UpdraftPlus and have been very satisfied with it.
Finally, our least preferred option is the manual backup. It’s the most prone to human error and the easiest to mess up. There may be cases when you might want to keep a manual copy. Still, it doesn’t happen often, and the alternatives are almost always better.
What should you back up?

If you want to back up your site, you need to create copies of everything. Every single database and root directory file must be backed up to preserve your website with 100% of its functionality and content intact as of the time of the backup.
How often should you back up your website?
Depends on the nature of your website. If it’s an eCommerce site with daily orders, you should back it up at least daily, but maybe more often if necessary.
If you’re a blogger who doesn’t need to store massive amounts of data, daily backups could work, but less often could also work. For websites that don’t change often, like business or personal sites that aren’t particularly active, you may need to determine the frequency that works best for you.
Ultimately, you must study your needs and determine the frequency best suits them.
The importance of backing up your WordPress website
There are many benefits to developing good backup practices. Some of the most significant include:
- Backups let you perform restorations if your site’s security is compromised or deliberately attacked or you suffer any other major failure.
- You can roll back your site if an update or installation causes compatibility issues.
- Your website’s files will be available at multiple locations.
- Increases business reliability.
- Backups save you the resources lost from cyberattacks or any other major failure which could wipe out your entire site.
- Protection from human error.
- Many backup plugins or web hosting services allow you to create staging environments for testing major changes.
- Downtime means lost money, especially for commerce sites. Backups reduce downtime.
- They foster good security practices by informing website owners of their sites’ potential threats.
Conclusion
Backing up your website is something every site owner should take very seriously, and there are various ways to do it. They can all be reliable, but they all have their cons, too.
To determine which backup practices will work best for your site, you need to explore your needs and determine which alternatives fulfill them the best. In general, backup plugins and web hosting solutions are reliable and time-efficient, but the details of the service may not work the best for you (inconvenient locations, security threats, etc.).
On the other hand, manual backups are relatively easy but take more time to perform and manage. However, in certain situations, they may be useful.
Constantly evaluate your evolving needs and explore solutions for them. Eventually, you’ll reach the best backup strategy for your website.
If you found this post useful, read our blog and resources for more insights and guides!
Related Articles

How to... / 5 min read
How to... / 5 min read
How to Make a Subscriber Into an Admin on WordPress?
While it's not the most common situation, at some point, you may find yourself needing to make a Subscriber into an Admin on your WordPress site. Maybe you need to…
Read More
How to... / 3 min read
How to... / 3 min read
How to Grant Secure Access to a Not Live WordPress Site During Development
When developing a WordPress site, you often need to collaborate with multiple developers and grant access to the website owner so they can review the progress themselves. However, granting access…
Read More
Industry Insights / 11 min read
Industry Insights / 11 min read
Do You Need a Web Developer to Build a WordPress Site?
If you’re building a WordPress site or considering building one, you wonder whether you need a web developer to create it or you can do it yourself. The answer can…
Read More
How to... / 6 min read
How to... / 6 min read
How to Change the Bottom Padding Dimensions on WordPress Blocks
If you're learning to modify your WordPress site's layouts and design, you may be wondering how to change the bottom padding dimensions of some of its elements. If that's the…
Read More
How to... / 10 min read
How to... / 10 min read
How to Disable the “Similar Posts” Section in WordPress Blogs
If you’re diving deeper into customizing your site, you may be wondering how to disable the “Similar Posts” section that appears on the bottom, sidebar, or footer of your WordPress…
Read More