
How to Fix “There Has Been a Critical Error on This Website” in WordPress

“There has been a critical error on this website” is a WordPress error message that appears when a PHP fatal error prevents your site from running necessary scripts. Let’s find out what causes this error and explore 7 possible solutions to get your site up and running again.
Key Takeaways
- WordPress critical errors happen when scripts fail to load and your site crashes.
- Solving critical errors may involve using the debug feature, restoring backups, switching to default themes, solving plugin incompatibilities, reuploading core files, or increasing the PHP memory limit.
What Is the “There Has Been a Critical Error on This Website” Error in WordPress?
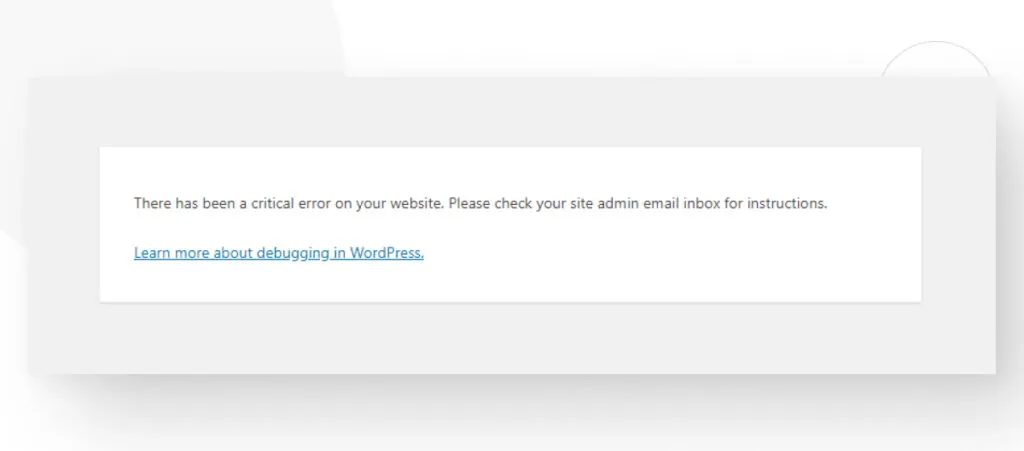
The “There has been a critical error on this website” message appears when a fatal PHP error occurs, preventing your site from loading the scripts it needs to run properly. These scripts may be associated with your WordPress core files, themes, or plugins.
When scripts fail to load due to a fatal PHP error, you may see the following error screen when accessing your site’s backend.
The message mentions you should check the site administrator’s email inbox. If you do, you will likely find an automated message from WordPress. The subject will be “Your Site Is Experiencing a Technical Issue,” and the message will contain the following text.
WordPress’s Email
Howdy!
Since WordPress 5.2 there is a built-in feature that detects when a plugin or theme causes a fatal error on your site and notifies you with this automated email.
In this case, WordPress caught an error with one of your plugins, [plugin name].
First, visit your website [your site’s URL] and check for any visible issues. Next, visit the page where the error was caught [page URL] and check for any visible issues.
Please contact your host for assistance with investigating this issue further.
If your site appears broken and you can’t access your dashboard normally, WordPress now has a special “recovery mode”. This lets you safely login to your dashboard and investigate further.
[URL to access your site in recovery mode]
To keep your site safe, this link will expire in 1 day. Don’t worry about that, though: a new link will be emailed to you if the error occurs again after it expires.
When seeking help with this issue, you may be asked for some of the following information:
WordPress version: [your WordPress site’s version]
Active theme: [your active theme]
Current plugin: [the plugin causing the issue]PHP version: [your current PHP version]
The content may be slightly different depending on what caused the problem, but the email will provide you with a link to access your site in “recovery mode,” providing access to your admin dashboard (which was likely previously inaccessible) to let you make the necessary changes to bring your site back up.
While recovery mode is not mandatory for every solution we’ll explain moving forward, some of the methods below require you to use it.
Let’s dive into the possible solutions for the WordPress critical error issue.
7 Ways to Fix the “There Has Been a Critical Error on This Website” Error in WordPress
Solution #1: Use WordPress’s Debug Features
The WordPress debug log is a tool for identifying and resolving issues within a WordPress site. It records errors, warnings, and notices generated by the WordPress core, themes, and plugins.
This log helps developers and site admins pinpoint the causes of problems by providing detailed information about what went wrong and where in the code the issue occurred.
The debug log is stored in a file named debug.log within the WordPress core’s wp-content directory. The path to the debug.log file is public_html > wp-content > debug.log.
To activate the debug log, go to the wp-config.php file in your root directory (public_html). Use an FTP client like FileZilla or a hosting control panel like cPanel to access it.
Paste the following code into the wp-config.php file:
define( 'WP_DEBUG', true );
define( 'WP_DEBUG_LOG', true );
These two lines enable WordPress debugging mode and log all debugging information to the debug.log file.
To access the debug file, go to the wp-content folder in public_html. Inside, you should be able to see the debug.log file.
The file contains all the debugging information your site generates.

Use the debug information to pinpoint the problem and fix it, or ask your hosting provider about it.
Solution #2: Restore a Recent Backup in Recovery Mode
Note: Your hosting provider may have its own backup feature, so try to use that feature first before trying this method. Restoring through your provider may be easier and faster.
While a critical error in WordPress prevents you from accessing your admin dashboard, using the recovery URL we mentioned earlier should let you access your site’s backend in recovery mode to restore a recent backup and get your site up again.
We’ve used the UpdraftPlus plugin, and it’s very reliable. In this example, we’ll restore a backup with this plugin. Other plugins will have similar but probably slightly different steps.
How to Restore a Backup
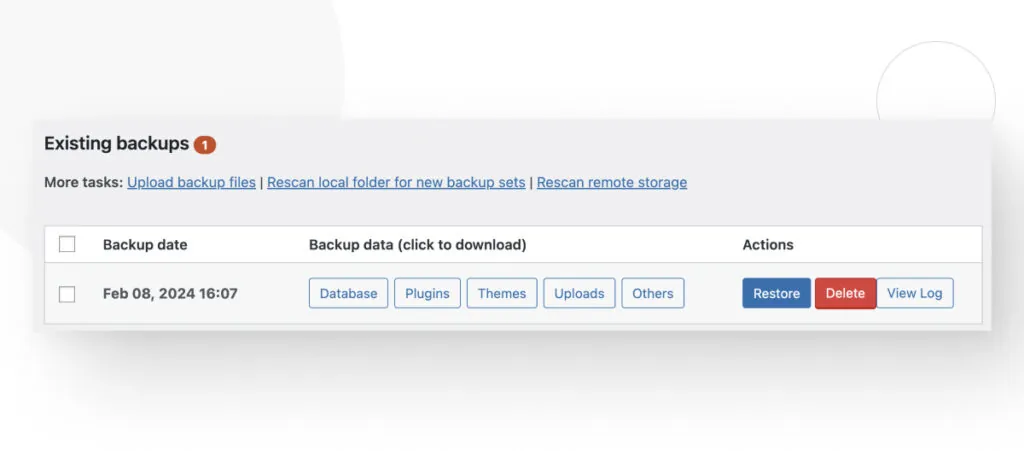
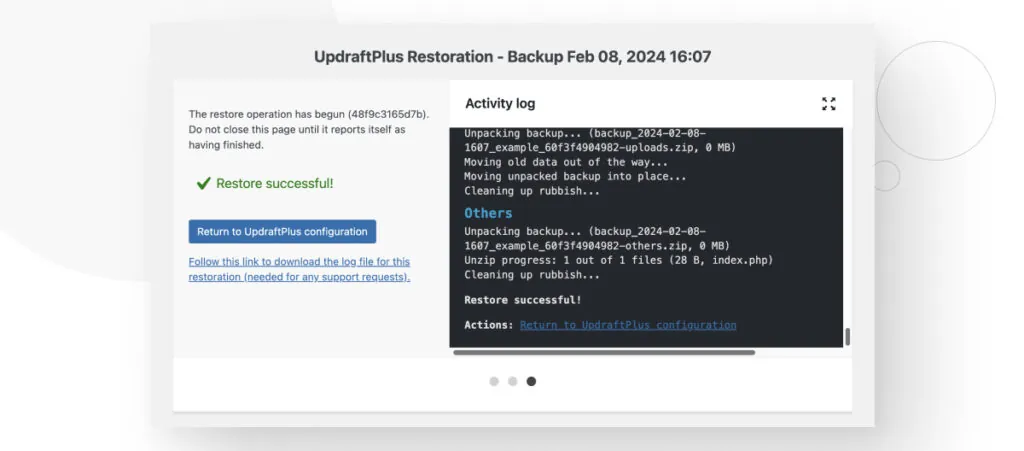
Assuming you already have a backup, here’s how to restore it with UpdraftPlus. On your website’s dashboard, go to Settings > UpdraftPlus Backups.
In the section Existing backups, you’ll have a list of backups UpdraftPlus has created. Each backup will have a Restore button to restore that specific backup. Select the backup you want to restore and click Restore.
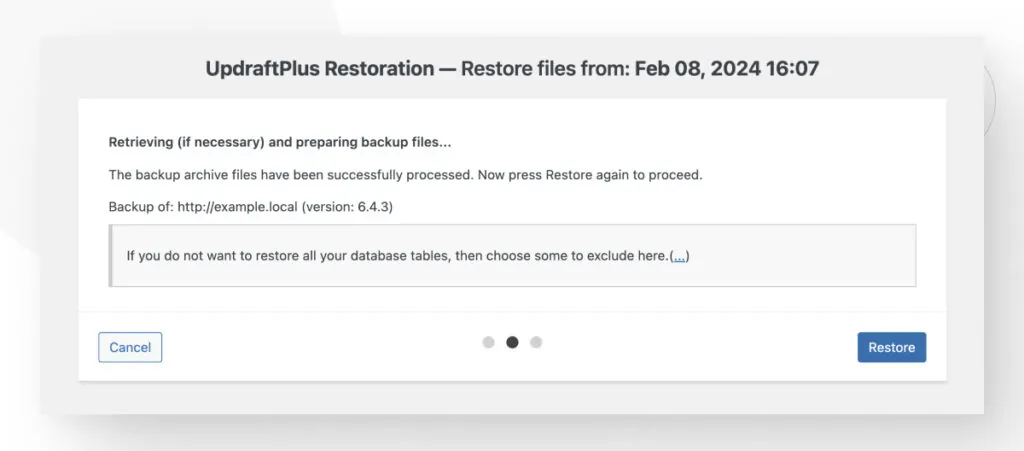
Now, you’ll be given the option to restore specific file types: Plugins, Themes, Uploads, Other, and Database. Check every type to perform a full restore, then click Next.

On the following screen, click Restore, and the process will begin.
Wait for the restoration to complete. You’ll get a “Restore successful” message at the end. Finally, click on Return to UpdraftPlus configuration to finish the process.
Always create backups before installing or updating your plugins, themes, or WordPress versions. This gives you a recent checkpoint to go back to when emergencies like critical errors happen.
Solution #3: Switch to a Default Theme
Sometimes, themes can be incompatible with one of your plugins, leading to unexpected behavior. These incompatibilities can be hard to spot, but the best way to test whether your theme conflicts with one of your plugins is to switch to a default theme.
Use the recovery URL provided by WordPress in the email we mentioned earlier to access your site in recovery mode.
Once in the dashboard, go to Appearance > Themes and activate one of WordPress’s default themes, such as Twenty Twenty-Four, Twenty Twenty-Three, or Twenty Twenty-Two.
If your site returns to normal after switching to a default theme, there’s probably something wrong with the theme you’re using. You may need to contact the developer for support.
Solution #4: Check for Plugin Incompatibilities
It’s common for plugin incompatibilities to cause issues that prevent your site from working as intended. If you believe the critical error may be caused by a plugin incompatibility, you may want to try disabling every plugin and reenabling them individually to see which one is causing the error.
To do that, you have 2 options. You can access the URL provided in the email we mentioned before to enter your admin dashboard in recovery mode. Alternatively, if you don’t have access to your admin dashboard, you can access your site’s folders via FTP and manually disable plugins.
Let’s explore both solutions.
Check Plugin Incompatibilities in Recovery Mode
Go to the URL provided in WordPress’s email to access your site’s backend in recovery mode. Recovery mode allows you to manage your site even after experiencing a critical error, so you can go to Plugins > Installed Plugins.
Click on the empty white box at the top to select all plugins.
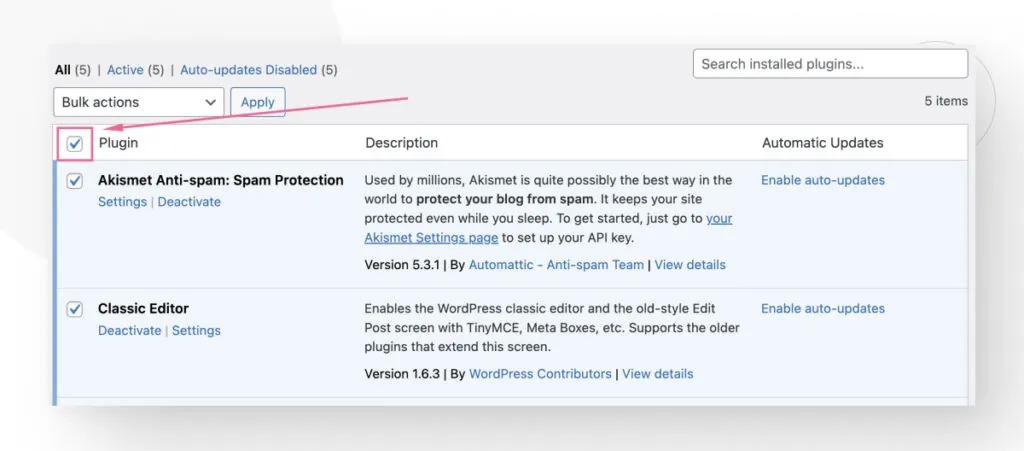
Now go to the Bulk actions menu and select Deactivate.
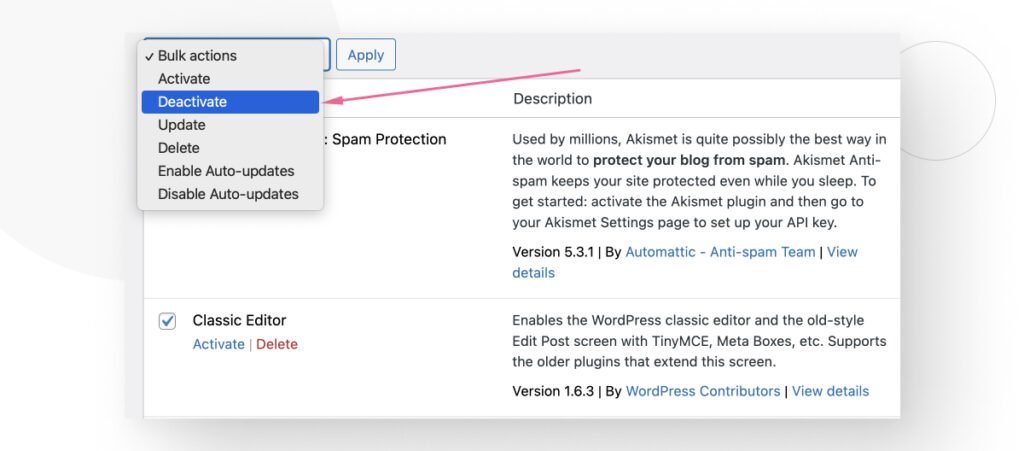
At this point, all plugins will be deactivated.
To test compatibility, start activating each plugin one by one. After activating a plugin, return to your site and see if the “There has been a critical error on this site” message persists.
If one of the plugins is the cause of the issue, at some point, you’ll activate a plugin that will restore the error.
Once identified, you may explore the plugin’s settings to see if you can configure it to solve the issue, check whether you’ve added any custom code, contact the plugin developer to ask about it, or switch to a similar plugin that doesn’t break your mobile site.
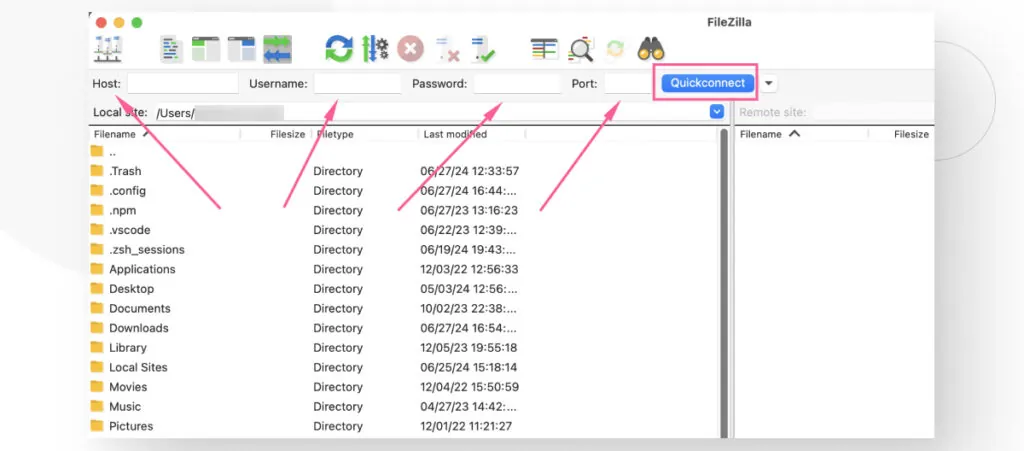
Check Plugin Incompatibilities Manually Via FTP or Hosting Control Panel
If your admin dashboard doesn’t load for some reason, you could manually deactivate and reactivate plugins via a hosting control panel like cPanel or an FTP client like FileZilla. The process is the same.
If you use an FTP client like FileZilla, input the host, username, password, and port. Your hosting provider should have your FTP information. Contact them or browse your hosting account’s settings to get it.

Once you connect, you will see your server’s folders.
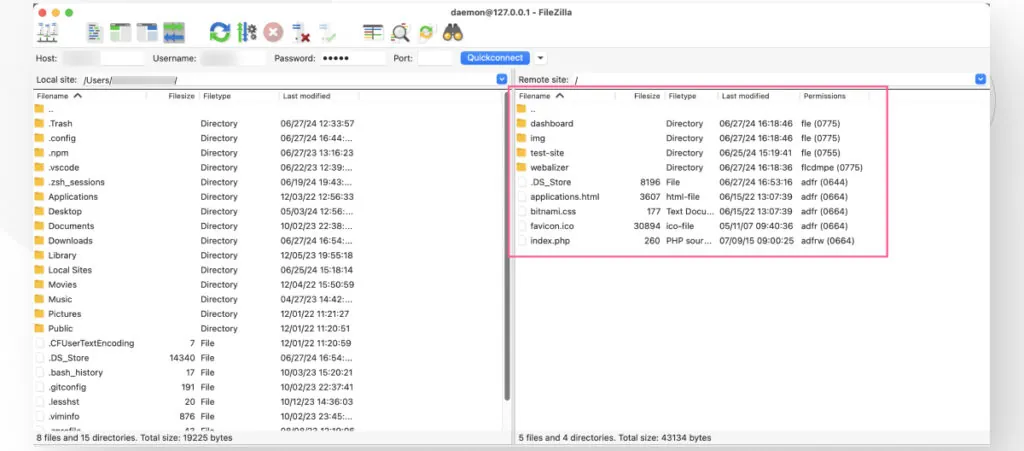
Navigate to your server’s public_html folder (sometimes named simply public). Then go to wp-content/plugins. You should see the folders of all the plugins currently installed on your site.
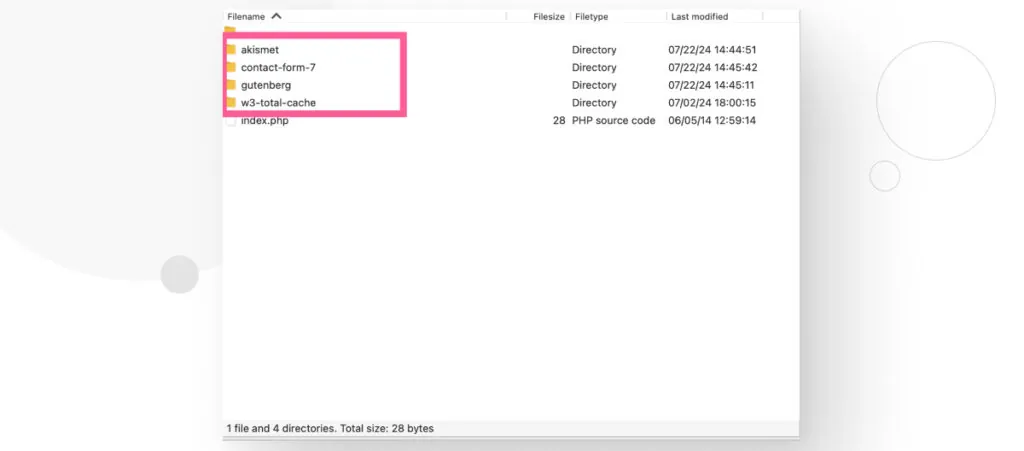
Right-click on each plugin folder and select Rename, then rename them to YourPluginName-disabled. When you’re done, all plugins should be deactivated.
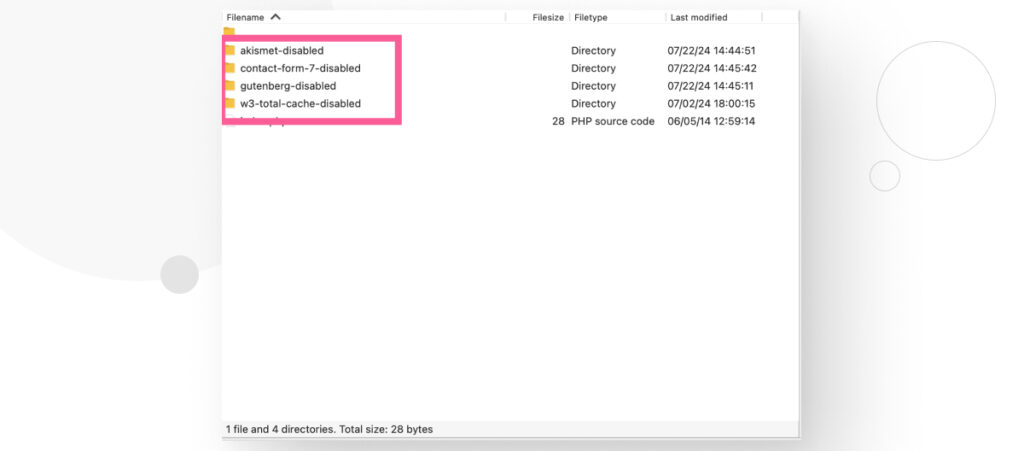
Once all plugins are deactivated, you could visit your site and see if it’s working properly. If it is, you now know that one of your plugins is the source of the issue. One by one, rename every plugin to its original name (remove the -disabled) and visit your site again each time.
Eventually one of the plugins will make the critical error message reappear and you will have found the source of the problem.
Explore the plugin’s settings to see if you can configure it to solve the issue, check whether you’ve added any custom code, contact the plugin developer to ask about it, or switch to a similar plugin that doesn’t break your mobile site.
Solution #5: Reupload Core WordPress Files
If you believe there’s a problem with the core files, reuploading them should wipe out the conflict and bring your site back up. Let’s explore how to reupload files automatically from your dashboard or, alternatively, manually through an FTP client.
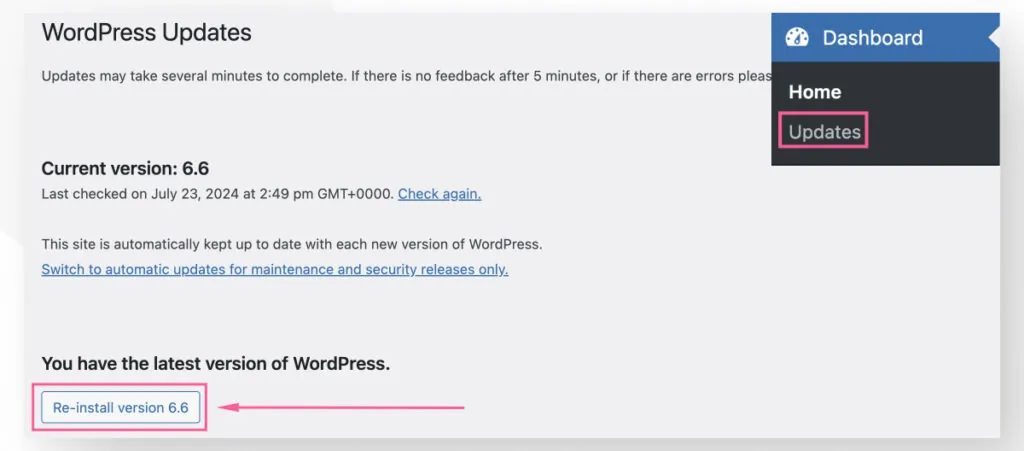
How to Reupload Files Quickly From the Dashboard
The quickest and easiest way to reupload core WordPress files into your installation is to access your site in recovery mode and go to Dashboard > Updates. Click on Reinstall version X.X.X.
It may take a few seconds, but when it’s done, you will land on your version’s About page.
How to Reupload Files Manually Using an FTP Client
The manual alternative if you can’t access your admin dashboard is manually uploading files via FTP.
First, go to WordPress.org’s Download page and download the latest version of WordPress.
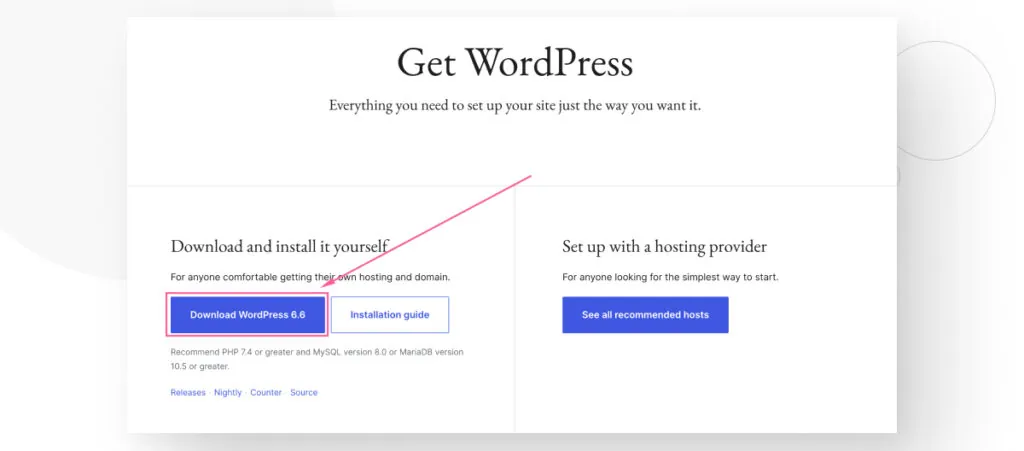
WordPress will download as an archive, so use 7zip or WinRAR to unzip the archive and reveal the core files inside.
With the core files unzipped, enter your FTP credentials and connect to your web server. Navigate to your server’s public_html folder (sometimes named simply public).
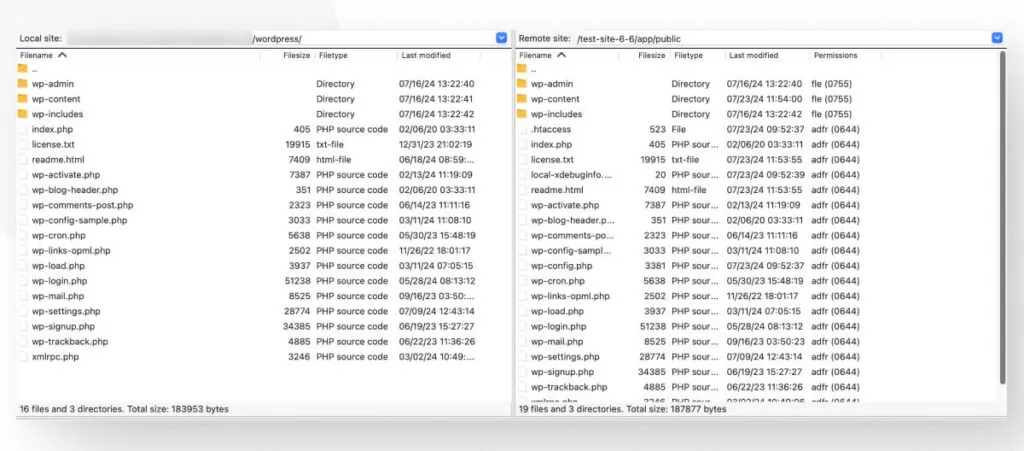
Now, you must select every folder and file (except for wp-content) on the WordPress installation you just downloaded and drag them into your web server.
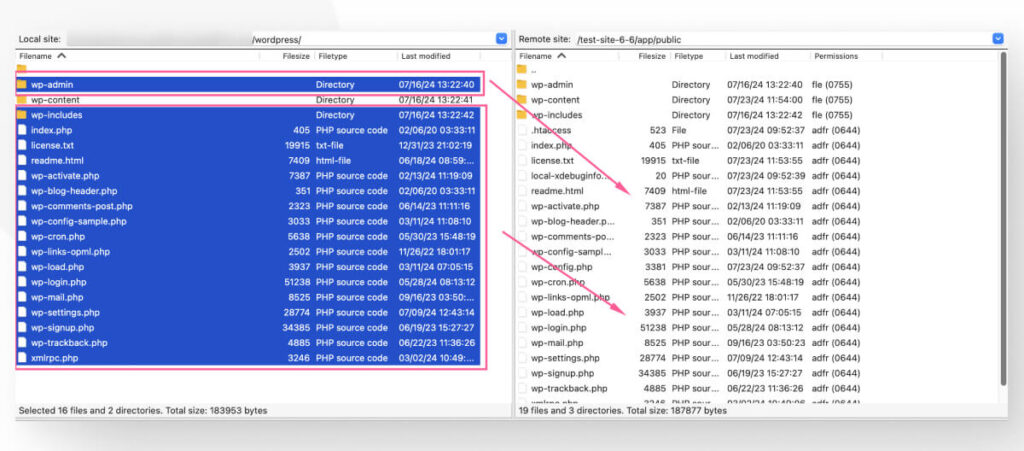
And with that, your core files will be overwritten, potentially wiping out any issues they may have that were causing the critical error.
Solution #6: Increase Your PHP Memory Limit
If your WordPress site has multiple plugins that demand a lot of memory, your site may crash and return a critical error screen.
A low PHP memory limit is a common problem in relatively cheap hosting providers, which often offer limited resources. To increase it, you’ll have to modify one line from the wp-config.php file.
To access the file, use a hosting control panel like cPanel or FileZilla. Navigate to the public_html folder, then right-click wp-config.php, and select View/Edit.
Once inside the file, use CTRL + F or CMD + F to search for WP_MEMORY_LIMIT. If you find it, it’ll look like this:
define('WP_MEMORY_LIMIT', '64M');Simply change 64M to 128M or 256M to increase your PHP memory limit. 128M should be enough for most sites, and 256M should be enough for sites that run resource-intensive plugins.
If you can’t find the line, you’ll simply have to copy and paste it. You must insert it above the line that says /* That's all, stop editing! Happy publishing. */, which is near the end of the file. It should look like this:
define('WP_MEMORY_LIMIT', '256M');
/* That's all, stop editing! Happy publishing. */
Solution #7: Contact Your Hosting Provider
If you’ve tried several solutions and can’t seem to figure out what’s wrong or how to solve it, it may help to contact your hosting provider. They may have experience with this issue and take the appropriate steps to solve it.
Additionally, some hosting providers have restrictions that prevent you from making changes, such as increasing your PHP memory limit, especially if you’re using a shared hosting plan, which usually has more limited resources.
Contacting your web host and explaining the problem may get them to scan your site and look for potential solutions.
Fix Critical Errors in WordPress
The “There has been a critical error on this website” means that a fatal PHP error prevents your site from loading necessary scripts, leading to a crash.
Getting to the root of this error can be challenging, but in this article, we explained 7 strategies for determining its cause and possible solutions. Hopefully, you can use what you learned here to get your site up and running again.
If you found this post useful, read our blog and resources for more insights and guides!
📬 Get WordPress updates to your inbox
Sign up for WC Blog updates and never miss a post!
Related Articles
How to Make a Subscriber Into an Admin on WordPress?

How to Grant Secure Access to a Not Live WordPress Site During Development

Do You Need a Web Developer to Build a WordPress Site?

How to Change the Bottom Padding Dimensions on WordPress Blocks