
How to customize WooCommerce with a child theme?
Since WooCommerce shops are all around us, with their custom look and feel, it’s essential to know how to customize yours, to stand out from competitors. If you want to professionalize your store to benefit your business, you came to the right place.

Why is it essential to customize your WooCommerce on WordPress?
If you aim to build your brand on a solid foundation and have users trust your site enough to make transactions, the design of your online store must remain consistent with the rest of the site.
Here is where one of the most significant benefits of using WooCommerce comes into play: both the content and the template code can be modified and customized to fit the look and feel of your website.
Some users make basic design modifications to the default template, such as customizing colors, fonts, or changing the color of the links.
On the other hand, advanced users choose to make deeper modifications to the code. The latter option may be easy if you are experienced; however, it is not a permanent solution. When updating the plugin version, the files are overwritten and the modifications are lost.
Below, we will go in-depth about 3 options to customize your WooCommerce on WordPress, along with their pros and cons.
Our take on these 3 ways of customizing your WooCommerce Store.
Using a Page Builder
Page builders are useful tools that help you customize your WordPress without the need for coding knowledge or technical expertise. Most page builders come with pre-made modules that you can easily drag and drop to your web pages.
Some of the most known Page builders are Elementor and Divi. Using one of these is maybe the simplest way to add some custom stuff to your Woo Pages.
But, although this approach looks easy to implement, it has two big cons.
First, we have builder limitations. While it may give you some liberties regarding your page design, the various modules and layouts it offers are limited. This is why when trying to escape from a WooCommerce default template, you may end up with a design that looks very similar to other sites that use Elementor or Divi.
On the other hand, adding a Page Builder to your website adds many unnecessary bloats.
Your site might look good and have some cool features, but you can end up with a big software that scatters all over your site, even in places where you’re not using it.
This could be a pain to manage, and it also takes a hit on performance and security.
Using a Plugin
If using a Page Builder can’t help with your purpose, you may think of using a plugin instead. There are thousands of WooCommerce-related Plugins over the Web, so you could probably find a Plugin that helps with your needs.
The thing with plugins is that they’re usually related to functionality rather than design. Furthermore, they can add bloat and generate potential conflicts to your site, and you should keep them up to date to prevent any potential security issues.
Creating a WooCommerce Child Theme
Every WordPress installation has a parent theme. It includes all the WordPress template files and assets required for the theme to work correctly.
So, what is a Child Theme?
A child theme allows you to modify small elements of the design and appearance of your website, keeping the look and feel of the parent theme. In this way, customizations are kept separate from the parent theme’s files.
Many popular themes have child themes that can be installed and activated to modify the look of the parent template without coding or styling adjustments.
If you ask us, this is the way to go if you want to customize your online store. Do you want to be a WooCommerce Ninja? Keep reading and follow the steps to open the door to a world of opportunities.
Should I purchase a child theme?
A purchased child theme can be a valid option to change the look of a theme through someone else’s design. For example, for the Storefront theme, there is quite an extensive catalog of child themes available.
A purchased child theme can be a valid option to change the look of a theme through someone else’s design. For example, for the Storefront theme, there is quite an extensive catalog of child themes available.
However, a child theme like this won’t make a great tool for adding custom code, for the same reason as you should avoid adding it to the parent theme; if there’s an update to the child theme, it will override all of your custom code as well.
Why use Child themes to customize WooCommerce?
There are two major reasons to use child themes:
- Theme developers can use child themes as a way to offer variations on a theme.
- Developers can use child themes to host customizations of the parent theme or any plugin on the site since the child theme will get priority over the plugins and parent theme.
How to set up a Child Theme?
Step 1: Create a child theme folder
You’ll need to create a folder to save all the templates and assets of your child theme. To complete this, go to your hosting’s file manager and find the wp-content folder.
Once inside, look for a folder named “themes”. Select it and then click on the “+ Folder” option. Name this folder “{main-theme-name}-child”. For example, if you’re using StudioPress, your folder name must be “StudioPress-child”.
Step 2: Create a Style Sheet
You must create a style sheet that contains all the CSS for your child’s theme. To complete this, create a new file inside the child theme folder and name it “style.css”.
<pre class="code-snippet"><code>

<p>Theme Name: {child theme name}</p>

<p>Theme URI: https://example.com/studio-press/</p>

<p>Version: {theme version}</p>

<p>Description: Studio Press Child Theme</p>

<p>Author: {your name}</p>

<p>Author URI: https://example.com/</p>

<p>Template: {the exact name of the parent theme folder}</p>

</code>
</pre>
You’ll need to add an obligatory header comment to make this sheet work. You must include the theme and template’s name.
Everything inside the slashes and asterisks is perceived as a comment inside the code, so WordPress won’t try to execute it.
This is a default stylesheet, you will be able to add more CSS later.
Click on save.
Step 3: Create a functions.php file and import styles from the parent theme
Create a file called functions.php inside your child theme’s folder. Inside it, paste the following code:
<pre class="code-snippet"><code>
<p>function my_theme_enqueue_styles() {</p>
<p>$parent_style = 'parent-style';</p>
<p>wp_enqueue_style( $parent_style, get_template_directory_uri() . '/style.css' );</p>
<p>wp_enqueue_style( 'child-style',</p>
<p>get_stylesheet_directory_uri() . '/style.css',</p>
<p>array( $parent_style ),</p>
<p>wp_get_theme()--->get('Version')</p>
<p>);</p>
<p>}</p><p>
</p><p>add_action( 'wp_enqueue_scripts', 'my_theme_enqueue_styles' );</p>
<p>?></p>
</code>
</pre>Now go to Appearance → Themes. If you’ve done this and the previous steps correctly, you should see your new Child theme.
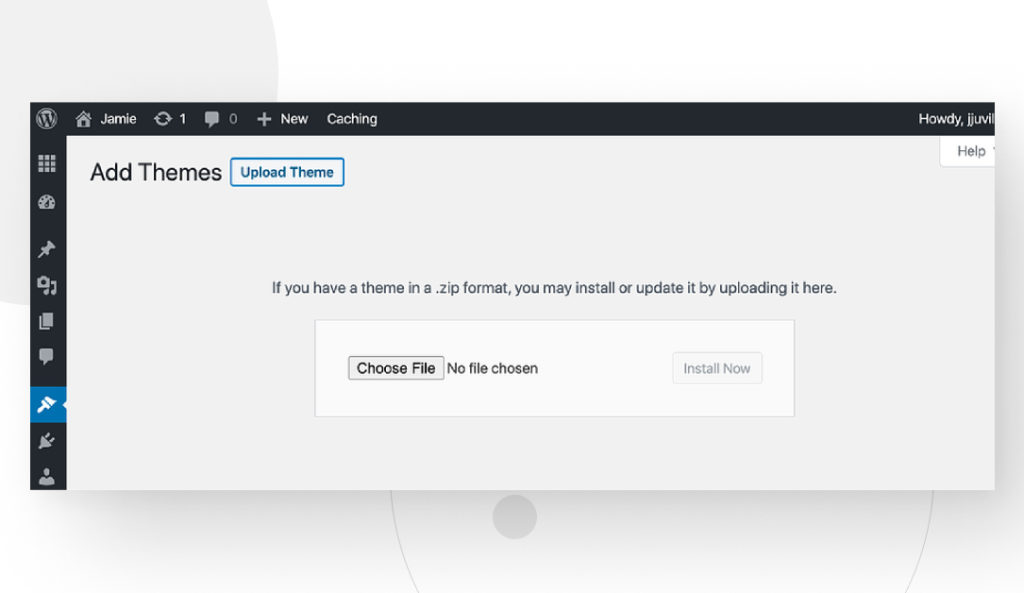
Step 4: Activate your Child’s theme
To activate the secondary theme, you’ll have to load a zip file of the child theme folder.
To achieve this, go to your WordPress admin panel and click on Appearance → Themes → Upload theme. Then, select your child’s theme location.
Step 5: Customize your child’s theme
As you’ll see, your uploaded theme looks exactly like your parent theme. That’s because you haven’t made any changes to it yet.
Now is the moment to customize it, adding code to your CSS stylesheet and your functions.php file.
Customizing WooCommerce Templates inside your Theme
Once you have your custom theme, you just need to find the WooCommerce plugin folder on your code editor by going to wp-content/plugins/WooCommerce. Inside the plugin folder, you’ll find one called templates.
Inside it, you’ll see all your store template parts are fractionated and organized in .php files and subfolders. You can access any template, and Woo will inform you how you can modify them with instructions at the top. From there, the only limit is your creativity.
One of the easiest ways to modify your theme is by adding CSS to the style.css file. Simply add some code to your secondary theme’s stylesheet to customize the colors, typography, padding, and other design elements of the main theme. This code will override the one in your main theme’s stylesheet.
If you want to modify or add functionalities to the theme, you will need to add functions to the functions.php file you previously created in the secondary theme’s directory.
You can also customize elements like your billing form inside the checkout folder. The checkout form template can be overridden by copying it to your-theme/woocommerce/checkout/form-billing.php.
However, on some occasions, WooCommerce will update the template files, and to keep the changes, you will need to copy the new files to your theme to maintain compatibility.
As a rule of thumb, Woo won’t make any major changes that can break your custom theme. If this happens, the plugin itself will warn you of this issue with a big alert popup when you update it, so you can make the corresponding fixes.
Even then, these modifications may mean investing some time but they are rather simple. Moreover, you will always be able to check your child theme status by going to the WooCommerce tab on your WP Admin Dashboard and looking for the Status Submenu. If you scroll down to the Template section, you’ll be able to see if you have any specific outdated templates.
Conclusions
Customizing your Woocommerce on WordPress will allow you to stand out in the competitive market of online sales. Using a child theme and putting your creativity to work, you can have an original, attractive, and functional store to win over buyers.
📬 Get WordPress updates to your inbox
Sign up for WC Blog updates and never miss a post!
Related Articles

How to Make a Subscriber Into an Admin on WordPress?

How to Grant Secure Access to a Not Live WordPress Site During Development

Do You Need a Web Developer to Build a WordPress Site?

How to Change the Bottom Padding Dimensions on WordPress Blocks