
What are WordPress must-use plugins?
WordPress must-use plugins or mu-plugins are a special type of plugin that is always on, which you cannot deactivate by conventional means. Let’s explore what they are, how to create one, and how they can help you develop and manage your site.
What are WordPress must-use plugins?
Mu-plugins are WordPress plugins that are activated by default. They are located in a subdirectory of wp-content named mu-plugins (wp-content/mu-plugins). If you’re managing a multisite network, mu-plugins activate for all sites in the network.
Mu-plugins do not appear if you go to Plugins > Installed Plugins from your admin dashboard, but they appear in a special Must-Use tab once you have installed at least one mu-plugin. However, you cannot deactivate an mu-plugin from the dashboard because any plugin in wp-content/mu-plugins is activated by default.
The only way to deactivate an mu-plugin is by manually deleting it from its directory.
WordPress must-use plugin features and drawbacks
An mu-plugin’s main feature is that it’s activated by default once installed (uploaded to the mu-plugins folder). You also cannot uninstall mu-plugins from the Installed Plugins admin section. This prevents the accidental deletion of necessary features. Admins can only uninstall them by deleting their files.
Mu-plugins are loaded before regular plugins in alphabetical order. Any resources, API hooks, etc., added in an mu-plugin will be available to regular plugins later.
Finally, mu-plugins, have three significant drawbacks worth considering:
- Mu-plugins do not update automatically, do not appear in update notifications, and don’t show their update status on the Installed Plugins page. It’s entirely up to you to update them.
- Since they’re not activated like regular plugins, activation hooks don’t execute on mu-plugins. Activation hooks run installation code to set up rewrite rules, custom database tables, or set default option values. Plugins that require activation hooks may not work correctly if uploaded to the mu-plugins folder. Test your mu-plugins thoroughly before deploying them to a live site.
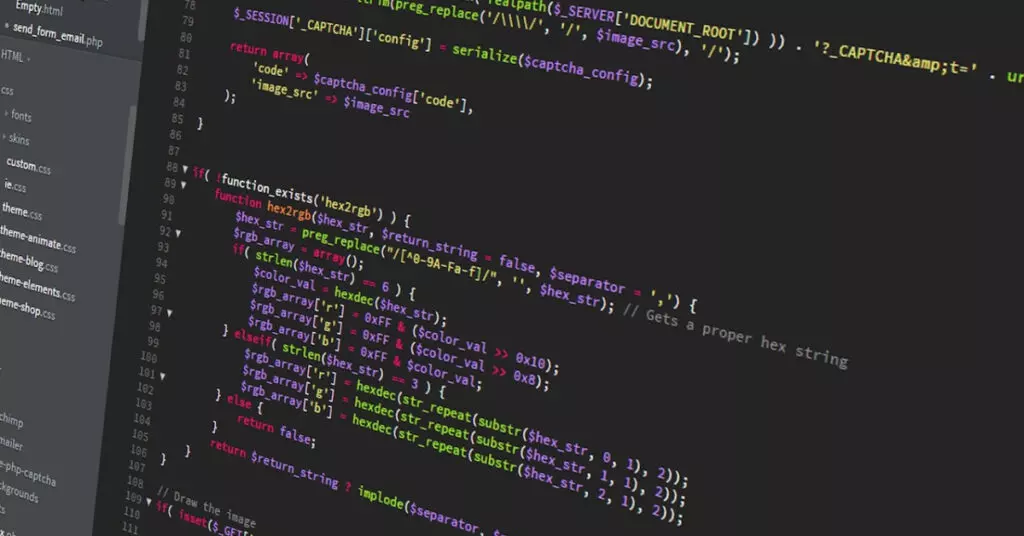
- WordPress doesn’t run PHP files in the subdirectories inside the mu-plugins directory or folder, only on the root. As a result, WordPress.org recommends you use a proxy PHP loader file inside the mu-plugins root:
<?php

// mu-plugins/load.php
require WPMU_PLUGIN_DIR.'/my-plugin/my-plugin.php';

?>
How to access WordPress must-use plugins?
The easiest way to access and see the installed mu-plugins is by going to Plugins > Installed Plugins > Must-Use (tab).
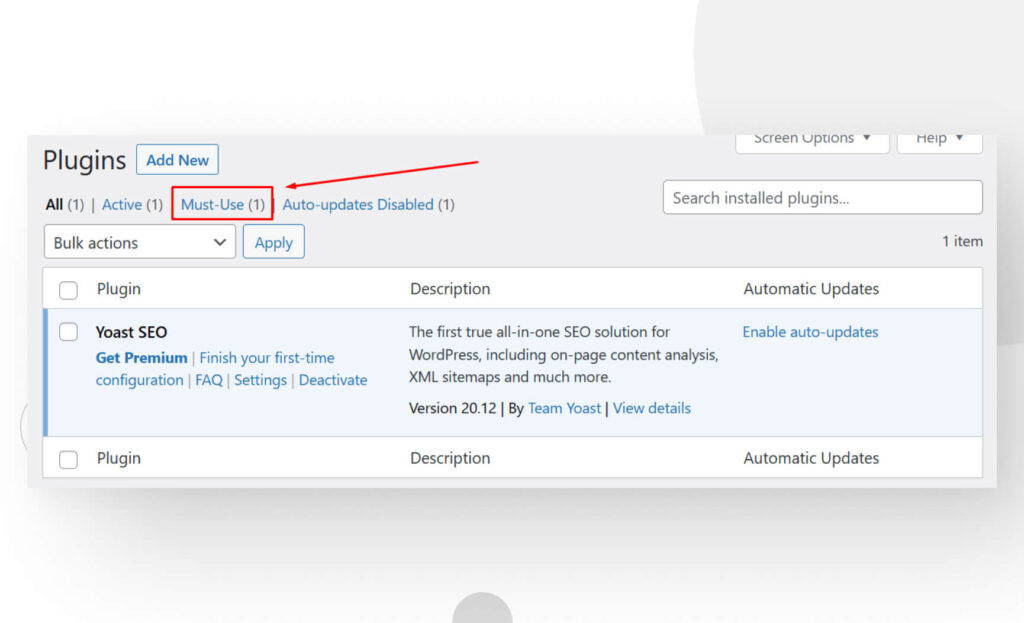
In the Must-Use tab, you’ll see the installed mu-plugins.
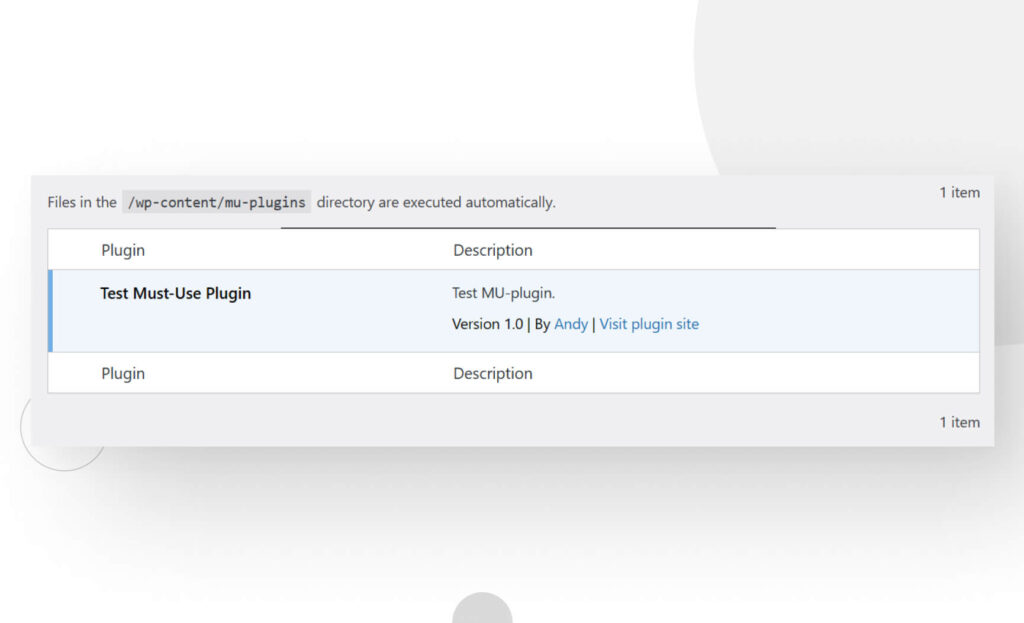
As you can see, you cannot activate, deactivate, or delete mu-plugins from the dashboard. The only way to deactivate an mu-plugin is to delete it from the mu-plugins directory.
Remember that this tab doesn’t appear unless there’s at least one installed mu-plugin. You won’t see this tab if you’ve not installed any mu-plugins.
How to create and install a WordPress must-use plugin?
Creating an mu-plugin is similar to creating any other plugin, but the process differs slightly. Let’s work through the steps of creating an mu-plugin.
Note: Remember to back up your site before making any significant changes!
Step 1: Create the mu-plugins subdirectory in wp-content
Using a control panel provider by your web host, an FTP client, or your local environment, navigate to wp-content and create a new directory. Name it mu-plugins.
Step 2: Create the PHP file in mu-plugins’ root
Mu-plugins essentially consist of PHP files. To enable one, create a PHP file in the root of the mu-plugins directory (remember that WordPress runs mu-plugins only from the mu-plugins root). You either create your PHP file in the root or set up a proxy PHP loader file that points to your file’s location in a subdirectory.
In this case, we’ll simply create a PHP file in the root named test-mu-plugin.php.
Step 3: Code your plugin
Now it’s time to code your plugin. Let’s create a very basic plugin that displays a text box.
<?php

/*
Plugin Name: Test Must-Use Plugin
Description: This is just a test.
Author: Andy
Author URI: https://wcanvas.com/
Plugin URI: https://wcanvas.com/
Version: 1.0
*/

add_action('wp_footer', 'displayTextBox');

function displayTextBox() {
    echo '<p style="position: absolute;
    font-size: 25px;
    top: 180px;
    right: 200px;
    padding: 10px;
    background-color: #000000;
    color: #FFFFFF;">This is an mu-plugin test. Don\'t panic!</p>';
}

?>
It looks like this on the live site:

This is a very rudimentary example, but it shows what you can do with mu-plugins!
Wrapping up
Mu-plugins are WordPress plugins activated by default, located in wp-content/mu-plugins. These plugins are great for multisite networks, ensuring that the plugin executes on all of the network’s sites and that the sites’ admins cannot deactivate them. Mu-plugins generally work well for adding code that needs to run no matter what.
However, they have three significant drawbacks: you’re entirely responsible for updating them, they don’t support activation hooks, and they have to run from the mu-plugins directory root.
If you know when and how to use them, mu-plugins can be very useful. For more WordPress insights and guides, visit our blog.
📬 Get WordPress updates to your inbox
Sign up for WC Blog updates and never miss a post!
Related Articles
How to Make a Subscriber Into an Admin on WordPress?

How to Grant Secure Access to a Not Live WordPress Site During Development

Do You Need a Web Developer to Build a WordPress Site?

How to Change the Bottom Padding Dimensions on WordPress Blocks