
WordPress Multisite: How to turn your site into a multisite
If you have a business that requires multiple microsites, having a WordPress Multisite could be very useful for you. Discover all about this functionality and how to use it on your site to contribute to your business goals.
WordPress is a mighty CMS with many features to improve your site’s management and functionality.
If you currently manage more than one site on WordPress, or you’re thinking about building more than one to meet the needs of your business, there is a solution to manage all of them in a much more efficient way.
We are talking about WordPress Multisite, a very useful feature to centralize the management of your microsites on this platform.
They can be multiple replicated sites for several products, different geographic locations, or even various sections of a digital medium/blog that are handled by different teams.
Next, we will go in-depth on the benefits of this WordPress feature and explain step-by-step how to implement it on your websites. Spoiler Alert: its setup only requires adding a few lines of code to a couple of WordPress installation files, so you should be able to implement it without any problems.
What is WordPress Multisite?
WordPress Multisite is a native capability of this CMS that allows you to create multiple sites on the same WordPress installation. This allows centralized management since it makes it possible to generate a network of microsites, which can be subdomains or subdirectories based on the same URL.
All sites will use the same theme and plugins and can be accessed from a single account. Multisite is, therefore, a way to have multiple websites running under a single WordPress.
How does WordPress Multisite work?
As mentioned before, multi-sites will share the same WordPress installation, themes, and plugins. The network settings of each theme and plugin will affect all the other subsites that use it.
However, despite this, multi-sites behave independently: each one has its own administration panel, media library, and specific configuration.
Administration roles
In basic WordPress, there is a single administrator role with full access to the site.
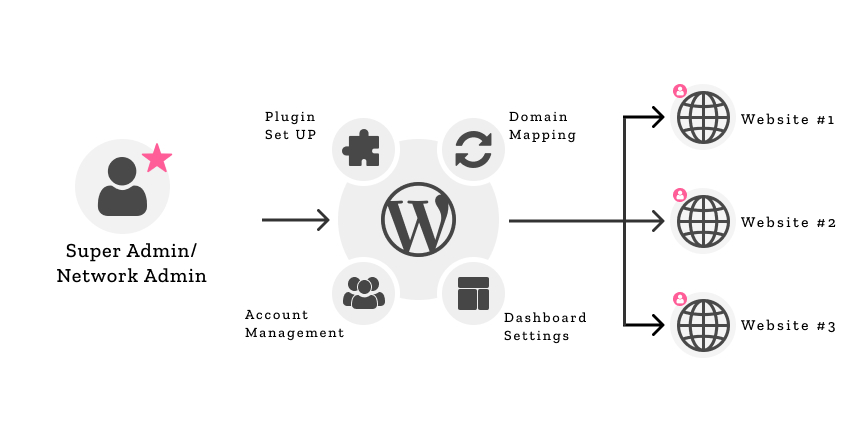
When implementing WordPress Multisite, each site has its own sub-administrator, while on the other hand, a Network Administrator role is created and has access to all the site’s content at a general level.
For example: if you are the administrator of one of the sub-sites, you will not be able to access the configuration of any other sub-site, nor will you be able to access the general panel that manages the entire network. Only the Network Administrator or someone to whom he/she has granted access can gain control of the entire site in general.
- wp_blogs
- wp_blog_versions
- wp_signups
- wp_registration_log
- wp_site
- wp_sitemeta
- wp_sitecategories (this last one is optional)
Data Bases
Although all sub-sites share the same database, having WordPress Multisite active generates 7 new database tables to store in the network:
When adding new sites to the multisite network, 11 new tables are generated based on the site ID. For example, if we already have 2 sites in our network, and we create a new one, this would be site 03, which will generate the following tables:
- wp_3_posts
- wp_3_postmeta
- wp_3_comments
- wp_3_commentmeta
- wp_3_users
- wp_3_usermeta
- wp_3_term_relationships
- wp_3_term_taxonomía
- wp_3_links
- wp_3_terms
- wp_3_options
The more the multisite network grows, the more database tables will be added.
In this way, sites are kept separate, and sub-administrators cannot access or modify data from other sub-sites.
Multimedia Content Uploads
The segregation and organization of files for each site is the key and main feature of WordPress Multisite. For this reason, separate folders are also generated for media and multimedia file uploads.
Enabling multisite generates a folder titled sites inside the wp-content/uploads directory. This folder hosts the media of all the sites in the network.
When new sites are created on the network, a new folder is generated for each one based on their ID. For example, the main site will have ID 01, the second site will have ID 02, and so on.
The complete path to each of these folders would then be:
wp-content/uploads/sites/01wp-content/uploads/sites/02Site Security
Security is one of the priorities when it comes to having a reliable website for users. It is also a very important feature for search engines when it comes to ranking a site in the top results.
One of the most common methods is the use of a Secure Sockets Layer (SSL) certificate, which encrypts the communication between a browser and the website to ensure that sensitive information is not being compromised.
Having a network of multisite requires an SSL certificate for each one, which implies an additional investment since these must be purchased separately.
All subsites must be protected with this certificate. Otherwise, the entire network may be compromised.
Pros and Cons of WordPress Multisite
Managing your multiple sites from a single WordPress dashboard can be extremely convenient, however, there are pros and cons to implementing it.
Pros
Themes setup and updates
By implementing multisite, you can install the theme of your choice once and use it as the main theme for all your sites. This saves a great deal of time on installation and updates and storage of themes and plugins.
Regardless of how many subsites use particular themes and plugins, they are only stored once, saving server space and hosting money.
Database
Since all sites use a single SQL database, the data can be stored in a single backup, so there is no need to back up each website.
Less code in the server
Having multiple sites on the same network means less code.
In other words, the multisite network takes up less space within the server, as opposed to the space that would be taken up by having several WordPress installations.
Cons
While centralized control is an advantage, it can be problematic, depending on your organization’s preferences. In some environments, the fact that sub-site administrators cannot install plugins and themes may present a difficulty.
On the other hand, security problems on one site (a cyber-attack or a data breach) can generate the same problems on the other sites within the network. The same applies to performance and loading problems on a site: inactivity time, traffic overload, etc.
As for plugins, some do not work with multiple sites and may instead cause conflicts. On the other hand, it is difficult to maintain customized versions of plugins and themes for particular sub-sites.
WordPress vs. WordPress Multisite
As a summary, the following comparison table lists the main differences between a basic WordPress and a WordPress Multisite.
| Basic WordPress | WordPress Multisite |
| 1 single site | Multiple sites with centralized management |
| 1 single user profile | 1 user profile for each sub-site + 1 Network Administrator with access to all sites |
| 1 single administrator panel | 1 individual admin panel for each site + 1 general panel for the Network Administrator |
| Individual administration of themes and plugins | The sites are governed under the same theme and plugins |
| All plugins work correctly | Some plugins are not compatible with multisite |
| Individual database | 1 SQL database with additional database tables for each site. |
| 1 single media and content upload folder | 1 media and content upload folder for each site |
| Only 1 SSL certificate is required | Each site must have its SSL certificate |
| Security issues affect only 1 site | Any security problem at one site can affect the entire network |
| It takes up more space and server investment if you have multiple sites with different installations. | Less code and server space since all sites are managed under the same WordPress network. |
Do you need to enable WordPress Multisite for your business?
Having a WordPress Multisite can be very attractive, but like any functionality, you should analyze beforehand if it is really useful for your business.
Taking into account all the previously mentioned features, we can say that multisite could be useful to you if:
- Recurrently, you install the same theme and plugins one by one on several sites.
- You have multiple sites for different branches or sections of an organization with many elements in common, such as categories or structure.
- Spend too much time updating several sites with the same features and functionality.
- Having shared administrator users will speed up your work and won’t cause security problems.
- Your organization agrees to a centralized approach to site management.
- You plan to scale your business sites and will need easier administration in the future.
In summary, having a WordPress Multisite can be very useful for businesses, organizations, or companies that are made up of several business units that share the same web design and configurations.
It is also a great option if you want to build website versions for different languages or geographic locations, starting from the same base URL. For example: if your site is mybusiness.com, and you want to have a Spanish version, you could set up a subdomain to be: es.mybusiness.com. If you want an Italian version: it.mybusiness.com. All these different versions can be built and managed on the same WordPress network, with multisite.
It can also be used on personal sites, such as blogs or online portfolios that share similar content and plugins, as well as sites of organizations or institutions with multiple internal areas or projects.
How to set up WordPress Multisite for local development with Local (as a subdomain)
To switch your single WordPress into a Multisite, you will need to follow the next steps:
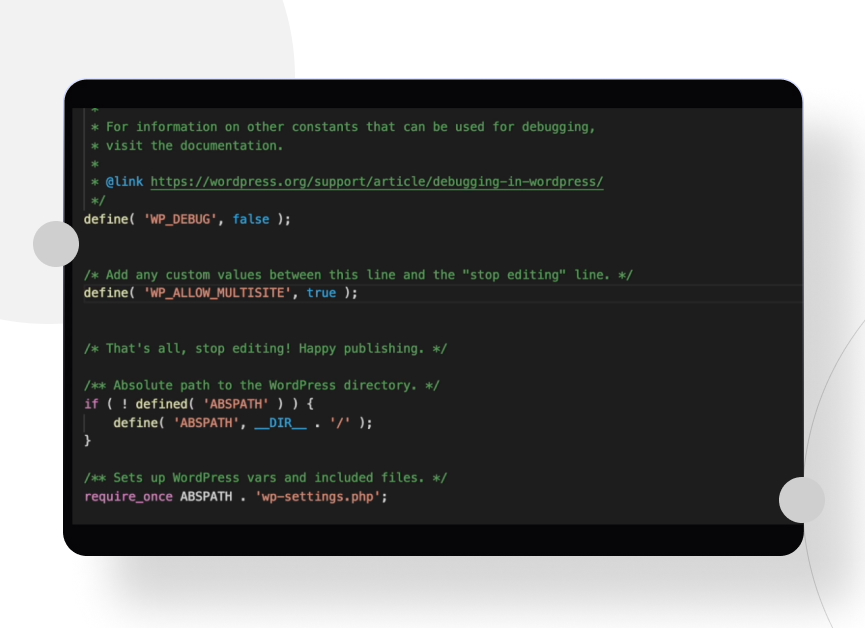
1- Update the wp-config.php file
The first thing to do is to locate and edit the configuration file: this is the wp-config.php file located in the root directory of your local website.
Once inside, locate the wp-config.php file and double-click it. A file with lines of code will open.
When you are inside that file, scroll down until you find a line that says: /* That’s all, stop editing! Happy blogging. */. There are cases where the line may also say: /* That’s all, stop editing! Happy publishing. */.
define( 'WP_ALLOW_MULTISITE', true );Above this line, add the following fragment:
Save the changes and close the file.
2- Configure the network structure
To configure the network structure, you must access the WordPress dashboard.
In there, you will find a new tab called Network Settings under Tools. This is where you will be able to configure and activate your WordPress Multisite network.
If any plugins are active at the time of setup, WordPress will request that you disable them before proceeding.
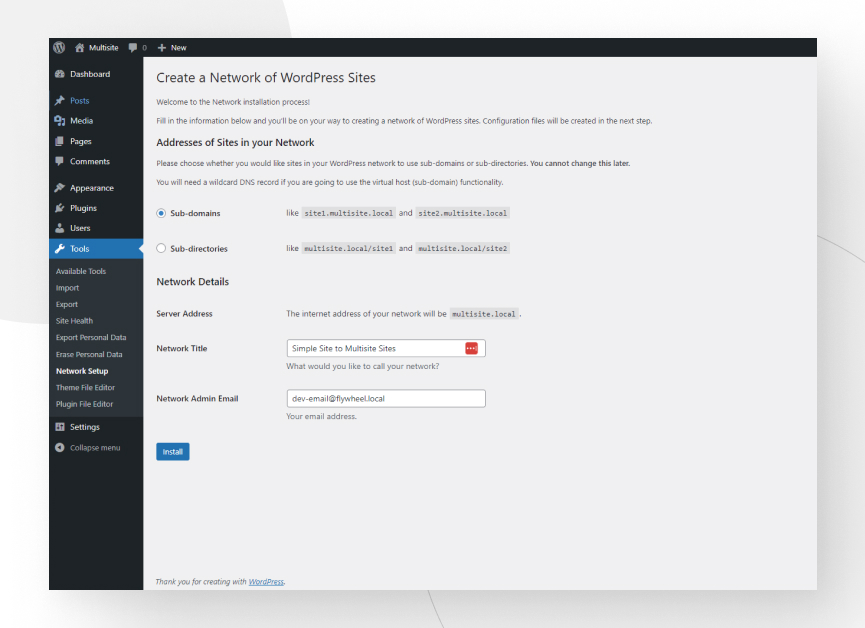
Note: in this case, we are going to use subdomains.
In “Internet Address of your Network”, you can choose whether you want to use subdomains or subdirectories for your multi-sites. It is important to pay attention at this point, as this decision will affect all the sites in the network and cannot be changed afterward.
After verifying that all the information entered is correct, click install.
3- Update wp-config.php
In this step, we will see how to add two code snippets to the wp-config.php. These are located in the WordPress root directory.
WordPress will request you enable the network and provide you with the necessary code snippets.
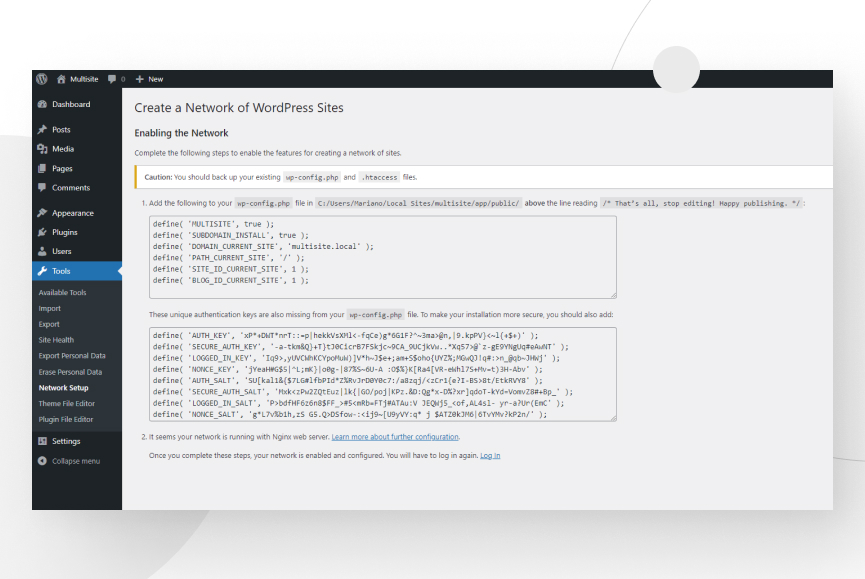
Before proceeding, be sure to make a backup copy of your wp-config file.
Copy the code snippets and follow the instructions, which should look like the following:
In the wp-config.php file, include the following code before the line that says /* That’s all; stop editing! Happy blogging. */:
<pre class="code-snippet"><code>

<p>define('MULTISITE', true);</p>

<p>define('SUBDOMAIN_INSTALL', false);</p>

<p>define('DOMAIN_CURRENT_SITE', 'your domain');</p>

<p>define('PATH_CURRENT_SITE', '/');</p>

<p>define('SITE_ID_CURRENT_SITE', 1);</p>

<p>define('BLOG_ID_CURRENT_SITE', 1);</p>

</code>
</pre>
Also, paste the unique authentication keys.
Remember to replace ‘your domain’ with the name of the domain in question.
Save changes.
4- Modify sites.json file.
That file holds all the settings for all the sites. You need to find the site you are looking for. You can search for the directory name: site-name, and then after that, find the multi-site setting. Something like “multiSite”:null or “multiSite”:””. Change that setting to “multiSite”:”ms-subdomain”. That will be a subdomain setup.
You can find this file here:
- MacOS: ~/Library/Application\ Support/Local/sites.json
- Window: Username\AppData\Roaming\Local\sites.json
- Linux: ~/.config/Local/sites.json
After this, you have to reset your site and sync your subdomains at the Multisite row.
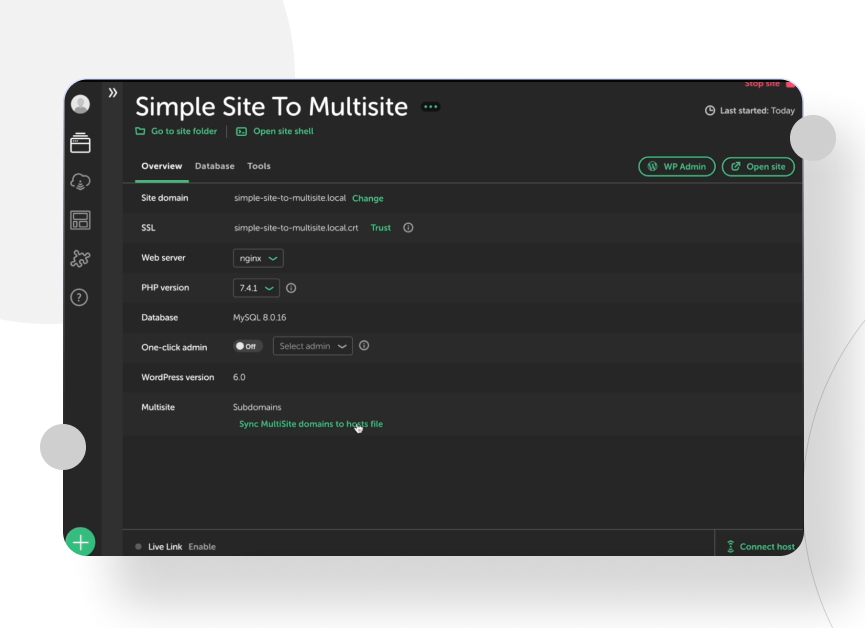
Note: This may take a few seconds, in MACOS and Linux, sometimes you have to enter your credentials on the popup.
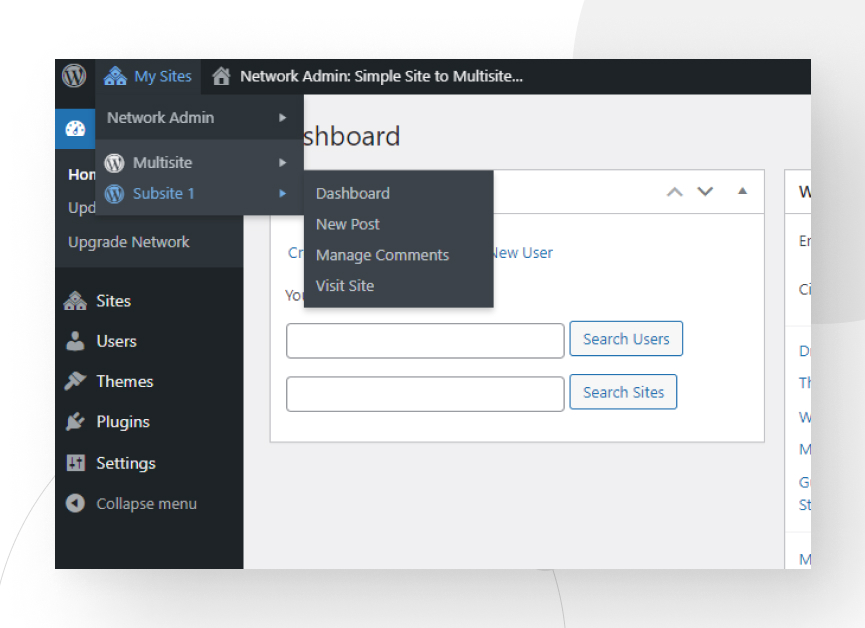
5- Access Multisite
If you followed the steps correctly, you can now log back into your WordPress administration panel and visualize the new “My sites” menu.
On the “Network Administrator” tab, you will be able to manage sites and user accounts. As you create new sites, they will be added to the drop-down menu under “My Sites”. You can access the administration panels of all sites from there.
Getting Started with WordPress Multisite
Congratulations! You now have a WordPress Multisite and are ready to start adding new sites to your network.
1- Adding new admin users
The first step is to add new users to start delegating the administration of your sites.To do this, go to Users > Add new in the network administrator panel.

Fill in the fields with a username and the e-mail address of the person to whom you want to delegate as administrator.
Once you have added the users you need, you can view and edit the permissions and privileges of each user in the Users panel. You can also grant them “super admin” permissions if you wish.
2- Adding Sites
Go to Sites > Add New in the Network Manager panel.
There you will find fields in which you can define a web address for your site, a title, a language, and an admin e-mail.
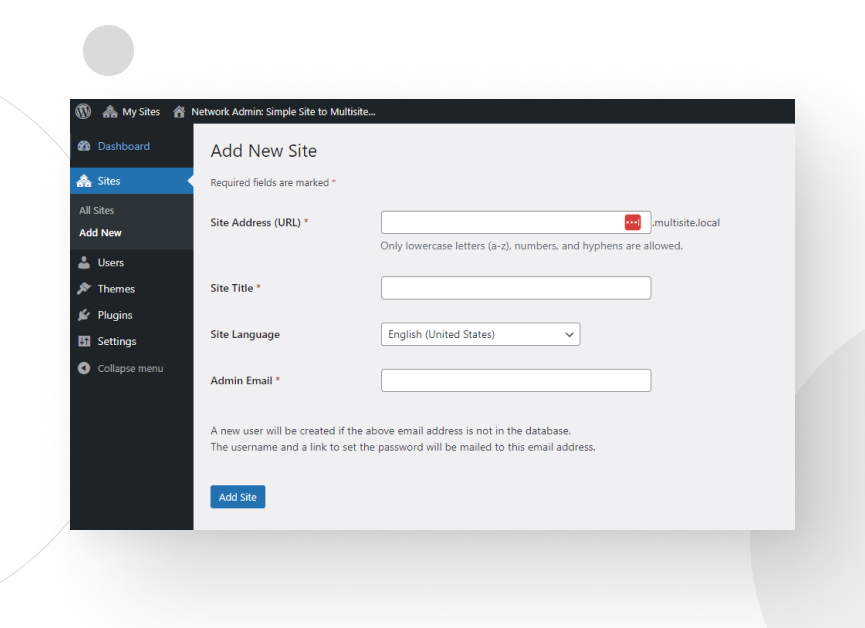
Once you have filled in these fields, click on Add site. This process can be repeated as many times as you need.
If you go to Sites > All Sites, you will be able to see all the sites you have created. You can also access editing options or direct access to each site from there.
3- Editing Network setting
Although by default, multisite already has network configurations that ensure that it is ready to be used without problems, it is worth reviewing the options it offers.
These can be found under the Settings > Network Settings tab.
At the bottom, you will see an option to enable site registration, there is also an option that gives users the privilege to register their sites.
Checking or unchecking this option will depend on your or your organization’s view of this privilege on network users.
Another option in this section is the “upload settings”. This allows you to set a space limit for uploading files and also to select which types of file extensions can be added.
4- Managing Themes and plugins
Remember that in multisite, you can centrally manage all the themes and plugins of your sites. Once you install them, they will be activated for the entire network. However, you will have the option to activate them or not for each website.
Conclusion
WordPress Multisite is a complete and extremely useful feature for those projects that need more than one site from the same WordPress installation.
We have seen everything you need to know about WordPress Multisite, its features and functionalities, advantages and disadvantages, a step-by-step to implement it, and the first steps and key settings to start working with it.
📬 Get WordPress updates to your inbox
Sign up for WC Blog updates and never miss a post!
Related Articles
How to Make a Subscriber Into an Admin on WordPress?

How to Grant Secure Access to a Not Live WordPress Site During Development

Do You Need a Web Developer to Build a WordPress Site?

How to Change the Bottom Padding Dimensions on WordPress Blocks