Passwords can be very important to protect your content. Still, password-protected pages typically look quite bland compared to the rest of the site. So, in this post, you’ll learn how to style WordPress password protected pages to make them blend in better with your branding.
Keep in mind that you will need some very basic CSS knowledge, but it’s definitely something you can do with just computer skills. Plus, we’ll provide some code snippets for you to use, so you won’t have to create code on your own.
Let’s get into it.
Key Takeaways
- The styling of password-protected pages usually doesn’t match that of the rest of your site.
- You can style password-protected with custom CSS.
- You can add custom CSS with your theme’s Customize feature, with a child theme, or a WordPress code snippets plugin.
Why Style Your Password-Protected Pages?
The main reason to style your password-protected pages is to spruce them up and give them some extra flare.
It can be off-putting for users to come across a page that looks half-baked or different from the rest of the site’s branding.
For example, here’s how password-protected pages look in the Twenty Twenty-Five theme:
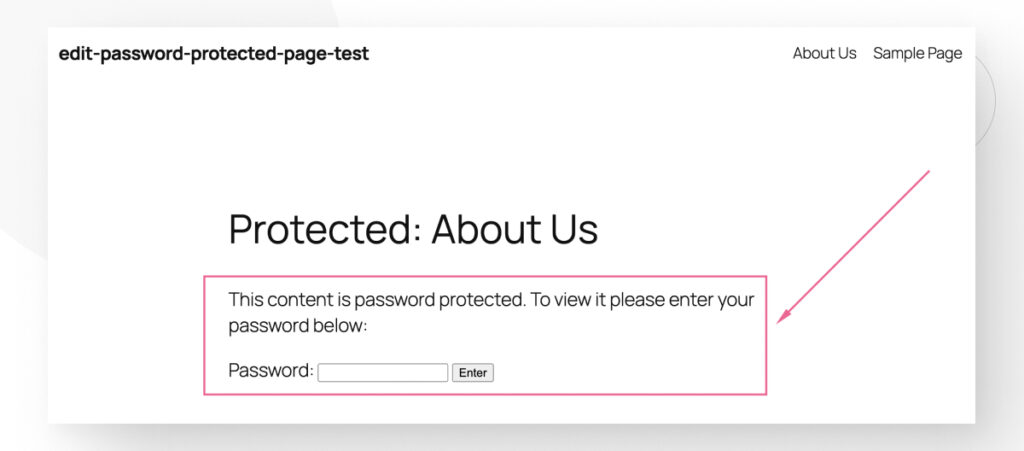
Styling changes depending on the theme, but password-protected pages usually look pretty bland regardless. This is how it looks in Hello:
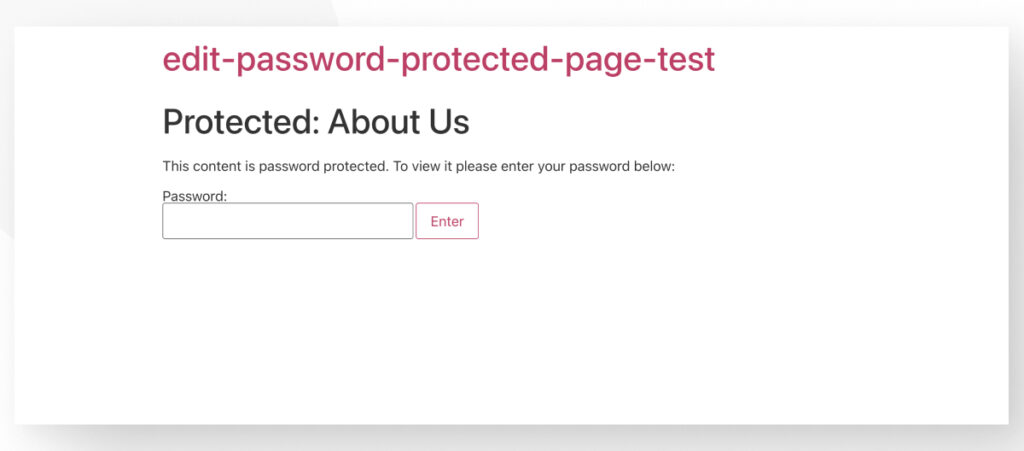
All these pages are serviceable, but maybe you want to give them a makeover to fit your branding better or simply make them look a bit more alive.
If that’s the case, keep reading to find out how.
2 Methods to Style Your Password-Protected Pages
These 2 methods will allow you to style your password-protected pages with CSS.
Method #1: Use the Theme Customizer
Perhaps the easiest and fastest way to style your password-protected pages is to add custom CSS using the Theme Customizer feature.
However, not every theme allows you to use the Customizer. Notably, WordPress’s default themes (Twenty Twenty-Five, Twenty Twenty-Four, etc.) don’t allow you to use the Customizer, so if this method doesn’t work, move on to the next.
Let’s get started.
Step #1: Identify the HTML to Style
As you likely know, password-protected pages prompt you to enter a password before accessing your site. This is accomplished with a simple HTML, which you can target if you know its class.
Learning the form’s class would allow you to target it with CSS code, which you can input in various ways, including the Customizer feature.
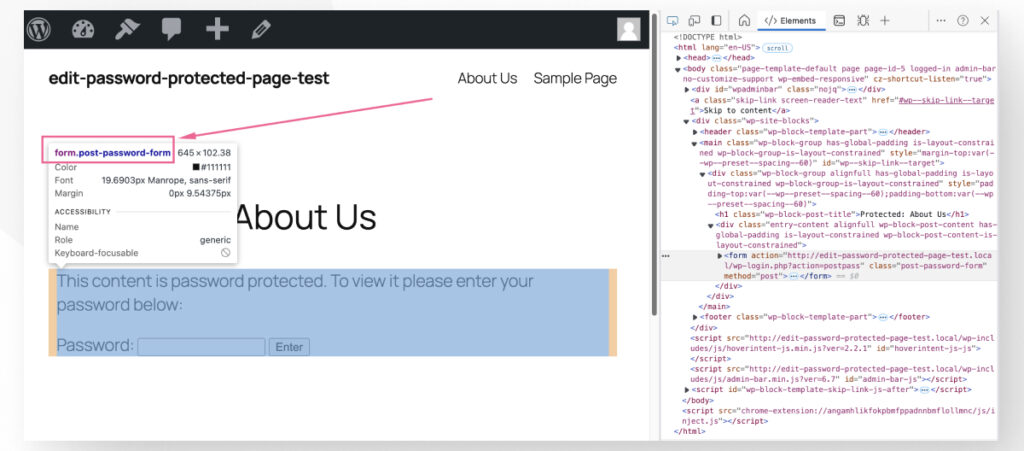
To identify the form’s class, you’ll need to use your browser’s developer tools. In Chrome, Firefox, and Edge, you can press CTRL + SHIFT + C or CMD + SHIFT + C to bring up the dev tools.
Hover your pointer over the form until you identify the correct piece of HTML to target. After inspecting a few elements, we found that the class to target is named post-password-form.
Step #2: Apply CSS to the Form’s HTML
With the form’s HMTL class in mind, go to Appearance > Customize on your admin dashboard. Navigate to Additional CSS.
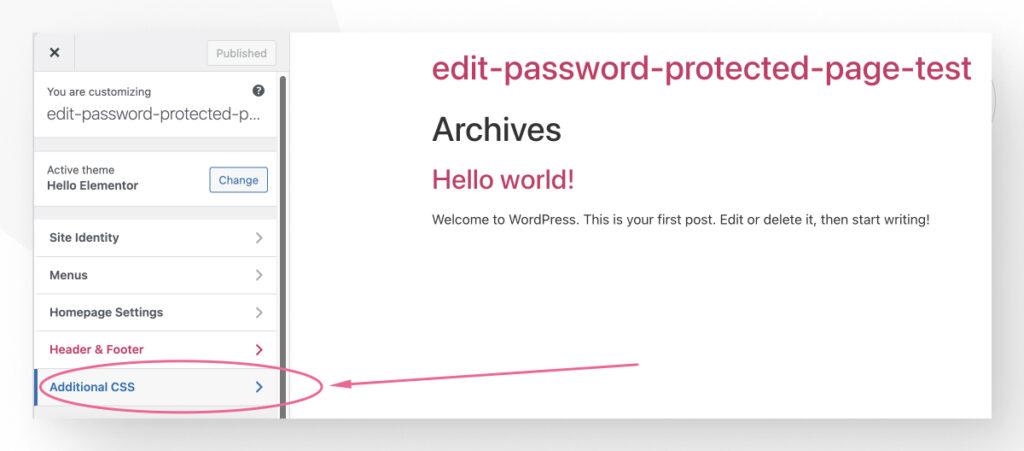
Now you can start adding CSS to edit the form.
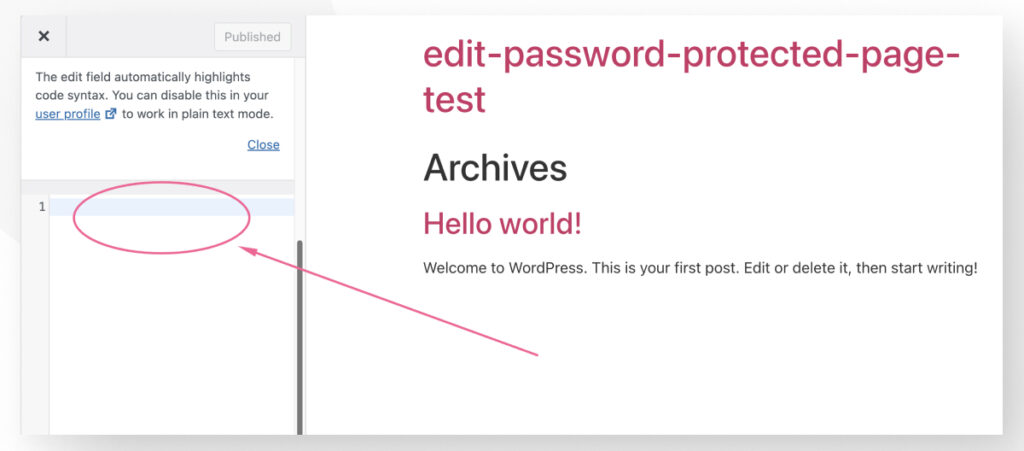
For example, you could use the following snippet to get started:
/* General Form Styling */
.post-password-form {
  max-width: 400px;
  margin: 20px auto;
  padding: 20px;
  background-color: #F9F9F9;
  border: 1px solid #ddd;
  border-radius: 8px;
  box-shadow: 0 4px 6px rgba(0, 0, 0, 0.1);
  font-family: Arial, sans-serif;
}
/* Paragraph Styling */
.post-password-form p {
  margin: 0 0 15px;
  font-size: 14px;
  color: #333;
}
/* Form Row Styling */
.form-row {
  display: flex;
  align-items: center;
  margin-bottom: 15px;
}
.form-row label {
  font-weight: bold;
  margin-right: 10px;
  color: #555;
  flex-shrink: 0;
}
.input-group {
  display: flex;
  align-items: center;
  flex-grow: 1;
}
/* Input Field Styling */
.post-password-form input[type="password"] {
  width: 100%;
  padding: 10px;
  font-size: 14px;
  border: 1px solid #ccc;
  border-radius: 4px;
  outline: none;
  transition: border-color 0.3s;
  flex-grow: 1;
}
.post-password-form input[type="password"]:focus {
  border-color: #007ACC;
  box-shadow: 0 0 3px rgba(0, 122, 204, 0.5);
}
/* Submit Button Styling */
.post-password-form input[type="submit"] {
  display: inline-block;
  padding: 10px 20px;
  font-size: 14px;
  color: #fff;
  background-color: #007ACC;
  border: none;
  border-radius: 4px;
  cursor: pointer;
  transition: background-color 0.3s;
  margin-left: 10px;
  flex-shrink: 0;
}
.post-password-form input[type="submit"]:hover {
  background-color: #005F99;
}
Now, it looks much better:
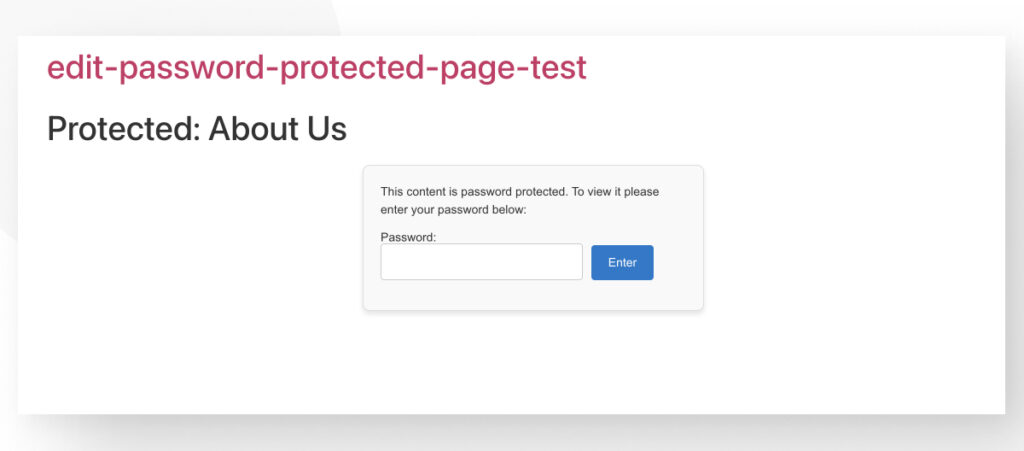
If you want to make any further adjustments, you can learn a bit of CSS and edit the form or the rest of the page as you see fit.
Method #2: Use a Custom PHP Snippet
Another option to style your password-protected pages is to add a custom CSS snippet with a child theme or a code snippets plugin.
This method is very similar to the first one, as it also comes down to CSS.
The difference is that this method will work with any WordPress theme, including those that don’t enable the Theme Customizer feature, like the default WordPress themes (Twenty Twenty-Five, etc.).
In this case, we’ll use the WPCode plugin, but you could use your child theme if you already have it.
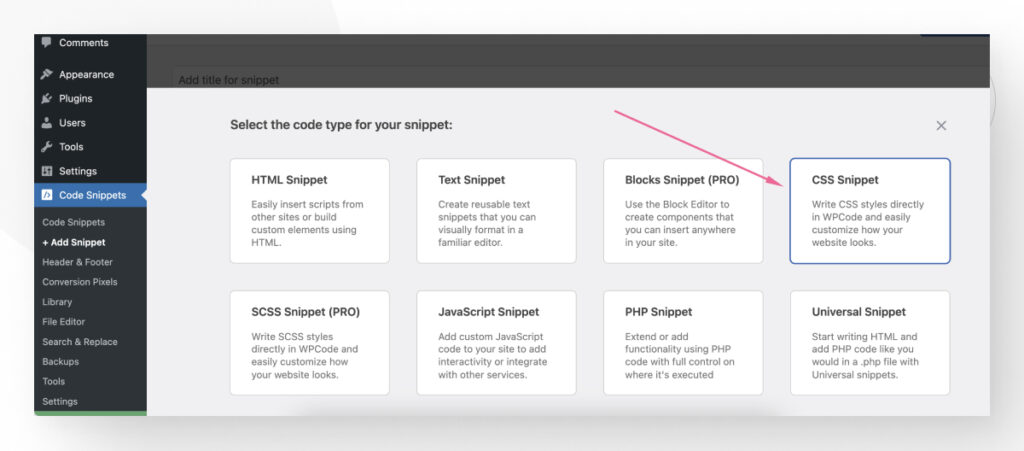
Once you’ve installed and activated the plugin, go to Code Snippets > + Add New Snippet from your dashboard. Click on the + Add Custom Snippet button.
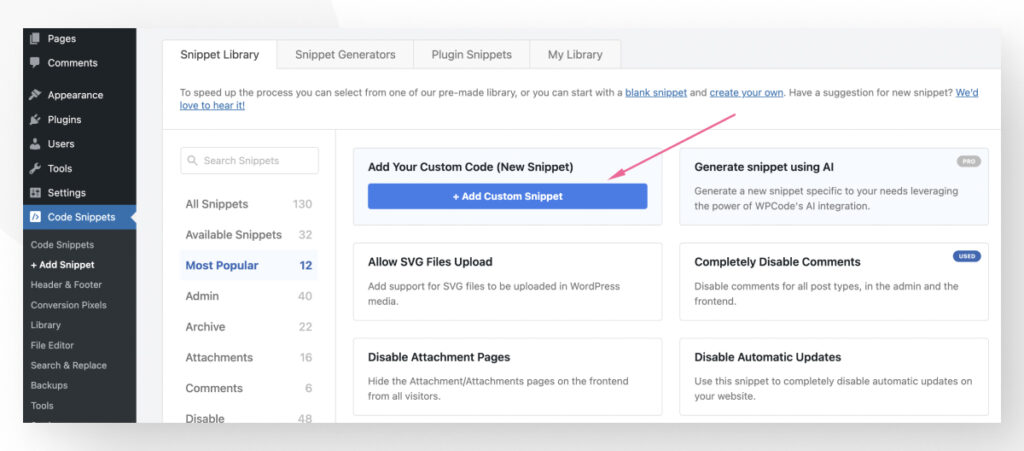
In the following screen, select CSS Snippet.
Now, name your snippet, activate it, paste it into the textbox, and click on the Save Snippet button.
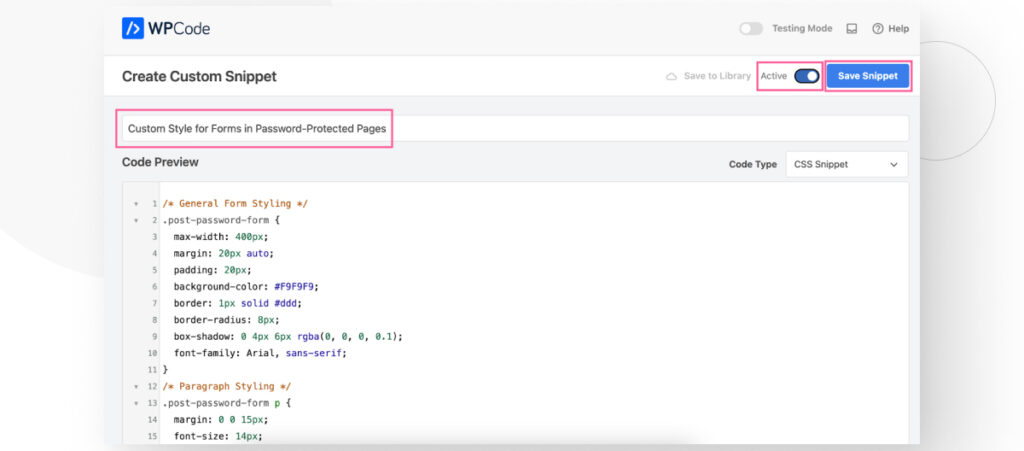
Use the following snippet, which is a slightly modified version of the one we used in the previous method:
/* General Form Styling */
.post-password-form {
  max-width: 400px;
  margin: 20px auto;
  padding: 20px;
  background-color: #F9F9F9;
  border: 1px solid #ddd;
  border-radius: 8px;
  box-shadow: 0 4px 6px rgba(0, 0, 0, 0.1);
  font-family: Arial, sans-serif;
}
/* Paragraph Styling */
.post-password-form p {
  margin: 0 0 15px;
  font-size: 14px;
  color: #333;
}
/* Form Row Styling */
.form-row {
  display: flex;
  align-items: center;
  margin-bottom: 15px;
}
.form-row label {
  font-weight: bold;
  margin-right: 10px;
  color: #555;
  flex-shrink: 0;
}
.input-group {
  display: flex;
  align-items: center;
  flex-grow: 1;
}
/* Input Field Styling */
.post-password-form input[type="password"] {
  width: 50%;
  padding: 10px;
  font-size: 14px;
  border: 1px solid #ccc;
  border-radius: 4px;
  outline: none;
  transition: border-color 0.3s;
  flex-grow: 1;
}
.post-password-form input[type="password"]:focus {
  border-color: #007ACC;
  box-shadow: 0 0 3px rgba(0, 122, 204, 0.5);
}
/* Submit Button Styling */
.post-password-form input[type="submit"] {
  display: inline-block;
  padding: 10px 20px;
  font-size: 14px;
  color: #fff;
  background-color: #007ACC;
  border: none;
  border-radius: 4px;
  cursor: pointer;
  transition: background-color 0.3s;
  margin-left: 10px;
  flex-shrink: 0;
}
.post-password-form input[type="submit"]:hover {
  background-color: #005F99;
}
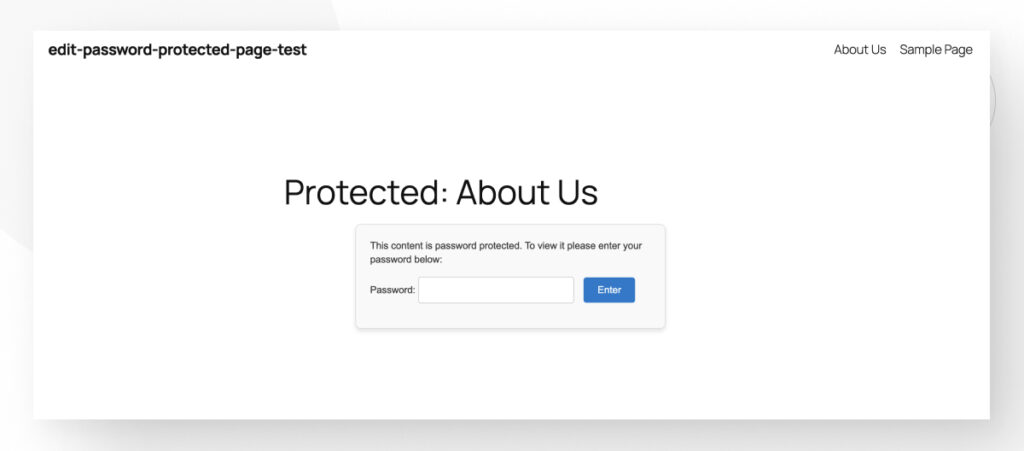
Here’s the final result:
Start Styling Your Password-Protected Pages in WordPress
As you can see, learning how to style WordPress password-protected pages is not that hard and can be done pretty quickly.
You can use your theme’s Customize feature or add CSS with a code snippets plugin or a child theme.
Hopefully, this knowledge will help you gain more control over your site’s styling!
If you found this post useful, read our blog and developer resources for more insights and guides!
Related Articles

Web Design / 6 min read
Web Design / 6 min read
How to convert Sketch to WordPress?
Sketch is a vector graphics editing tool used for prototyping web and desktop apps. Let’s explore 5 ways to convert your Sketch designs into WordPress websites.
Read More
Web Design / 5 min read
Web Design / 5 min read
Website Color Theory: How to Choose Website Colors Correctly
Did you know colors have a huge impact on your website’s success? Find out how to choose the best color palettes for your website.
Read More
Web Design / 5 min read
Web Design / 5 min read
UX/UI Design — What’s the Difference between UX and UI?
What is UI? What is UX? Similar but not the same. Learn the difference between the UX and UI and how they work together in building your website or app.
Read More