
How to use Gravity Forms in headless WordPress with Next.js

Forms are an essential element of web development that allows us to collect data, manage users, generate leads, perform ecommerce transactions, and much more. However, not every plugin for creating and deploying forms works perfectly in headless WordPress implementations.
The headless model is a relatively new development, so we’re in a transition period where some functionalities still have to be ironed out and worked on before developers can make the most out of them.
Luckily for us, Gravity Forms, the most popular premium form plugin, can still work if you know how to set it up. Let’s explore, step by step, how you can deploy Gravity Form forms on headless WordPress sites by using a GraphQL endpoint and a Next.js project for your frontend.
What is headless WordPress?
“Headless WordPress” refers to using the WordPress CMS with a headless architecture instead of a traditional monolithic one. Traditional WordPress sites combine the backend and frontend inseparably into a single software. The backend manages the site’s content, including databases and servers, while the frontend is what users see and interact with.
In headless WordPress, the backend and frontend are separated. WordPress acts as the backend, while a different platform displays user-friendly interfaces and content on the frontend. Developers can use any modern frontend technologies for their headless WordPress sites, such as React, Angular, Next, and Gatsby.
Under this model, WordPress is a content hub. It exposes an API that allows any frontend technology to access and display the content. Headless WordPress provides developers with flexibility when choosing their frontend technologies and scalability for managing multiple channels from a single backend.
What Is Gravity Forms for headless WordPress?
As you know, Gravity Forms is one of the most popular premium plugins for creating and adding forms to WordPress sites. Site owners, admins, and developers can choose from a collection of pre-designed templates to customize.
It also offers multiple official add-ons for integrating external services, such as payment gateways, a comprehensive API, WordPress hooks, and more.
But despite its many benefits, the Gravity Forms plugin was not developed for headless implementation—terrible news for the headless WordPress developers planning to use it on their next project.
Fortunately, there are ways to overcome this design limitation and implement Gravity Forms on your headless WordPress site.
Let’s find out how.
How to use Gravity Forms with headless WordPress, GraphQL, and a React-based frontend
Step 1: The setup
There are a few ways to use Gravity Forms on a headless WordPress site, but in this case, we’ll use a WordPress backend connected to a Next-js frontend using a GraphQL API. For this process to work, you’ll need the following software components:
- A WordPress installation. In this case, we’ll use a Local installation.
- A React-based frontend. We’ll use this Next.js project created by WP Engine developer Kellen Mace.
- The Gravity Forms plugin and any add-on your project needs.
- The WPGraphQL plugin. It provides an extendable GraphQL schema and API for any WordPress site.
- The WPGraphQL for Gravity Forms plugin add-on. It allows you to use Gravity Forms on a headless WordPress site by fetching data from the backend with a GraphQL API. This is the plugin that makes the project possible.
To install the WPGraphQL for Gravity Forms plugin add-on, download the repository with the plugin data and drag it into your local environment. See how in the next step.
Step 2: Set up your local site
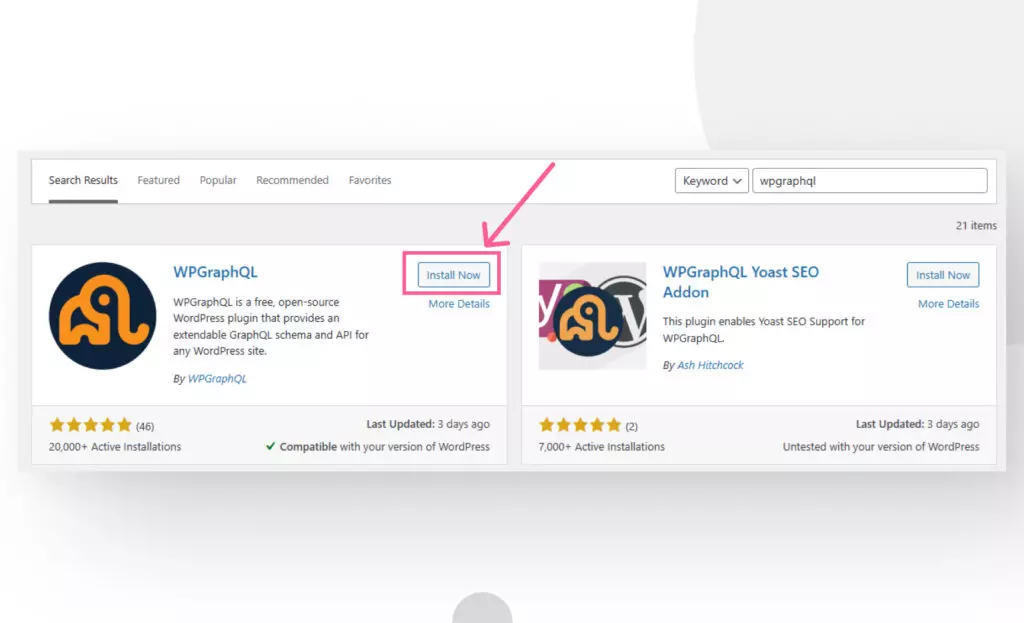
Set up a local WordPress environment using Local, the most popular software for this purpose. Once your site is set up, go to Plugins > Add New to install and activate the WPGraphQL plugin.
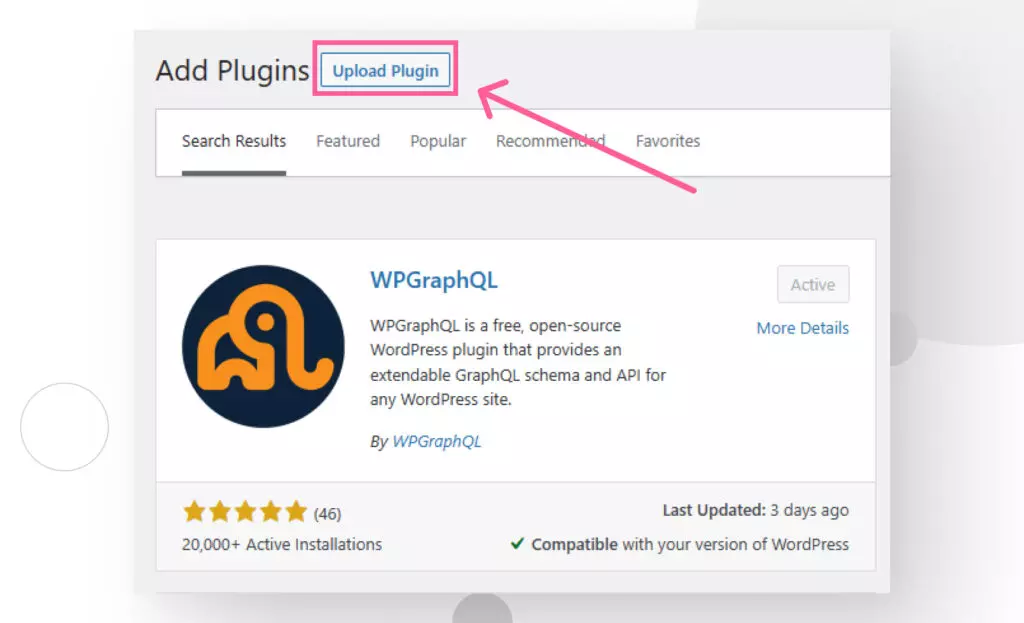
To add the WPGraphQL for Gravity Forms add-on, go to the repository and download the latest release in .zip form. Then go to Plugins > Add New and click on Upload Plugin.
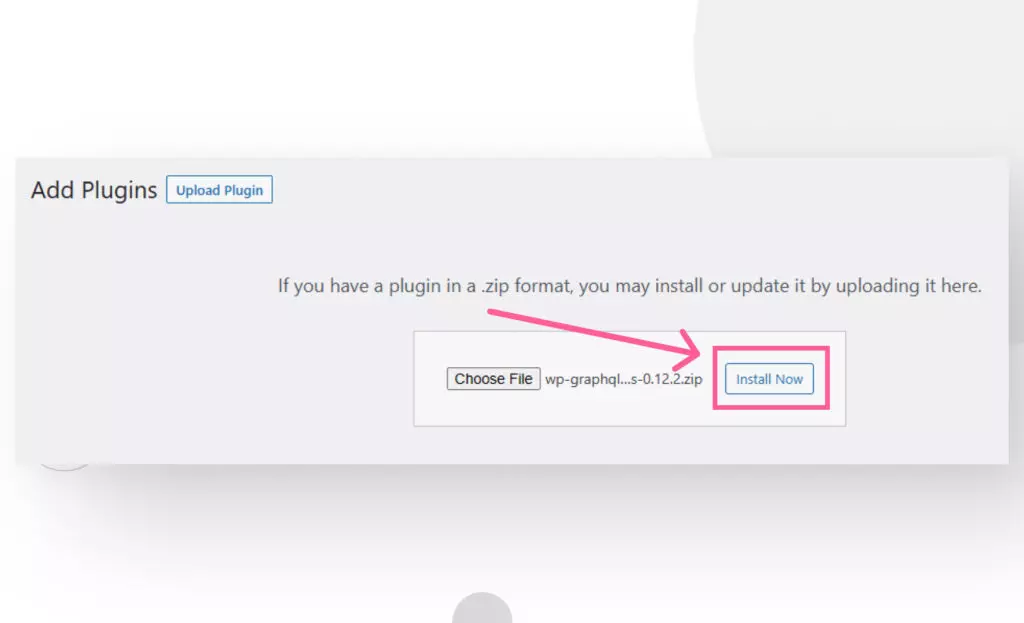
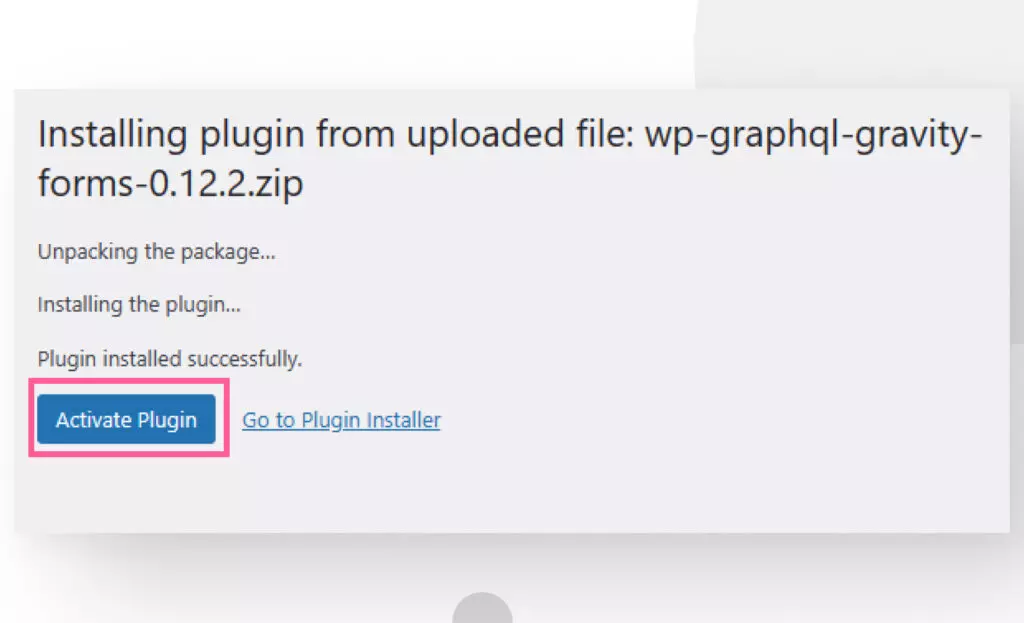
Drag the .zip file or click Choose File to browse your file manager. Click on Install Now and click on Activate Plugin on the following screen.
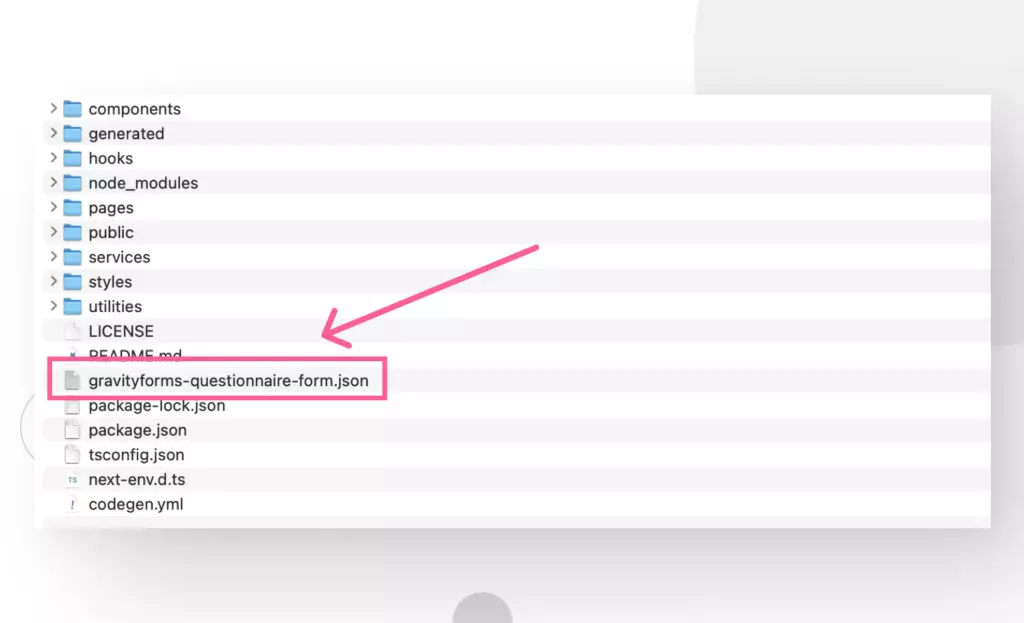
All the necessary plugins are set up now. It’s time to import the questionnaire form. Go to Forms > Import/Export > Import Forms from the WordPress admin sidebar. Select the gravityforms-questionnaire-form.json file inside the Next.js app’s folder and click the button to import it.
With that done, let’s move on to preparing your Next.js frontend site.
Step 3: Prepare your frontend site
For this project, we’ll be using a Next.js project created by WP Engine developer Kellen Mace. The project provides a suite of React components, a React hook, and helper functions to ensure Gravity Forms works on your headless site. These helper functions render Gravity Forms forms and make requests to the WordPress backend.
To prepare the frontend site, we have to:
- Clone the project from GitHub.
- Add an environment variable to the project’s root and create a GraphQL endpoint.
- Install the project’s dependencies.
Let’s get started.
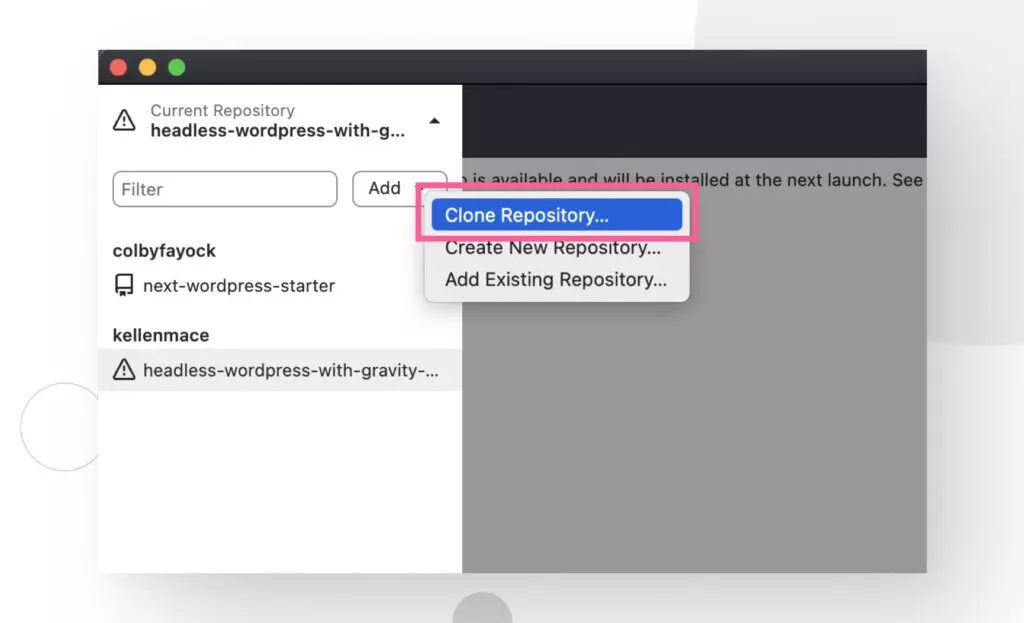
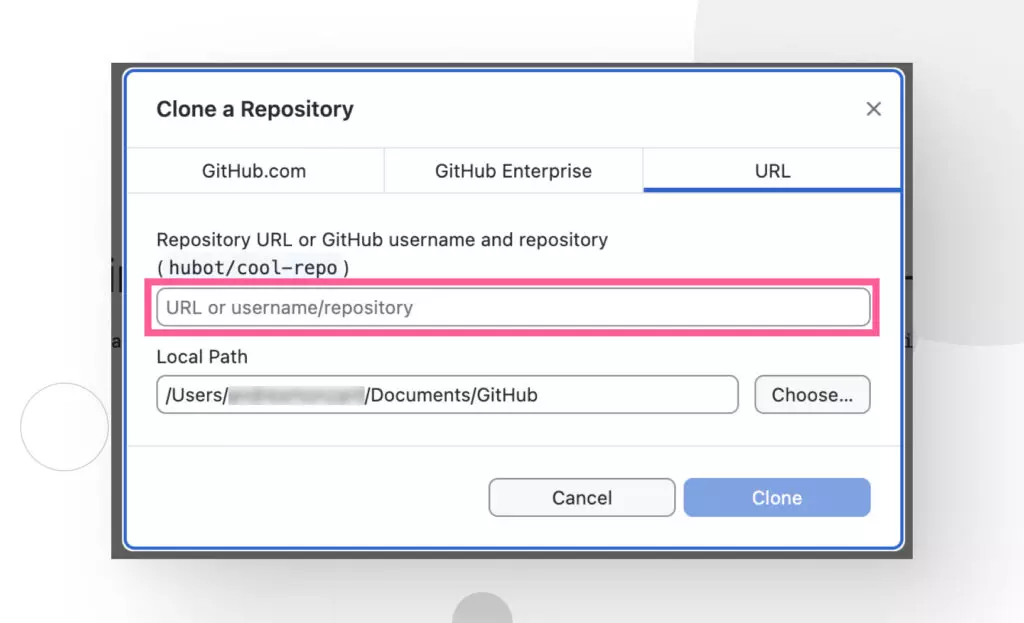
Clone the repository
Clone the repository from the console line:
git clone https://github.com/kellenmace/headless-wordpress-with-gravity-formsOr if you prefer using Github Desktop, go to Add… > Clone Repository. Then paste the repository’s URL in the URL section.
Add the environment variable
Now open the projects folder on Visual Studio Code or your preferred code editor. Create a new file called .env.local in the project’s root.
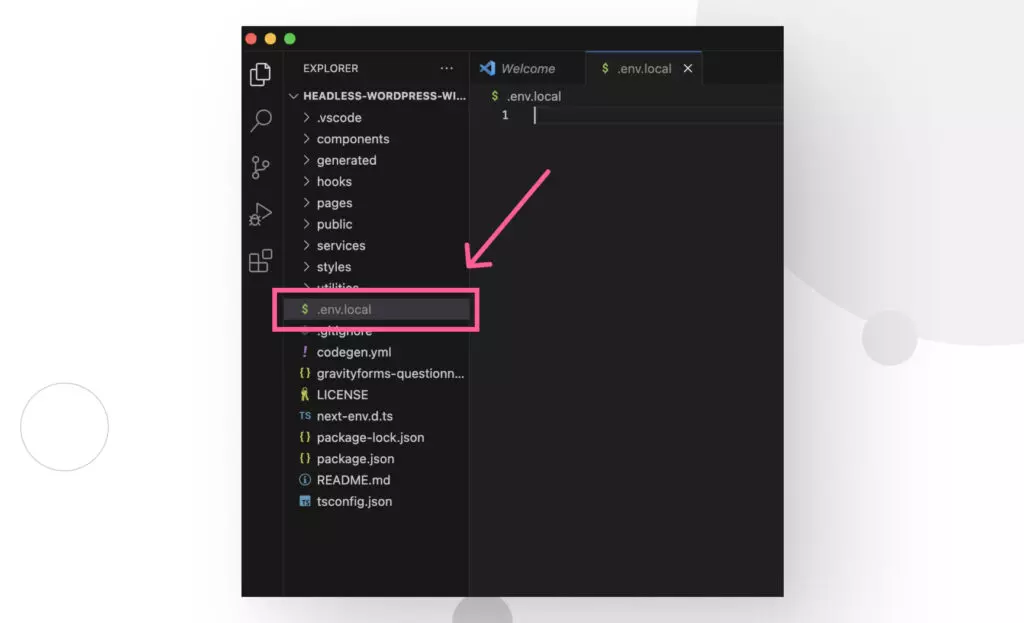
Now you have to add the GraphQL endpoint your frontend will consume to display your forms. Add the following code to the .env.local file:
NEXT_PUBLIC_WORDPRESS_API_URL=http://my-wordpress-site.local/graphqlSubstitute my-wordpress-site with your local site’s domain.
Install dependencies
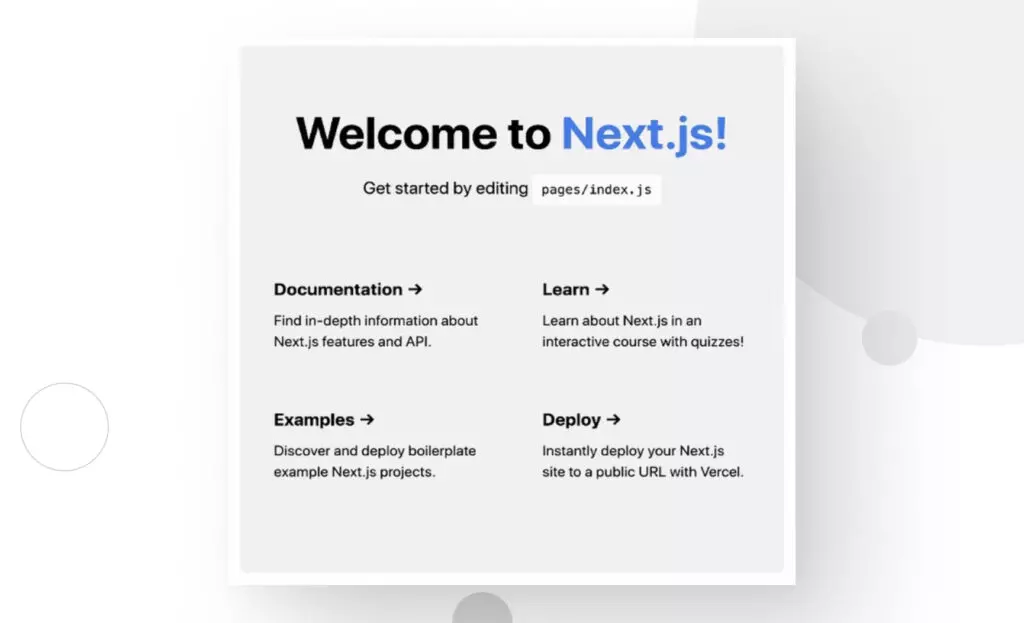
Run npm install from the console to install the project’s dependencies.
Now you can use npm run dev from the terminal to spin up a development server. If you visit “http://localhost:3000/” in your browser, you should get the following welcome screen that confirms your Next.js project frontend site is up and running!
Step 4: Import a Gravity Forms form
Now that your WordPress backend and Next.js frontend are up, you need to import the Gravity Forms form included in the repository we cloned. From the dashboard’s sidebar, go to Forms > Import/Export. Click on Import Forms.

In the following screen, click Choose File and navigate to your repository. Select the file gravityforms-questionnaire-form.json.
Now go to Forms on the Gravity Forms dropdown menu on the sidebar to verify the form was correctly imported. Take note of the ID field because we will use it in the next step.

Step 5: Render the Gravity Forms form
To render the form on your Next.js frontend site, you’ll have to input the form’s ID into a function in the questionnaire.tsx file. To do it, go to pages/questionnaire.tsx on your project and look for the following function:
export async function getStaticProps() {
  const form = await getGravityForm(gravity_forms_ID);
  return {
    props: { form },
};
Substitute gravity_forms_ID with the ID for your form.
This function gets the form’s data and returns it as a prop, which is passed into this file’s Questionnaire component to render this Gravity Forms form. Once you set the correct ID, you should be able to visit http://localhost:3000/questionare and see the form you just imported!
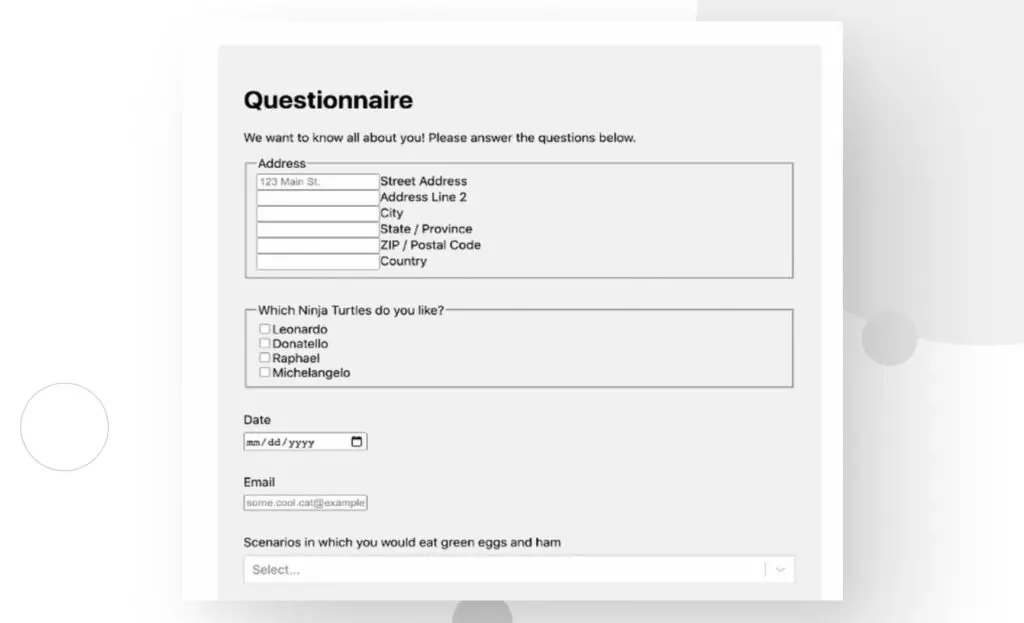
Step 6: Submit the form
Now that you’ve imported and rendered the form, it’s time to fill it! Simply go ahead and fill in the form’s fields. You don’t need to fill in every one, just a few ones and hit Submit Questionnaire at the bottom.
You’ll get the following confirmation message.

Now you can go to Forms > Entries from the dashboard and review every submission you’ve received! Now your Next.js frontend is equipped to receive and display new forms for you information from your users.
How does WPGraphQL for Gravity Forms query for a form?
Your Gravity Forms deployment into a headless WordPress site is complete, but it’s important to understand how the WPGraphQL for Gravity Forms plugin add-on helps WPGraphQL query for forms. If you explore the plugin’s documentation, you’ll find the entry for querying forms.
To query a specific form, you can use gfForm to compose a query by going to GraphQL > GraphiQL. Here’s a sample query to get an individual form and its associated formFields:
{
  gfForm(id: 50, idType: DATABASE_ID) {
    cssClass
    databaseId
    dateCreated
    formFields {
      nodes {
        databaseId
        type
        ... on TextField {
          label
          description
        }
      }
    }
    pagination{
      lastPageButton {
        text
        type
      }
    }
    title
  }
}
The id input takes either the Gravity Forms form ID (idType: DATABASE_ID) assigned to your WordPress site’s database or a global base-64 encoded ID ( idType: ID).
If you want to dive deeper into everything WPGraphQL for Gravity Forms has to offer, read the full documentation.
It’s possible to use Gravity Forms of headless WordPress
While the headless WordPress models sometimes limit which plugins we can use due to compatibility issues, Gravity Forms is fully functional if you know how to set it up correctly using WPGraphQL, WPGraphQL for Gravity Forms, and a Next.js app.
Hopefully, this was useful for you, and you can now use your newfound knowledge on future headless WordPress implementations! For more WordPress guides and insights, check out our blog.
📬 Get WordPress updates to your inbox
Sign up for WC Blog updates and never miss a post!
Related Articles

How to Make a Subscriber Into an Admin on WordPress?

How to Grant Secure Access to a Not Live WordPress Site During Development

Do You Need a Web Developer to Build a WordPress Site?

How to Change the Bottom Padding Dimensions on WordPress Blocks