
5 ways to remove the noindex tag in WordPress

When you remove the noindex tag in WordPress sites, you ensure web crawlers index your website correctly and display it in search results. By default, posts and pages don’t have the noindex tag, but you may have accidentally added it to a post or page and later forgotten. Or you may have deliberately added it but now want to remove it.
Let’s explore why you’d want to remove the noindex tag from your content and five easy methods to do it.
What is the noindex tag?
noindex is an HTML tag that tells search engine robots (“crawlers”) not to index a particular web page, preventing it from appearing in search results. For some context, consider that search engines have three primary functions: crawling, indexing, and ranking.
- Crawling. Scouring the internet, going through the code and content of every URL that search engine crawlers can find. A “crawler,” “web crawler” or “web spider” is a program search engines use to crawl pages.
- Indexing. Storing and organizing the content scoured during the crawling process. The “index” is an extensive database of crawled pages.
- Ranking. Providing the most relevant content for the searcher’s query. What you see on search results is what the search engine ranked from most to least relevant for your query.
When crawlers index a page, it competes with other pages to rank in search results for specific keywords. What the noindex tag does is prevent that page from being added to the index and thus prevent it from appearing in search results.
Why remove the noindex tag in WordPress?
Sometimes, you won’t want specific posts or pages to appear in search results. One common case would be the “Thank you” pages visitors land on after joining your newsletter, subscribing to a service, or buying merchandise.
Other cases include “Members Only” pages, printer-friendly versions of pages (as search engines may tag them as duplicates), admin and login pages, and more.
However, you want most pages on your website to receive traffic, especially if you have a blog or post regular content you want search engines to pick up on. Additionally, search engines may penalize you for having too many posts or pages with the noindex tag, dropping your entire website’s SEO rankings.
All this say, you must be wise with the pages or posts you noindex. If you determined you want search engines to index a page or post, consider using one of the following five methods.
5 ways to remove the “noindex” tag.
Just as there are various ways to add the noindex tag to your posts or pages, the same goes for removing it. These are 5 of the easiest and most user-friendly methods to do so.
Method 1: Edit Yoast SEO’s advanced settings
The Yoast SEO method is probably the easiest way to remove the noindex tag. To do it, go to the post or page you want search engines to index, scroll down, and click the Advanced tab. Simply click Yes on Allow search engines to show this Blog in search results? and it’ll eventually be indexed into search results.
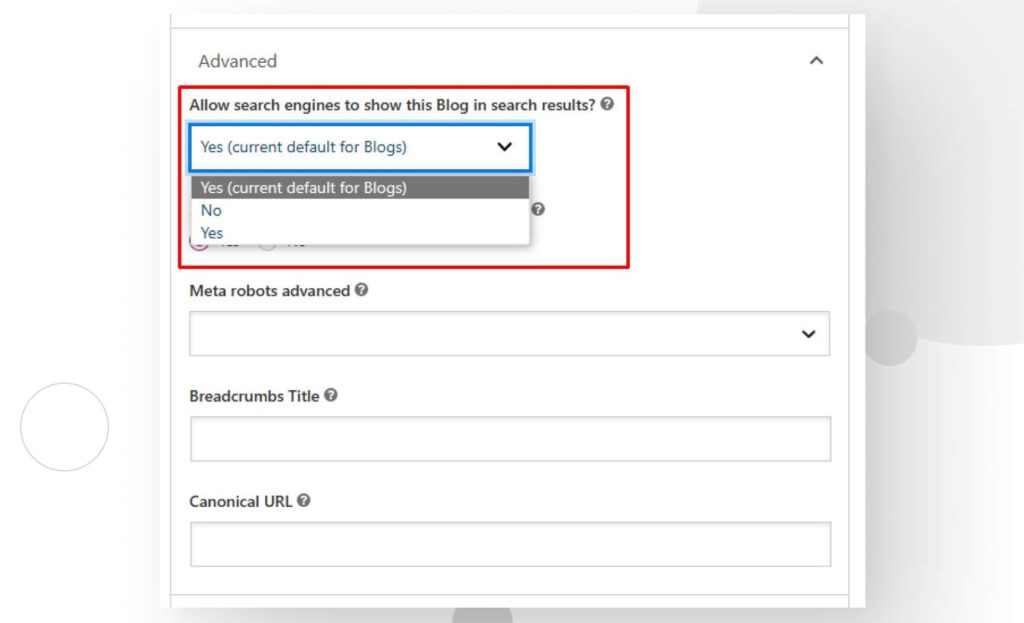
Remember that the process may take some time, as crawlers will likely need to parse this page or post again and notice the noindex tag is missing before indexing it.
Method 2: Delete the HTML meta tag
As mentioned several times, noindex is an HTML tag. As such, you can remove it by editing the post or page’s HTML. Look for the following code in the file’s <head> section:
<meta name="robots" content="noindex" />Simply delete it, and your post or page will eventually be indexed. This method is just as effective as using Yoast SEO’s Advanced settings. Like all other methods, it may take some time to take effect, too.
Method 3: Delete the “noindex” directive from the “header.php” file
Another way to add and remove the noindex tag is by editing your theme’s header.php file. However, remember that using this method adds or removes the noindex tag to all pages and posts, not just specific ones unless you add extra code to specify.
For this reason, it’s generally not the recommended method unless that’s exactly what you’re looking for.
Still, if you added the tag through this .php file, it’s very easy to remove it. Look for the following code snippet and delete it:
header("X-Robots-Tag: noindex", true);Method 4: Add a custom function in “functions.php”
You can edit your theme’s functions.php file and add a custom function to remove the noindex tag. The following code works well:
function remove_noindex() {
    if ( is_single() && get_post_type() == 'post' ) {
        echo '<meta name="robots" content="index,follow" />';
    }
}

add_action( 'wp_head', 'remove_noindex' );
This piece of code, as it’s written, removes the noindex function from all posts, so it doesn’t work if you want to keep some posts off search results. Additionally, it won’t affect pages or custom post types.
To target specific posts or other types of content, modify the is_single() and get_post_type() conditions.
Method 5 Delete the “Disallow” directive from robots.txt
Although less common than other methods, you can add a directive to the robots.txt file to noindex specific pages. Adding the tag this way is not recommended since search engines may detect internal or external links that lead to the URL and still index it.
To access robots.txt, connect to your website via FTP using FileZilla or a similar app. You can also use cPanel’s File Manager or Yoast SEO by going to SEO > Tools and clicking on File Editor in the following screen. Regardless of the method, you’ll need to locate and delete the following line and delete it:
Disallow: /URL-for-your-page/There are multiple ways to remove the “noindex” tag
As you can see, there are multiple ways to remove the noindex tag, an essential step to make your site appear in search results. Overall, the easiest and most user-friendly method is Yoast SEO, but there are several others that have a similar effect.
Hopefully, the information here helps you, and you now understand the process better. Read our blog for more guides and WordPress insights.
Good luck, and keep learning!
📬 Get WordPress updates to your inbox
Sign up for WC Blog updates and never miss a post!