How to Fix the WordPress “Cookie Check Failed” Error

The “cookie check failed” error is a message that appears on some WordPress sites, preventing users from accessing some or all content and admins from managing the website.
Let’s explore what causes the “cookie check failed” error and explore 7 solutions to help you get your site back on track.
Key Takeaways
- The “cookie check failed” error is usually the result of your caching plugin storing expired data and using it to validate processes like form submissions and logins.
- When your server delivers expired data, you and your users may be unable to access content or admin interfaces.
- The solutions involve mostly configuration changes to your caching plugin to prevent it from storing and delivering expired validation tokens.
What Is the “Cookie Check Failed” Error in WordPress?
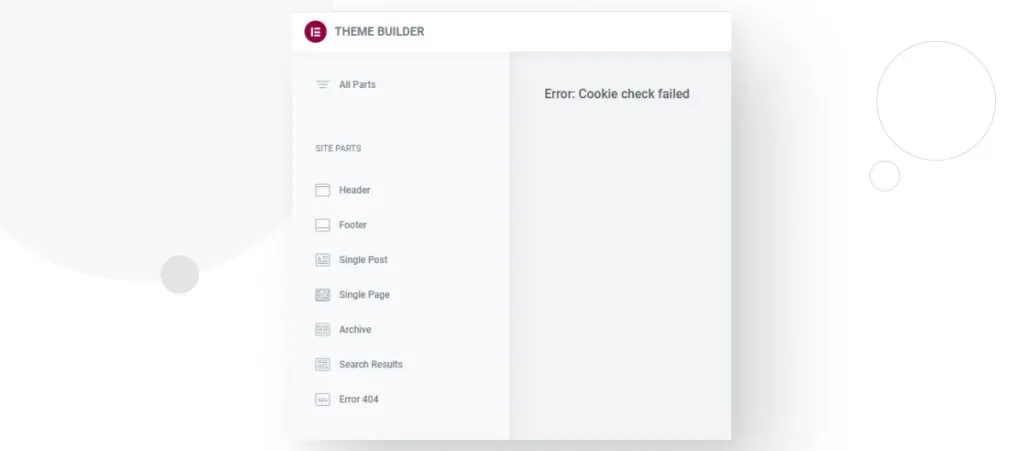
“Cookie check failed” is an error message that appears on some WordPress sites, taking over live pages or plugin interfaces in the admin dashboard. It prevents users from viewing the content and site admins from making changes to the site.
While “cookie check failed” is the most common error message, some users have also reported seeing “Cookie nonce is invalid” and rest_cookie_invalid_nonce.
These errors may appear when using different plugins, including builders like Elementor, optimization plugins like WP Rocket, some payment plugins, and importers.
The most common causes of these error messages are problems with caching plugins, issues with nonces, plugins to password-protect pages, and plugin or theme incompatibilities.
Nonce issues seem to be a particularly common cause. A nonce (number used once) is a unique, random, one-time number used to prevent replay attacks and ensure the integrity of requests when handling validation for logins, forms, etc. Nonces are common solutions to CSRF attacks.
WordPress returns the “cookie check failed” error when a previously used nonce is cached and reused after it expires (usually 12 hours after its initial use). When this happens, actions that require validation, like logins and form submissions, will fail because the nonce is invalid.
While nonce issues related to unnecessary caching seem to be the most common cause of the problem, it may not be the only one. Keep reading to learn about potential solutions.
7 Solutions for the “Cookie Check Failed” Error in WordPress
Solution #1: Switch Browsers
The browser where you use WordPress or the one your users use to access your site may play a role in the problem. Some users in WordPress.org’s forums mentioned that switching browsers helped solve the issue.
So, as a first step, edit and visit your site on a different browser than you’re used to. Try the most popular browsers: Chrome, Safari, Edge, Samsung Internet, and Firefox. You may also just test the browsers your visitors use the most, if you have access to that data.
If your site works on some browsers but not others, you can start to narrow down the problem. However, this doesn’t solve the issue for affected users. It’s just something to remember as you move forward with the rest of the solutions.
Solution #2: Clear the Cache on Your Local Device and Website
Clear the Cache and Cookies on Your Local Desktop
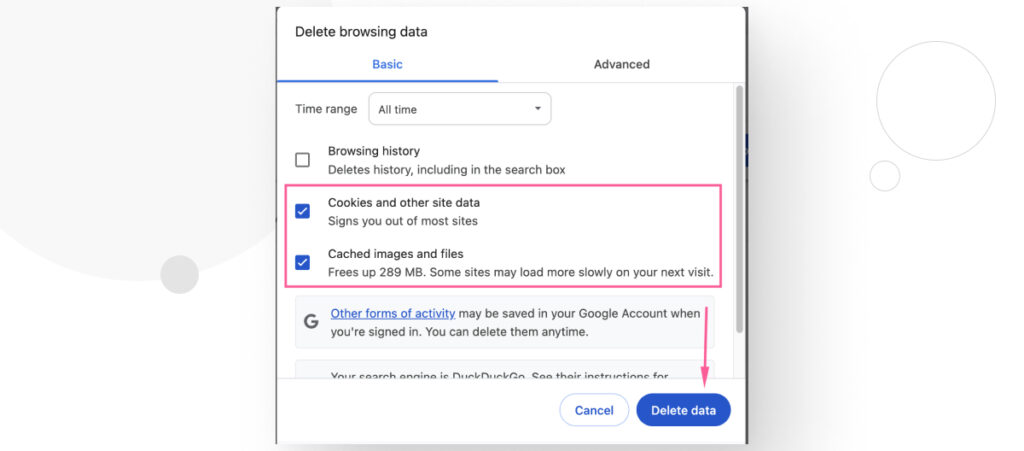
Open Chrome on your local desktop. Tap More (the three dots in the upper right-hand corner) and then Clear browsing data.
On the following screen, select “Cookies and other site data” and “Cached images and files” and tap Clear data.
The steps vary depending on your browser but are very similar across the board.
After clearing the cache, refresh your site and see if the “cookie check failed” error continues.
Remember that if clearing the local cache fixes the issue, you still need to clear the cache on your WordPress site so all your users can access fresh copies of all resources.
Clear the Cache on Your WordPress Site
One of the most popular methods for building and maintaining WordPress caches is using a caching plugin. On our site, we use WPEngine’s caching layer, but if your hosting provider doesn’t have a built-in caching service, we recommend W3 Total Cache.
To clear the cache in W3 Total Cache, navigate to Performance > Dashboard on the admin dashboard and click on Empty All Caches.
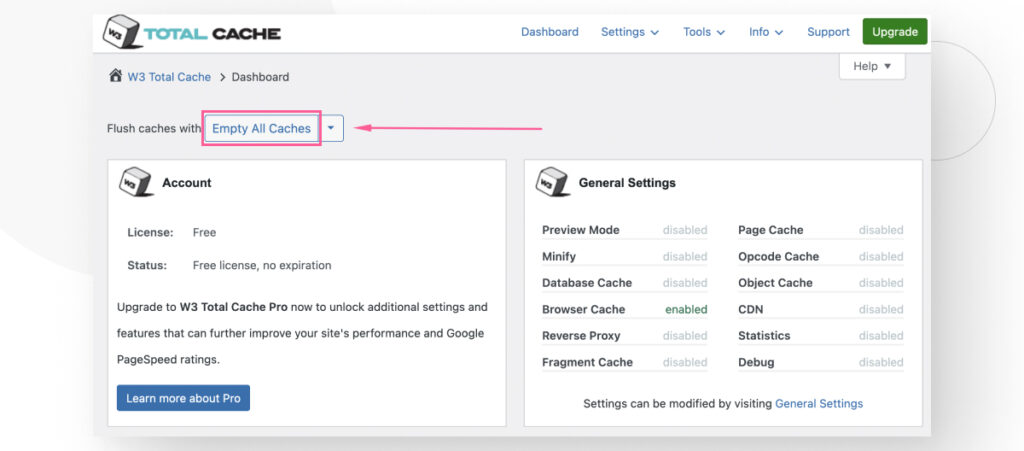
This will delete the site’s entire cache and force the server to provide users with fresh copies of all resources, including nonces. Hopefully, this will fix the issue.
Keep in mind that other caching plugins have slightly different steps, but they’re essentially the same process.
Solution #3: Modify How Long Your Caching Plugin Stores Expired Data
Since one of the most common causes of “cookie check failed” errors is cached, expired nonces, reducing the time your caching plugin stores expired data may be key to solving the issue.
The steps may vary for different caching plugins, but the process is essentially the same. Go to Performance > Page Cache and click on Advanced (or scroll down to the “Advanced” section).
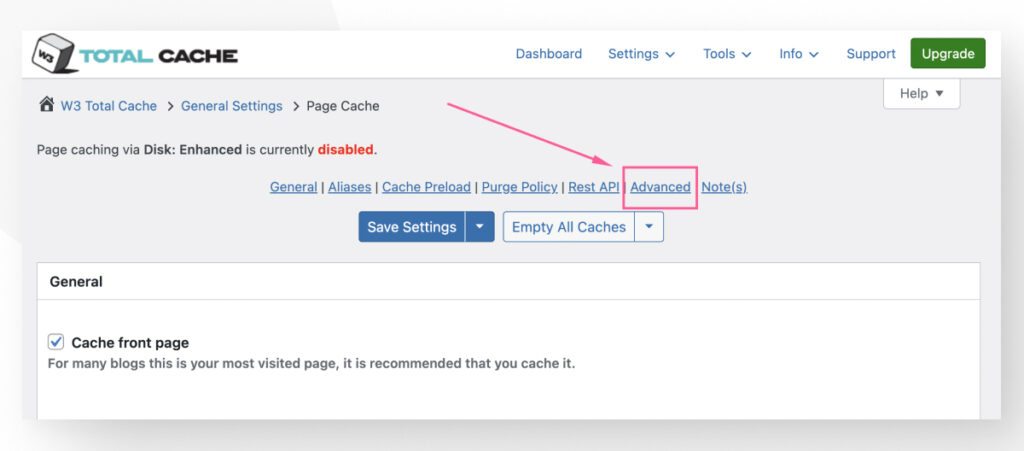
Find the Garbage collection interval setting.
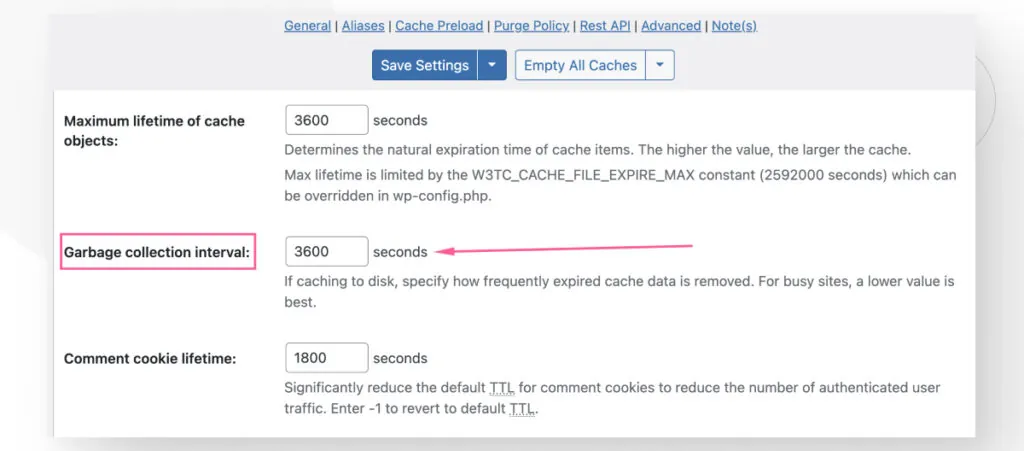
This setting determines how long your cache stores expired data. The default value is 3600 seconds (1 hour). Lowering this value will force your page cache to rebuild more often, reducing the chance that you or one of your users will be served an expired nonce.
Remember to click on Save Settings when you’re done.
However, keep in mind that adjusting this value may reduce performance if you set it too low.
Solution #4: Exclude Protected Pages from Caching
If you’re using a plugin that password-protects pages, like PPWP or Passster, you may want to exclude those protected pages from the cache to prevent the possibility of storing and using expired validation tokens.
Performance > Page Cache and click on Advanced (or scroll down to the “Advanced” section). Find the setting Never cache the following pages:
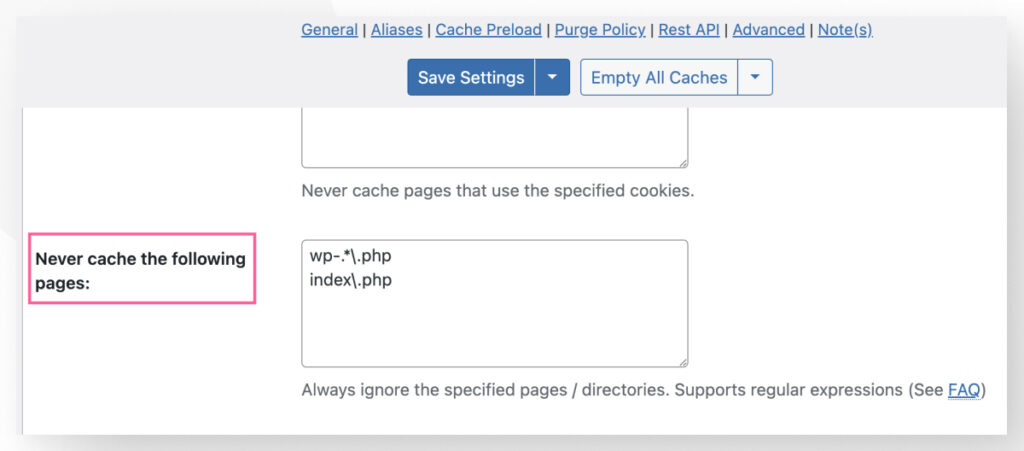
Paste the slug of the protected page into the textbox. You don’t need to separate entries with commas or periods. Just press Enter to start a new line and paste the slug.
For example, if the URL for the page you want to exclude from the cache is https://your-site.com/protected-page-1428, then you would paste protected-page-1428 on the text box, like this:
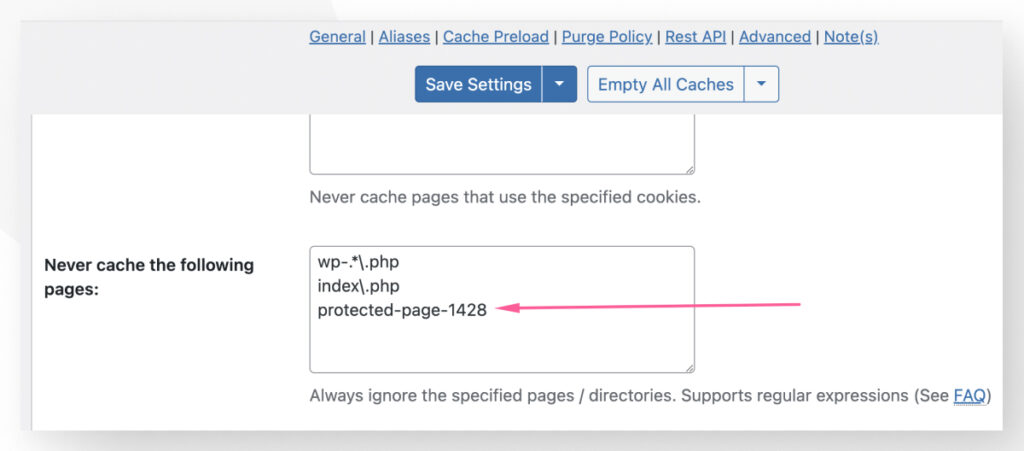
After adding the page(s), click on Save Settings.
Solution #4: Check Your Site and WordPress Addresses
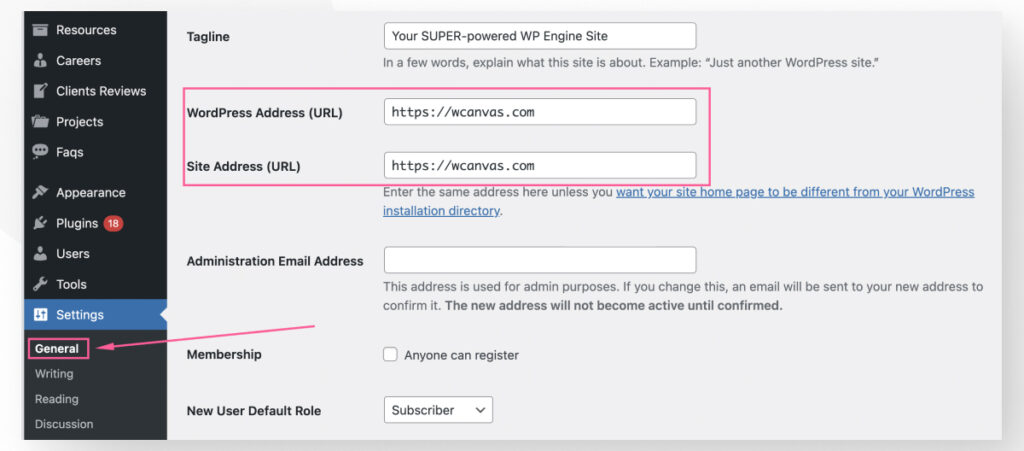
Some plugins have features that only work when your Site address is the same as your WordPress address.
The Site Address is the URL your users must type to visit your site. On the other hand, your WordPress Address is the folder on your web server where your WordPress installation and all associated files are stored.
Most times, the Site and WordPress addresses are the same, but in some cases they may be different, such as when a company changes their WordPress address due to moving the installation to a different server for security reasons.
When that happens, some plugins may stop working as intended. For example, as of the time of writing, this is a known issue for Elementor.
To check whether this is the case for you, go to Settings > General.
If the addresses are the same, ignore this method.
However, if they are different and they’re not supposed to be, you may need to set them to be the same and make all necessary changes, such as moving your installation back to your server’s webroot.
Finally, if they’re different and you’ve deliberately set them to be that way due to your site’s needs, you may need to identify which plugin is causing the issue and contact the developer. But be aware that some plugins simply aren’t designed to work when the Site and WordPress addresses are different, and you may need to look for alternatives.
Solution #5: Check Theme Incompatibilities
Sometimes, themes can be incompatible with one of your plugins, leading to unexpected behavior. These incompatibilities can be hard to spot, but the best way to test whether your theme conflicts with one of your plugins is to switch to a default theme.
If you’re using a non-default plugin, go to Appearance > Themes and activate one of WordPress’s default themes, such as Twenty Twenty-Four, Twenty Twenty-Three, or Twenty Twenty-Two.
If your site returns to normal after switching to a default theme, there’s probably something wrong with the theme you’re using. You may need to contact the developer for support.
Solution #6: Verify Whether There Are Plugin Conflicts
Sometimes, plugins conflict with each other and cause unexpected behavior.
Spotting these incompatibilities can be difficult because you never know which plugin may be causing the issue. The best way to confirm the culprit is to deactivate all plugins and reactivate them individually.
Here’s the step-by-step.
From the admin dashboard, go to Plugins > Installed Plugins.
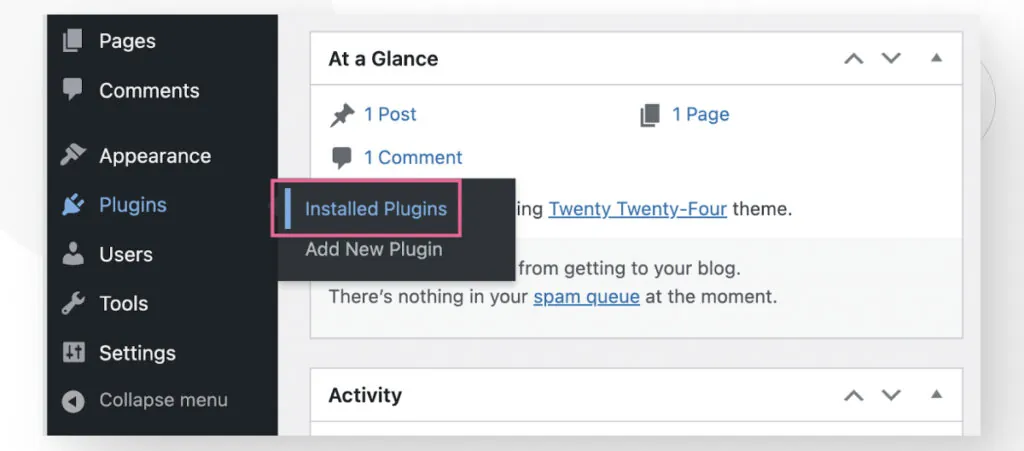
Click on the empty white box at the top to select all plugins.
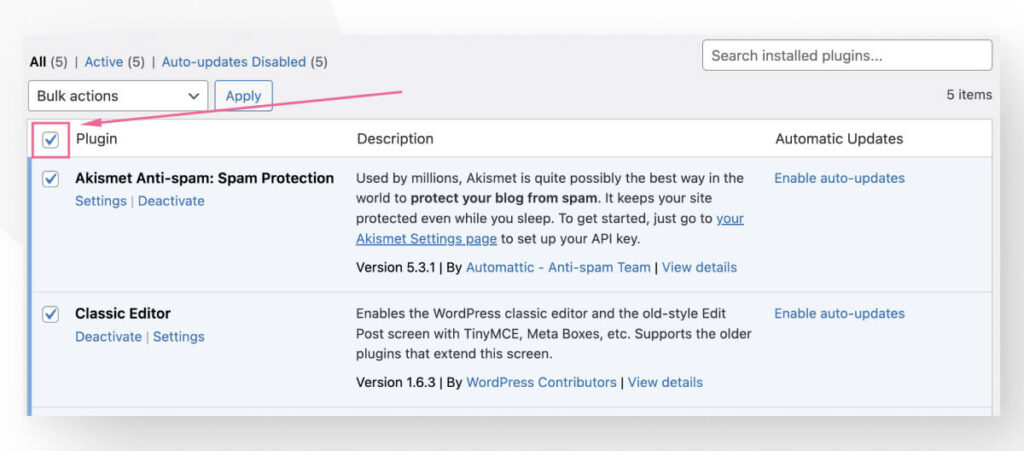
Keep in mind that if you’re having problems only when using a specific plugin, such as when editing your site with Elementor, deactivate all plugins except the plugin you’re having trouble with.
Now go to the Bulk actions menu and select Deactivate.
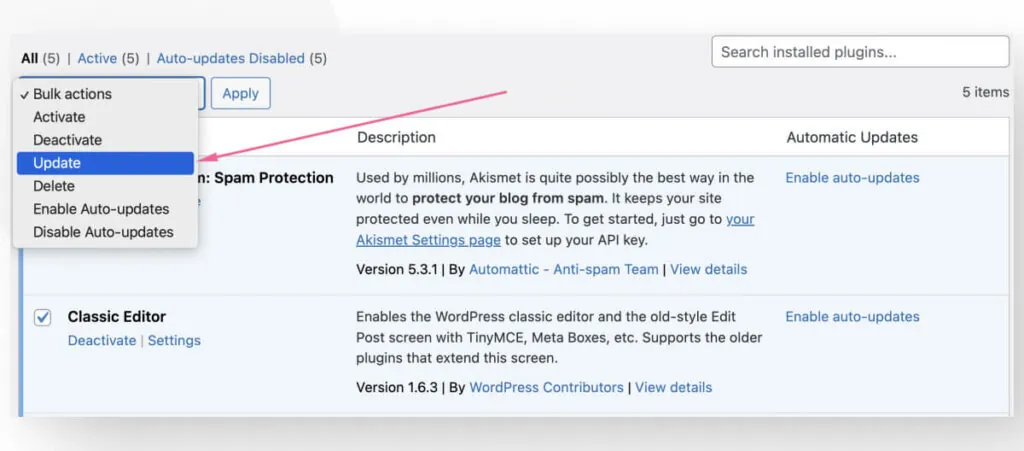
At this point, all plugins will be deactivated.
To test compatibility, start activating each plugin one by one. After activating a plugin, return to your site and see if the “cookie check failed” error persists.
If one of the plugins is the cause of the issue, at some point, you’ll activate a plugin that will restore the error.
Once identified, you may explore the plugin’s settings to see if you can configure it to solve the issue, contact the plugin developer to ask about it or switch to a similar plugin that doesn’t break your mobile site.
Solution #7: Contact Your Hosting Provider
If you’ve tried several solutions and can’t seem to figure out what’s wrong or how to solve it, it may help to contact your hosting provider. They may have experience with this issue and take the appropriate steps to solve it.
Additionally, some hosting providers have rules and restrictions that can prevent some resources from loading on your site.
For example, by default, WP Engine prevents search engine bots from loading dynamic content, which can impact sites applying custom CSS with plugins like Jetpack in an effort to make the layouts more mobile-friendly. You can contact them to remove this limitation on your site or add the custom CSS directly to your theme’s style.css.
Contacting your web host and explaining the problem may get them to check security logs on their end to determine whether they’re inadvertently blocking connections to one of your plugins.
Fix the “Cookie Check Failed” Error Today
The “cookie check failed” error usually results from your caching solution (a plugin or your hosting provider) storing expired data such as nonces and using it during validation processes like form submissions.
This error prevents users from accessing resources and admins from editing the site.
In this article, we explored 7 solutions to fix the problem. We hope one of them helps you understand where the problem comes from and how to resolve it.
If you found this post useful, read our blog and resources for more insights and guides!
📬 Get WordPress updates to your inbox
Sign up for WC Blog updates and never miss a post!